Chat now with support
Chat with Support

Defender 6.5 - Administration Guide

Getting started Managing Defender objects in Active Directory Configuring security tokens Securing VPN access Securing Web sites Securing Windows-based computers Defender Management Portal (Web interface) Securing PAM-enabled services Delegating Defender roles, tasks, and functions Automating administrative tasks Administrative templates Integration with Active Roles Push Notifications Appendices
Appendix A: Enabling diagnostic logging Appendix B: Troubleshooting common authentication issues Appendix C: Troubleshooting DIGIPASS token issues Appendix D: Defender classes and attributes in Active Directory Appendix E: Defender Event Log messages Appendix F: Defender Client SDK Appendix G: Defender Web Service API

Defender Security Server Configuration tool reference

For the Defender Security Server to work properly, you need to connect it to Active Directory. To do that, you need to use the Defender Security Server Configuration tool.

To open the Defender Security Server Configuration tool, complete the steps related to your version of Windows in the following table:

Table 2:

Steps to open Defender Security Server Configuration tool

Windows Server 2012 R2 and Windows Server 2012

On the Apps screen, click the Defender Security Server Configuration tile.

Windows Server 2016 and Windows Server 2019
  1. Click the Windows Start button, and then scroll through the alphabetical list on the left.
  2. Click One Identity to expand the list of components of Defender products installed on the system.
  3. Click Defender Security Server Configuration.

The Defender Security Server Configuration tool looks similar to the following:
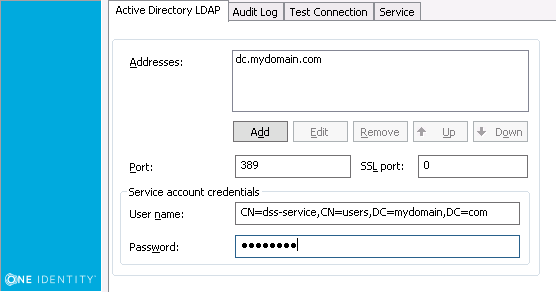
The Defender Security Server Configuration tool has the following tabs:

Table 3:

Defender Security Server Configuration tool tabs

Tab

Description

Active Directory LDAP

Use this tab to configure Active Directory connection settings. The Defender Security Server uses these settings to read data in Active Directory.

  • Addresses  Set up a list of domains or specific domain controllers to which you want the Defender Security Server to connect to read data in Active Directory.

    To add a domain or domain controller to the list, click the Add button, and then enter the DNS name or IP address.

    To edit a list entry, select that entry, and click the Edit button.

    To remove a list entry, select that entry, and click the Remove button.

  • Port  Type the number of the LDAP port on which you want the Defender Security Server to connect to Active Directory. The default port is 389.
  • SSL port  Type the number of the SSL port on which you want the Defender Security Server to connect to Active Directory. The default SSL port is 0.
  • User name  Type the user name of the service account under which you want the Defender Security Server to connect to Active Directory. Use either <domain>\<user name> format or distinguished name (DN) as shown on the screenshot above.

    The Defender Security Server communicates with Active Directory during the authentication process to read and write Defender-related data. Therefore, the service account you specify must have sufficient permissions in Active Directory. An account such as the built-in Administrator account or members of the Domain Admins group have the required permissions by default.

    You may want to create a service account in Active Directory specifically for use with the Defender Security Server. To assign the sufficient permissions to that service account, you can use the Defender Delegated Administration Wizard. For more information, see “Delegating Defender roles, tasks, and functions” in the Defender Administration Guide.

  • Password  Type the password that matches the user name specified in the User name text box.

Audit Log

Use this tab to configure Defender logging information.

To specify a different log path for the Defender Security Server log file, click Browse and navigate to the required location.

To change the size of the Defender Security Server log file, enter the required size in the Log size field.

To create a duplicate copy of the current Defender Security Server log, select the Create additional log with fixed name check box, and then enter the name of the log file in the Log name field.

If you want to save Defender Security Server logging information to a syslog server, as well as to the Defender Security Server log, select the Enable syslog check box and click Add.

In the IP Address or DNS Name field, enter the name or the IP address of the host computer where the syslog server is running.

In the Port field, enter the port number used by the computer specified in the IP Address or DNS Name field.

Test Connection

Use this tab to test the Active Directory connection settings specified on the Active Directory LDAP tab.

Click the Test button to check if the specified connection settings are correct. You can select the Test connection automatically check box to automatically test the specified connection settings.

Service

Use this tab to check the Defender Security Server service status and manage the service.

To restart the Defender Security Server service, click Restart Service.

To stop the Defender Security Server service, click Stop Service.

Communication ports

Defender uses the following communication ports:

Table 4:

Default communication ports

Port

Protocol

Type of traffic

389

LDAP, TCP/IP

Defender Security Server, Active Directory connections

636

LDAP

Active Directory password changes (only if Defender is configured to handle Active Directory passwords).

1812/1813 or 1645/1646

UDP

RADIUS protocol

2626

TCP

Communications between Defender agents and the Defender Security Server.

5228/5229/5230

TCP/UDP

If the organization has a firewall to restrict traffic to or from the Internet on the mobile devices, you need to configure the port on the firewall to receive push notifications

443

SSL

For DSS to send the authentication request to the third party cloud messaging service to send the push notifications, the SSL port 443 needs to be enabled on the server.

Upgrading Defender

This section provides information on how to upgrade the Defender components. Defender is upgradeable from version 6.1.0 and later.

To upgrade a Defender component, install the new version of that component on the computer where an earlier version of the component is installed and follow the instructions mentioned on the screen to complete the upgrade process.

NOTE: If your current Defender version is lower than version 6.1.0, it is recommended to upgrade to version 6.1.0 or later.

Upgrading Defender Security Server and Administration Console

You cannot upgrade Defender Security Server and Administration Console separately. When upgrading the Security Server, select both the Security Server and Administration Console components. Your configuration settings will be automatically applied when the upgrade is complete.

To upgrade Defender Security Server and Administration Console

  1. On the computer that has a previous version of Defender Security Server and Administration Console installed, run the Defender.exe file.

    In the Defender distribution package, you can find the Defender.exe file in the Setup folder.

  2. Complete the Defender Setup Wizard.

    When stepping through the wizard, make sure to select the Defender Security Server and Defender Administration Console features for installation.

For more information about the wizard steps and options, see Defender Setup Wizard reference.

Related Documents

The document was helpful.

Select Rating

I easily found the information I needed.

Select Rating