Policy tab
This tab allows you to view the current and assign a new Defender Security Policy to the Defender Security Server object.
On this tab, you can use the following elements:
- Policy Shows the Defender Security Policy that is currently assigned to the Defender Security Server object. When there is no Defender Security Policy assigned to the Defender Security Server object, this option displays <undefined>.
- Select Allows you to select a Defender Security Policy to assign to the Defender Security Server object.
- Clear Unassigns the current Defender Security Policy from the Defender Security Server object.
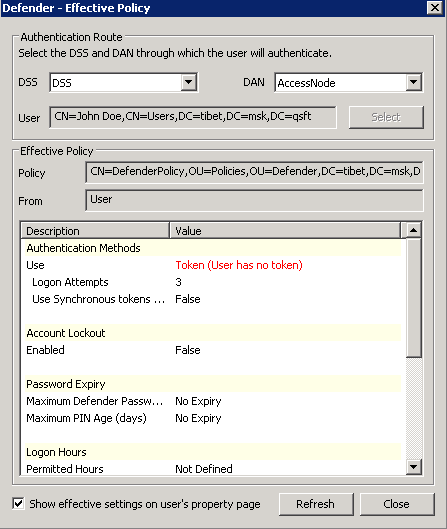
- Effective Click this button to view the Defender Security Policy settings that will apply to a specific user for a particular Defender Security Server/Access Node combination. The window that opens looks similar to the following:

Click the Select button to select the user for whom you want to view the Defender Security Policy that will apply.
The DSS list shows the Defender Security Server that is currently selected for the user. If necessary, select any other Defender Security Server.
The DAN list shows the Access Node that is currently selected for the user. If necessary, select any other Access Node.
The Effective Policy area displays the Defender Security Policy details and authentication settings that will be effective when the user authenticates via Defender.
RADIUS Payload tab
This tab allows you to view the current and assign a new RADIUS payload to the Defender Security Server object.
On this tab, you can use the following elements:
- Payload Shows the RADIUS payload that is currently assigned to the Defender Security Server object. When there is no RADIUS payload assigned to the Defender Security Server object, this option displays <undefined>.
- Select Allows you to select a RADIUS payload to assign to the Defender Security Server object.
- Clear Unassigns the current RADIUS payload from the Defender Security Server object.
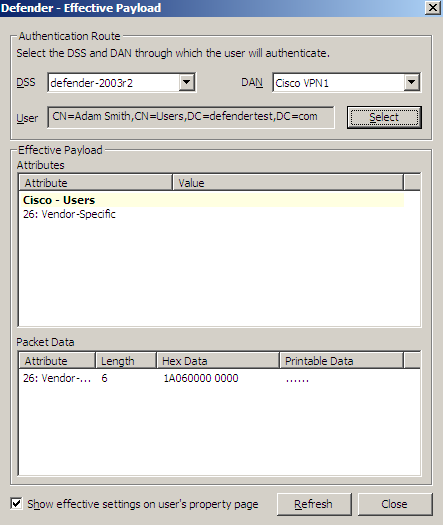
- Effective Click this button to view the RADIUS payload that will apply to a specific user for a particular Defender Security Server/Access Node combination. The windows that opens looks similar to the following:

Click the Select button to select the user for whom you want to view the RADIUS payload that will apply.
The DSS list shows the Defender Security Server that is currently selected for the user. If necessary, select any other Defender Security Server.
The DAN list shows the Access Node that is currently selected for the user. If necessary, select any other Access Node.
The Effective Payload area displays the details of the RADIUS payload that will be effective when the selected user authenticates via Defender.
Creating a RADIUS payload object
Remote Access Dial in User Service (RADIUS) is an access-control protocol that verifies and authenticates users based on challenge-response method. This protocol allows a computer to verify your identity, find out what you are allowed to access, and then tell you all of this.
The RADIUS protocol is built around the AAA concept, which stands for authentication (the process of verifying identity), authorization (the process of defining what you are allowed to do), and accounting (the process of monitoring logging statistics and usage information).
The purpose of RADIUS payload is to have the Defender Security Server send information back to the NAS device for reasons such as extra security or for accounting or other reasons specific to the NAS.
To create a RADIUS payload object
- On the computer where the Defender Administration Console is installed, open the Active Directory Users and Computers tool (dsa.msc).
- In the left pane (console tree), expand the appropriate domain node, and then expand the Defender container.
- Right-click the RADIUS Payload container, point to New, and then click Defender RADIUS Payload.
A wizard starts.
- In the Enter a name and description for this RADIUS Payload step, type a name and description for the payload being created. Click Next.
- On the Select the attributes to return when access is approved step, use the Add button to add the attributes you want the RADIUS payload to return, and assign values to those attributes. For more information, see RADIUS payload attributes.
RADIUS payload attributes
The next table lists the attributes you can assign to a RADIUS payload. The RADIUS payload will return these attributes after user’s access to the resource has been approved. For instructions on how to create a RADIUS payload, see Creating a RADIUS payload object.
Table 11:
Attributes you can assign to a RADIUS payload
|
06: Service-Type |
Specifies the type of service the user has requested or the type of service to be provided.
This attribute can take one of the following values:
- 1 - Login
- 2 - Framed
- 3 - Callback Login
- 4 - Callback Framed
- 5 - Outbound
- 6 - Administrative
- 7 - NAS Prompt
- 8 - Authenticate only
- 9 - Callback NAS Prompt
- 10 - Call Check
- 11 - Callback Administrative
- 12 - Voice
- 13 - Fax
- 14 - Modem Replay
- 15 - IAPP-Register
- 16 - IAPP-AP-Check
- 17 - Authorize Only
|
|
07: Framed-Protocol |
Specifies the framing to be used for framed access. This attribute can take one of the following values:
- 1 - PPP
- 2 - SLIP
- 3 - Apple Talk Remote Access Protocol (ARAP)
- 4 - Gandalf proprietary SingleLink/MultiLink protocol
- 5 - Xylogics proprietary IPX/SLIP
- 6 - X.75 Synchronous
- 7 - GPRS PDP Context
|
|
08: Framed-IP-Address |
Specifies the address to be configured for the user. This attribute can take one of the following values:
- 0xFFFFFFFF - NAS should allow the user to select an address
- 0xFFFFFFFE - NAS should select an address for the user
- Specific IP address value
|
|
09: Framed-IP-Netmask |
Specifies the IP netmask to be configured for the user when the user is a router to a network. |
|
10: Framed-Routing |
Specifies the routing method for the user when the user is a router to a network. This attribute can take one of the following values:
- 0 - None
- 1 - Send routing packets
- 2 - Listen for routing packets
- 3 - Send and Listen
|
|
11: Filter-Id |
Specifies the name of the filter list for particular user. The value of this attribute can include individual groups or all groups of which the user is a member. The default value is all groups. When the user has been successfully authenticated by the Defender Security Server, groups that include the authenticated user’s ID are returned to the NAS. |
|
12: Framed-MTU |
Specifies the maximum transmission unit (MTU) to be configured for the user when it is not negotiated by some other means such as PPP. |
|
13: Framed-Compression |
Specifies a compression protocol to be used for the link. This attribute can take one of the following values:
- 0 - None
- 1 - VJ TCP/IP header compression
- 2 - IPX header compression
- 3 - Stac-LZS compression
|
|
14: Login-IP-Host |
Specifies the system with which to connect the user, when the Login-Service attribute is included. This attribute can take one of the following values:
- 0xFFFFFFFF - NAS should allow the user to select an address
- 0 - NAS should select a host to connect the user to
- Specific address value
|
|
25: Class |
Available to be sent by the server to the client in an Access-Accept and should be sent unmodified by the client to the accounting server as part of the Accounting-Request packet if accounting is supported.
The value of this attribute can include individual groups or all groups of which the user is a member. When the user has been successfully authenticated by the Defender Security Server, groups that include the authenticated user’s ID are returned to the NAS that initiated the authentication request. |
|
26: Vendor Specific |
Specifies a method for communicating vendor-specific information between Network Access Servers and RADIUS servers. This attribute encapsulates vendor-specific attributes, allowing vendors to support their own extended attributes otherwise not suitable for general use. |
|
Custom |
Allows you to specify a custom attribute by attribute ID. |


