Appendix A: Safeguard ports
Safeguard for Privileged Passwords requires port availability for various system operations.
Port details
Safeguard network port details are in the following table.
Table 213: Safeguard ports
|
|
MGMT |
TCP |
HTTPS used for a secure first-time configuration of the appliance. The IP address is a fixed address that cannot be changed. It is available in case the primary interface becomes unavailable.
Typically used: TCP/443 and IP address: 192.168.1.105 |
| Base operation |
25 |
TCP |
SMTP: Simple Mail Transfer |
| Base operation |
53 |
TCP / UDP |
DNS (Domain Name Server) |
|
Base operation |
123 |
|
NTP time synchronization |
|
Base operation |
88 |
UDP |
For communication with Active Directory, Safeguard uses port 88 (for example, Kerbos authorization against Active Directory). |
|
Base operation (AD Asset and Account Discovery, password check and change) |
389 |
TCP |
LDAP used for Active Directory Asset Discovery and Directory Accounts Discovery. The standard global catalog port, 3268 (LDAP), must be open on the firewall for every Windows global catalog server in the environment and SPP Appliance to communicate for directory management tasks (for example, adding a directory account, a directory user account, or a directory user group). LDAP uses port 389 for unencrypted connections. For more information, see the Microsoft publication How the Global Catalog Works.
For basic functionality when changing an OS account password, the following ports are required:
- Windows Active Directory: TCP/389 and TCP/445
- Windows, Windows Desktop: TCP/445
Also see:
|
|
Base operation (password check and change) |
445 |
TCP SMB |
NetLogon Service (NP-In) is used to perform password check and changes for Windows Active Directory and Windows, Windows Desktop. Also see port 389 and Preparing Windows systems |
| LDAPS |
636 |
|
Supported for non-AD LDAP providers. The default LDAPS port is 636. Port 636 needs to be open to use LDAPS for non-AD LDAP providers. |
|
WMI |
135
(49152-
65535
Windows) |
TCP |
The firewall must be configured to allow Windows Management Instrumentation (WMI) for computer name and other lookups. WMI is also required if SPP performs any of the functions listed below on any Windows machine (whether it be a dependent system or a normal target platform):
- Managing service account passwords
- Managing scheduled task passwords
- Restarting a service
- Using Account Discovery on the target
WMI / DCOM from DPA will need access to TCP/135 to initiate communication on the target. The conversation continues on a random negotiated port. On Windows 7 and Windows 2008 (and above) this is in the range: 49152 - 65535.
To limit the ports used by WMI/DCOM, refer to these Microsoft articles:
For Windows Active Directory, if using Account Discovery or Auto Discovery CLDAP ping UDP/389 is also required. See:
|
|
WMI |
49152-65535 |
|
See port 135 |
|
SPP/SPS internal communications |
8649 |
TCP |
Used for the SPP/SPS internal communications when SPS is joined with SPP.
- SPS to SPP:
- SPS completes the join by talking to SPP on port 8649.
- SPS authenticates a new session and acquires the password from SPP by talking on port 8649.
- SPS queries SPP for cluster information and the appliance version.
- SPP to SPS:
- SPP queries SPS for cluster information and node roles.
- SPP pushes SSH host keys to SPS when a session is initiated.
- SPP queries SPS for session playback, follow mode, and session termination.
In SPS, the nodes require UDP ports 500 and 4500 and TCP 8649. For the latest detail, see the SPS Administration Guide, Enabling cluster management. |
|
Firewall |
655 |
TCP / UDP (X0) |
TINC (655) is open for secure VPN communication between appliances in a clustered high-availability configuration. TINC perfers UDP and uses TCP if UDP is unreliable. See KB article 232671.
To enroll an appliance into a cluster, the appliance must communicate over port 655 UDP/TCP and port 443 TCP, and must have IPv4 or IPv6 network addresses (not mixed). See:
|
|
Firewall and Client and Web browser points |
443 |
TCP
(X0) |
HTTPS over TLS/SSL (443/TCP) permits inbound requests (for client/Web/API access). Used to initially log on to the appliance to join the cluster member. Users must have access to the cluster X0 ports on port 443.
To enroll an appliance into a cluster, the appliance must communicate over port 655 UDP/TCP and port 443 TCP, and must have IPv4 or IPv6 network addresses (not mixed). See:
The port is used to prepare VMware ESXi host. See:
|
|
Global catalog |
3268 |
|
The LDAP standard global catalog port for Active Directory. The standard global catalog port, 3268 (LDAP), must be open on the firewall for every Windows global catalog server in the environment and SPP Appliance to communicate for directory management tasks (for example, adding a directory account, a directory user account, or a directory user group). LDAP uses port 389 for unencrypted connections. For more information, see the Microsoft publication How the Global Catalog Works. Also see:
There are no services listening for this port on a member/server workstation (local configuration). |
|
Kiosk |
DB9 |
SERIAL |
To connect to the Safeguard Kiosk. See KB article 233584. |
|
Radius server |
1812 |
|
Default port number that a Radius server uses to listen for authentication requests. See Adding identity and authentication providers. |
|
SonicWALL SMA or CMS appliance |
8443 |
TCP/ UDP |
For SonicWALL SMA or CMS appliance. See information related to authenticating an asset, Password (local service account). |
|
SQL server |
1433 |
|
The port on which the SQL server will be listening for connections. See information related to authenticating an asset, Password (local service account). |
|
Telnet |
23 |
TCP |
Telnet |
Platform ports
ACF2 – 23
ACF2 LDAP – 389
AIX – 22
AWS – 443
Cent OS – 22
Cisco Pix – 22
Debian – 22
IDRAC – 22
ESXi - 443 default
F5 - 22 default
Fortinet – 22 default
Free BSD – 22
HP iLO
IBM i – 23
JunOS – 22
MongoDB - https://docs.mongodb.com/manual/reference/default-mongodb-port/
MySQL – 3306
Oracle – 1521
Oracle Linux – 1521
OSX – 22
Other – port is not supported for the platform
Other Managed - port is not supported for the platform
Other Linux – 22
Pan OS – 22
PostgreSQL – 5432 default
RACF – 23
RACF LDAP – 389
RHEL – 22
SAP Hana – 39013 default
SAP Netweaver – 3300
Solaris – 22
SoniOS – 22
SonicWall SMA – 22
SQL – 1433
SUSE – 22
SyBase – 5002
Top Secret – 23
Top Secret LDAP – 389
Ubuntu – 22
Windows (various depanding on OS type) – 135/389/445 and maybe dynamic ports
Archiving
Archiving uses uses SFTP/SCP and CIFS.
- SFTP/SCP: 22 TCP (X0). See the Port details table, appliance port 22 for X0.
- CIFS: Uses UDP ports 137 and 138 and TCP ports 139 and 445.
Backup
Same as Archiving.
External Authentication
Federation – Port 443
Secondary Auth – Radius Port 1812
Starling - Port 443
External Integration
SNMP – Port 162 UDP
SMTP - Port 25 TCP Simple Mail Transfer
SysLog – 514 UDP
External Integration for Password Workflow
Approval Anywhere - 443
Ticketing – ServiceNow 443
Ticketing - Remedy 1433 (communicates to the SQL server directly)
Other
NTP – port 123 UDP
Directories – Ports 389 LDAP and 3268 global catalog
Appendix B: SPP 2.7 or later migration guidance
Safeguard for Privileged Passwords version 2.7 was simplified to allow for a separation of duties based only on identity management, asset management, access policy configuration, and appliance maintenance. In the migration to version 2.7 or later, greater flexibility is realized through these high-level assignments:
- Directories are migrated to assets.
- Accounts include both directory accounts and asset accounts.
- Each directory is assigned its own partition in the migration to version 2.7 or later.
The following information details the changes from version 2.6 to version 2.7 or later. The same information is generally true if you are upgrading from version 2.1 forward to version 2.7 or later.
Before you migrate
- Make sure you back up before migrating to version 2.7 or later.
-
Be sure you have data you want to migrate and perform general clean up. For example, if you have entities that are not needed, remove them before migrating.
-
Complete as many outstanding Access Requests as possible. This is especially important for Active Directory Access Requests because any outstanding Active Directory Access Requests will need to be recreated after the migration since they cannot be resubmitted.
- Save all necessary version 2.6 logs. Directory log history prior to the migration to version 2.7 or later is not available after the migration. Details follow.
- Before the migration to version 2.7 or later, Directory Administrators, Asset Administrators, and Auditors can see audit log history for each of the directories, regardless of who created or changed them.
- The migration takes Directories and turns them into directory assets. All associated relationships with directories are also migrated to the new directory assets. The Directory Administrator role is removed and users with Directory Administrator permission are assigned as a partition owners for directories that are migrated to assets.
- After the migration to version 2.7 or later, the Asset Administrator can see the directory asset whose audit log history starts on the day of the migration. Events prior to migration are not available.
- We recommend two clients:
- A version 2.6 client to connect to older appliances
-
A new version 2.7 or later client to get the new features of Directory Assets and Discovery
This recommendation is made because a new client uses v3 endpoints. A version 2.6 appliance doesn't know how to respond to v3 calls. An new client pointed to an old appliance will get an error when trying to connect. You will see this message: The Safeguard desktop application is not compatible with this appliance. Please contact your administrator.
What to expect
The following lists entity changes you will note in the migration to version 2.7. or later.
Directories are migrated to Assets
-
Directories are migrated to assets with the appropriate platform assignment.
- Directories are still synced with Safeguard.
- Migrated directory assets reflect any account dependencies with Windows services and task on other assets.
-
You can select whether a directory asset manages the forest or a subset of the forest. Multiple assets can be assigned against the same forest.
-
Every migrated directory has Managed Forest selected so the administrator can create a directory to manage a domain or part of a domain. As assets, directories can be shared and all domains in a forest can be managed from one instance of a domain. Navigate to Administrative Tools | Asset | Management tab | Managed Forest check box.
-
Every migrated directory asset has Available for discovery across all partitions selected so the asset is available for asset and account aiscovery jobs beyond partition boundaries. Any partition that exists is able to use this directory asset. Navigation: Administrative Tools | Asset | Management tab | Available for discovery across all partitions check box.
- Discovery detail grids will identify migrated directory assets with a Partition value of Import.
-
Each migrated directory asset is assigned to its own partition and includes the Account Discovery jobs, the check and change schedules, account password rules, password sync groups, and related functions.
- To view the Account Discovery job assigned as the results of migration, navigate to Administrative Tools | Asset. Select the directory asset then Edit. Then navigate to | Account Discovery tab to see the selected Account Discovery job for the partition. If no schdule is selected, this message displays: No Account Discovery Chosen.
- Directory tags are migrated into the appropriate partition tag. To copy a tag to a new partition, change the description then copy the tag.
Administrative Tools | Directories removed and Discovery added
When Safeguard for Privileged Sessions version 2.7 is installed, directories, discovery jobs, and other related entities automatically migrate to the appropriate associations. The Administrative Tools | Directories selection is gone, and Administrative Tools | Discovery has been added. Functionality is reorganized and streamlined for better data control.
Discovery
- During migration, existing partition account discovery jobs are separated by platform type, for example, Unix, Windows, or Directory. As a result, you will see discovery jobs with the same name and a different prefix which denotes the platform. For example, you may see:
Each discovery job is assigned the appropriate asset and settings that apply to the platform.
You can rename or delete jobs, as needed. Navigate to: Administrative Tools | Discovery.
Account changes
- Accounts include directory accounts and asset accounts.
- Directory accounts are migrated into accounts and are assigned to the appropriate asset.
- Accounts identify the dependent assets.
-
Every migrated account has Available for use across all partitions selected. For example, if you create an asset service account with this check box selected, the service account could be used from anywhere.
Navigate to Administrative Tools | Account | Management tab | Available for use across all partitions check box.
- You cannot add the same account to multiple partitions from the same domain.
-
You can select a directory account and view the assets that have dependency on the directory account.
Navigate to Administrative Tools | Accounts | Dependent Assets.
Dynamic account group changes
The rules for dynamic asset groups and dynamic account groups include attributes for directory assets.
NOTE: Dynamic asset groups rule attributes do not include attributes for directory accounts. A directory cannot be the target of an asset group because you can not get an RDP or SSH session to them. Dynamic asset groups are for Security Policy Administrator control and directories are not included in policies.
Identity and authentication provider migration
A directory identity provider is managed by creating a directory asset which points to the same directory. The directory identity provider can be created and, optionally, put under management or not.
During migration from earlier versions of Safeguard for Privileged Passwords, if there are Active Directory users and user groups, SPP determines if Active Directory should be the identity provider or not. To see the result of the migration:
- Navigate to Administrative Tools | Settings.
- Select the directory then the General tab.
- Scroll down to Available Domains for Identity and Authentication to view the domains selected for the directory. Directory groups require the forest root domain to be visible and available for identity and authentication set on Administrative Tools | Settings | External Integration | Identity and Authentication. For more information, see Available Domains for Identity and Authentication (for Active Directory).
After the initial migration to version 2.6, add the identity provider.
Entitlements and access request policies
- Entitlement access request policies are migrated. If the access configuration for the asset-based session asset is a directory and you are using the version 2.6 desktop client, the name of the directory account may be blank since version 2.6 understood only one assignment and version 2.7 or later handles multiple assignments. To verify this, navigate to the Entitlements | Access Request Policy | Access Config tab. For directory accounts, the Asset-Based Session Access is correctly identified as a Directory Account, however, the directory account name is blank.
Management
Directories can be subdivided so administrators can be assigned to manage portions of a directory. For example, Admin A may only manage objects in the Finance organizational unit (OU) of the directory, and Admin B may only manage objects in the Engineering OU of the directory. This is possible via the settings on Assets including the asset Name, Domain Name, and whether to Manage Forest. This way, multiple assets can govern the same domain.
Directory accounts can be service accounts to other assets to run windows services/tasks on assets to keep password changes in sync.
Administrator role changes
- The Directory Administrator role is removed, and users with Directory Administrator permission are assigned as partition owners for directories that are migrated to assets. This role does not include the ability to manage identity providers.
- An Authorizer Administrator can now add an Active Directory forest only for identity to use as an unprivileged service account for connection.
- An Asset Administrator can now:
- Use service accounts to manage Active Directory. The service accounts can have limited permissions within a single domain.
- Use multiple service accounts for managing the same Active Directory domain with different limited permissions within the domain. For example, the administrator can add the domain as a managed asset multiple times with different service accounts.
- Use a service account from Active Directory to manage an asset from a different partition so that the administrator does not have to add that Active Directory to each of the administrator’s partitions.
- Set up a dependent system for a service running as an Active Directory account that isn’t in the administrator’s partition. This avoids having to add the Active Directory asset or the account to the partition.
- Add Active Directory for authentication to Safeguard for Privileged Passwords without managing any of the accounts in Active Directory.
- Set up multiple assets for the same domain.
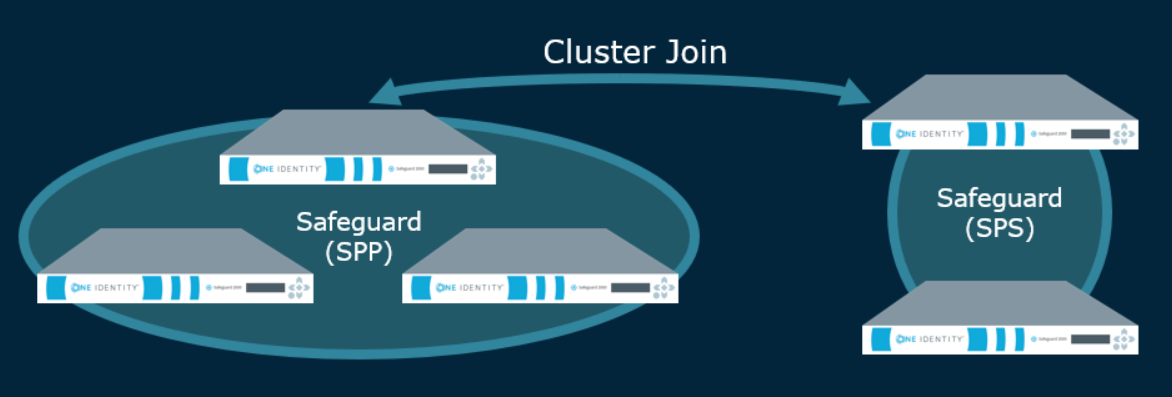
Appendix C: SPP and SPS join guidance
Safeguard for Privileged Passwords version 2.7 introduced the ability to join Safeguard for Privileged Sessions for session recording and auditing.
The Asset Administrator can join a Safeguard for Privileged Sessions (SPS) cluster to a Safeguard for Privileged Password (SPP) cluster of one appliance or more for session recording and auditing. The actual join must be between the SPP primary and the SPS cluster master. This means that the Safeguard for Privileged Sessions (SPS) cluster is aware of each node in an SPP cluster and vice-versa.
Once joined, all sessions are initiated by the SPP appliance via an access request and managed by the SPS appliance and sessions are recorded via the Sessions Appliance.
NOTE: If you have a single node SPS cluster where the Central Management node is also the Search Master, SPP will be unable to launch sessions. There has to be at least one SPS appliance in the cluster that is capable of recording sessions. See the SPS Administration Guide, Managing Safeguard for Privileged Sessions (SPS) clusters.
Additional overview information can be found in the Safeguard for Privileged Sessions Administration Guide, Passwords-initiated (SPP-initiated) workflow.
Session recording, playback, and storage after the join
- Sessions recorded after the join are playable through SPP and are stored on the SPS appliance. An archive server can be set up through SPS.
- Sessions recorded prior to joining the Safeguard Sessions Appliances are not migrated to the SPS appliance. For that reason, it is recommended that the SPP sessions be migrated to an archive server prior to the join.
Functionality in SPS after the join
The following functionality handled in SPP's user interface is available in SPS after the join.
- Session certificate assignment is handled by SPS. The certificate is available for audit by the Auditor.
- After the join, you will set the following configurations in SPS. There is no migration of the SPP settings added via Administrative Tools | Entitlements | Access Request Policies | Session Settings. These include:
- Session recording
- SSH related command detection and controls (such as SFTP, SCP, and X11 forwarding)
- RDP related command detection and controls (such as Windows title detection and allowing the clipboard)
- In SPS, you will:
- Set the SSH banner text that is shown to session users when they initiate a privileged session notifying them the session will be recorded.
- Identify the SSH host key presented to the user's SSH client when an SSH session is started.
- Identify the status of the session module, such as session module health.
- Edit the default policy.
The primary provider names must match for a SPS initiated connection with SPP. See KB article 311852.
Functionality in SPP after the join
- During the join, SPP sets the SPS Connection Policy to safeguard_default for SSH or safeguard_rdp for RDP, as appropriate and may need to be changed. This default is nothing more than SSH or RDP connection policy.
- Other configuration set via the Access Request Policies dialog, are not affected by the join. These include: General, Scope, Requester, Approver, Reviewer, Access Config, Time Restrictions, and Emergency tabs.
- The Activity Center shows all old sessions and new sessions per the configuration. You can play back a session from SPP. However, the session index, which makes the privileged users' activity searchable, is only available from SPS.
- Entitlement reports have not changed.
- On the Dashboard, administrators can still view and manage access requests and accounts failing tasks as usual.
- After the join, Administrative Tools | Settings | Sessions functionality is no longer available and is handled via SPS. This includes session recording management, sessions module, SSH banner, and SSH host key.
Step 1: Prepare for the join
Move all session recording files from Safeguard for Privileged Passwords to an archive server.
- The SPP embedded sessions module was remove in SPP 6.0 LTS so this step should have been completed earlier. If not, move the SPP embedded sessions recordings from local SPP to an archive server.
- If the join has not been started, you can use the SPP user interface to archive existing SPP sessions:
- Set up the archive server. Navigate to For more information, see Archive servers.
- Assign the archive server to the SPP appliances. SPP moves the files and deletes the local file storage.
- Verify the recordings have been archived by comparing the session events in the Activity Center with the actual recording files on the archive server.
- Test the playback of a recording stored on the archive server. You will need to download it before you can play it. For more information, see Replaying a session.
-
Ensure the join is performed when open access requests are not pending, if possible.
When the SPS session connection is joined, open access requests are automatically closed. When you double-click the event in the Activity Center, the event details Action is Evicted.
- Back up your appliances and archive servers. For more information, see Backup and Retention settings.
Step 2: Join SPS and SPP
The join is initiated from Safeguard for Privileged Sessions. For details about the join steps and issue resolution, see the One Identity Safeguard for Privileged Sessions Administration Guide.
Pay attention to the roles assigned to the SPS nodes. The following caution is offered to avoid losing session playback from SPP.
|

|
CAUTION: Do not switch the role of an SPS node from the Search Local role to Search Minion role. If you do, playback of the sessions recorded while in the Search Local role may not be played back from the SPP appliance, and may only be played back via the SPS web user interface. Recordings made with the node in Search Minion role are pushed to the Search Master node and are available for download to SPP. For details about SPS nodes and roles, see the One Identity Safeguard for Privileged Sessions Administration Guide: One Identity Safeguard for Privileged Sessions - Technical Documentation. |
Step 3: Perform post join activities in SPP and SPS
Steps to perform in SPP
-
The Appliance Administrator assigns the managed networks for sessions management.
Navigate to Administrative Tools | Settings | Cluster | Managed Networks. For more information, see Managed networks.
-
The Appliance Administrator can view, delete, or edit join connections, as needed.
Go to Administrative Tools | Settings | Cluster | Session Appliances. For more information, see Session Appliances with SPS join.
If you soft delete a session connection, then reconnect, the access policies remain available. If you hard delete, the Security Policy Administrator will need to rejoin and reestablish the SPS Connection Policy via Administrative Tools | Entitlements | Access Request Policies | Session Settings. For more information, see Connection deletion: soft delete versus hard delete.
-
The Security Policy Administrator identifies the session settings on the entitlements access request policy.
Perform the following steps to ensure each policy's session setting is correctly assigned.
- Navigate to Administrative Tools | Entitlements, select an entitlement, and open Access Request Policies.
- Double-click a policy, or select a policy and click
 Edit Access Policy.
-
On the Session Settings tab, go to the SPS Connection Policy. The host name of the cluster master is displayed first followed by the IP address: safeguard_default.
-
If needed, select the cluster or appliance to which the policy applies.
For more information, see Session Settings tab on page 1.
- While on the Access Request Policies dialog, the Security Policy Administrator checks any other tab, as needed. The join does not affect the settings on the tabs including the General, Scope, Requester, Approver, Reviewer, Access Config, Time Restrictions, and Emergency tabs.
Steps to perform in SPS
Complete any set up in SPS required (such as setting up an archive server, the SSH banner, the SSH host key, as well as SSH-related or RDP-related command detection and controls). For details, see the One Identity Safeguard for Privileged Sessions Administration Guide: One Identity Safeguard for Privileged Sessions - Technical Documentation. :
Standard operating procedure after the initial join
If you add another SPS cluster after the initial join, follow these standard operating procedures:
- Add join connections. For more information, see Session Appliances with SPS join.
- Identify the session settings on the entitlements access request policy (SPS Connection Policy that is the IP address of the cluster master). For more information, see Creating an access request policy.
- Assign the managed networks. For more information, see Managed networks.
Appendix D: Regular Expressions
Regular expressions are used to parse large amounts of data to find matching patterns and validate a predefined pattern. For example, in Safeguard for Privileged Passwords, regular expressions are used for:
- Account Discovery rules (Property Constraints, Name Ranges and Group Ranges). Partial matches are acceptable (unless the regular expression itself is defined to only return exact matches).
- Ticket numbers when an external ticketing system is not used. Matches must be exact.
For details, see these Microsoft resources:
Best practices for ticketing not tied to external ticket system
These best practices are for adding a regular expression for ticketing not tied to an external ticket system. For more information, see Ticketing systems.
If you use an alternation construct (“|” which is “or”), the longest matching expression is defined first to the least matching expression because Windows.Net regular expression (regex) stops after finding the first match.
For example: A{3}[0-9]{5}ZZZ|A{3}[0-9]{5} is advised instead of the reverse order. Sample entry results follow for the A{3}[0-9]{5}ZZZ|A{3}[0-9]{5} expression:
| User entry: |
Match? |
|
| AAA12345 |
Yes. Matched on the second regex |
|
| AAA12345Z |
No. There is no exact match. |
|
| AAA12345ZZZ |
Yes. Matched on the first regex.
If the expression were reversed (A{3}[0-9]{5}|A{3}[0-9]{5}ZZZ) there would be a partial match on the first expression and the entry would be returned as invalid. |
|
You may want to wrap each expression in an alternation construct with the anchors ^ and $ when using alternation constructs. An example follows: ^A{3}[0-9]{5}ZZZ$|^A{3}[0-9]{5}$.
The ? lazy quantifier should be avoided, especially at the end of the expression. For example, if the regex is A{3}[0-9]? and the user enters AAA12345, AAA1 is returned as a matched string which is not an exact match of AAA12345.
If the greedy quantifier (*) is used against AAA12345 then the matched string will be AAA12345 and be an exact match.
