
Introduction
|
|
NOTE:
This tutorial describes the deprecated version of the plugin. To upgrade your deprecated plugin for One Identity Safeguard for Privileged Sessions 6.0, see Upgrading plugins for One Identity Safeguard for Privileged Sessions version 6.0. |

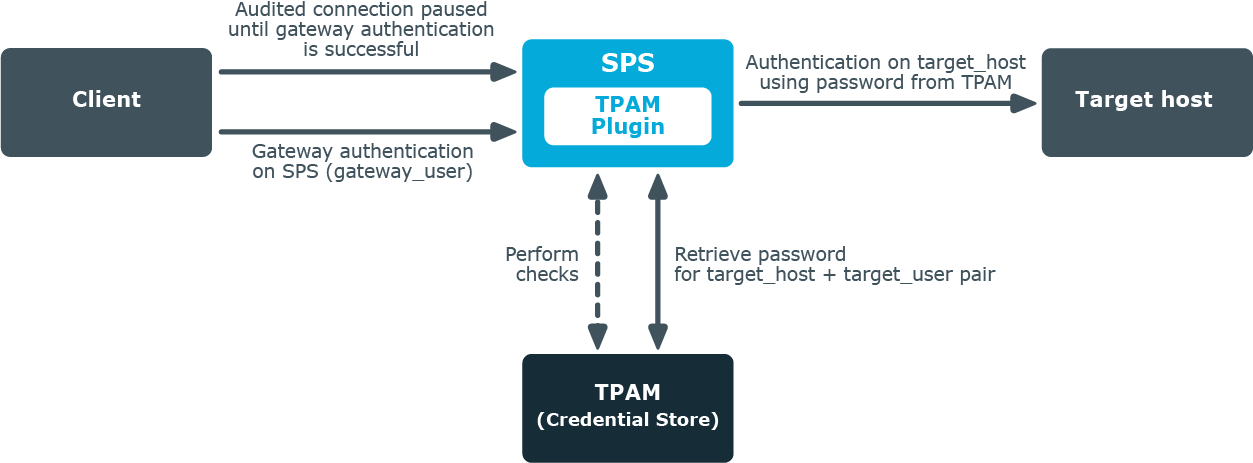
This tutorial describes how to connect your One Identity Safeguard for Privileged Sessions (SPS) with TPAM using a plugin to automatically retrieve passwords.
Users wishing to access a target host are able to authenticate themselves without actually having access to the credentials required to access that host. Passwords are retrieved by SPS from TPAM using a plugin, with SPS impersonating the authenticated user and TPAM acting as the repository of user credentials (a Credential Store in SPS terminology).
This automatic password retrieval is crucial as this method protects the confidentiality of passwords, enabling you to protect critical assets and meet compliance requirements.
How SPS and TPAM work together
-
A client attempts to establish a connection to a protected server (the target host) through SPS as a gateway.
In SPS, TPAM is configured as a Credential Store (together with a TPAM plugin) in the connection policy matching the connection.
- SPS prompts the client, now considered a gateway user, for credentials.
- The client provides authentication details.
- To retrieve the password required to access the target host from the configured Credential Store (that is, TPAM), SPS establishes an SSH connection to TPAM.
- SPS and TPAM mutually verify each other's identity.
- The TPAM plugin maps the data received from SPS to corresponding data entries in TPAM so that TPAM receives data that it can process.
- SPS retrieves information from TPAM through the TPAM plugin. Depending on the authorization method configured, SPS:
-
Performs certain checks about the gateway user.
If the checks are successful and the client is granted access, SPS retrieves from TPAM the password required to establish the connection between the client and the target host.
- Retrieves the requested password from TPAM without performing any checks.
-
- SPS authenticates the client to the target host, and establishes the connection.
Technical requirements
To successfully connect SPS with TPAM, you need the following components.
In SPS:
- A copy of the TPAM plugin, version 1.1.0 or later.
- Gateway authentication must be configured in the connection that uses TPAM as Credential Store so that gateway user details are at hand. For details, see Configuring gateway authentication.
- DNS resolution must be configured for the target host. For details, see Configuring DNS resolution.
In TPAM:
If you do not want the password to be automatically provided by TPAM following successful gateway authentication, one of the following is required (depending on the chosen authorization method):
- The gateway user requesting to access the target host must be present in TPAM as a Requestor with approval to view the password.
- The gateway user requesting to access the target host must have an access policy for either the Accounts or Systems that you want to include in the scope of password retrieval.
How SPS and TPAM work together - in detail
-
A client attempts to establish a connection to a protected server (the target host) through SPS as a gateway.
In SPS, TPAM is configured as a Credential Store (together with a TPAM plugin) in the connection policy matching the connection.
For details on setting up gateway authentication on the connection that uses TPAM as a Credential Store, see Configuring gateway authentication.
For details on configuring a TPAM plugin, see Using a custom Credential Store plugin to authenticate on the target hosts.
- SPS prompts the client, now considered a gateway user, for credentials.
- The client provides authentication details.
-
To retrieve the password required to access the target host from the configured Credential Store (that is, TPAM), SPS establishes an SSH connection to TPAM as an Information Security Administrator (ISA) CLI user present in TPAM.
For details on how to add an ISA CLI user in TPAM with ISA permissions at the Account level, see Adding an ISA CLI user and Assign ISA access policies to ISA CLI user.
- SPS and TPAM mutually verify each other's identity. This requires the presence of the following keys:
- TPAM's server_public_key
-
the private server_user_key of the ISA CLI user
This key must be stored in a local Credential Store on SPS. For details, see Storing sensitive plugin data securely.
-
The TPAM plugin maps the data received from SPS to corresponding data entries in TPAM so that TPAM receives data that it can process. The goal is to match up SPS data with TPAM data as follows:
Table 1: Mapping SPS data to TPAM data Data in SPS Data in TPAM gateway user Requestor target user Account target host System -
The TPAM plugin calculates the hostname of the target host. TPAM expects the address of the target host as a hostname rather than as an IP address.
If the address of the target host is an IP address, there are two options depending on how the system_name_resolver parameter is configured in the TPAM plugin:
- The IP address is retrieved from TPAM itself. This is the default behavior. For this to happen, the system_name_resolver parameter must be set to tpam, and you must ensure that the ISA CLI user has an ISA access policy assigned for all relevant Systems. For details, see Assign ISA access policies to ISA CLI user.
- A DNS lookup is performed. For this to happen, you have to set the system_name_resolver parameter to dns, and also configure DNS resolution in SPS. For details, see Configuring DNS resolution.
If the address of the target host is in FQDN format, then the hostname part of the FQDN is kept.
- Optionally, if the relevant setting (system_prefix) is enabled, a prefix of your choice is prepended to the hostname.
-
Optionally, this step might involve an extra round of mapping. If the relevant setting (system_maptoreal) is enabled, the TPAM plugin performs a lookup to check whether the Account-System pair is mapped to custom fields set in TPAM. If yes, then it is the password corresponding to the custom data entries that TPAM will retrieve.
Table 2: Mapping Account-System data to custom field data in TPAM Account-System data in TPAM Custom data in TPAM Real Account ManagedAccount.AccountCustom1 Real System ManagedAccount.AccountCustom2 For details on how to enable custom fields in TPAM, see Enabling custom attributes in TPAM.
-
-
SPS retrieves information from TPAM through the TPAM plugin. Depending on how the authorization parameter is configured, the following happens:
- If authorization is set to approval: SPS checks whether the gateway user is present in TPAM as a Requestor with approval to view the password. If present, SPS retrieves from TPAM the password required to establish the connection between the client and the target host.
- If authorization is set to policy: SPS checks whether the gateway user has an access policy in TPAM for either the Account or System in question. If present, SPS retrieves from TPAM the password required to establish the connection between the client and the target host.
- If authorization is set to gateway: The gateway user is granted access and SPS retrieves from TPAM the password required to establish the connection between the client and the target host without any further checks.
- SPS authenticates the client to the target host, and establishes the connection.