
Getting started with the Safeguard Desktop Player
-
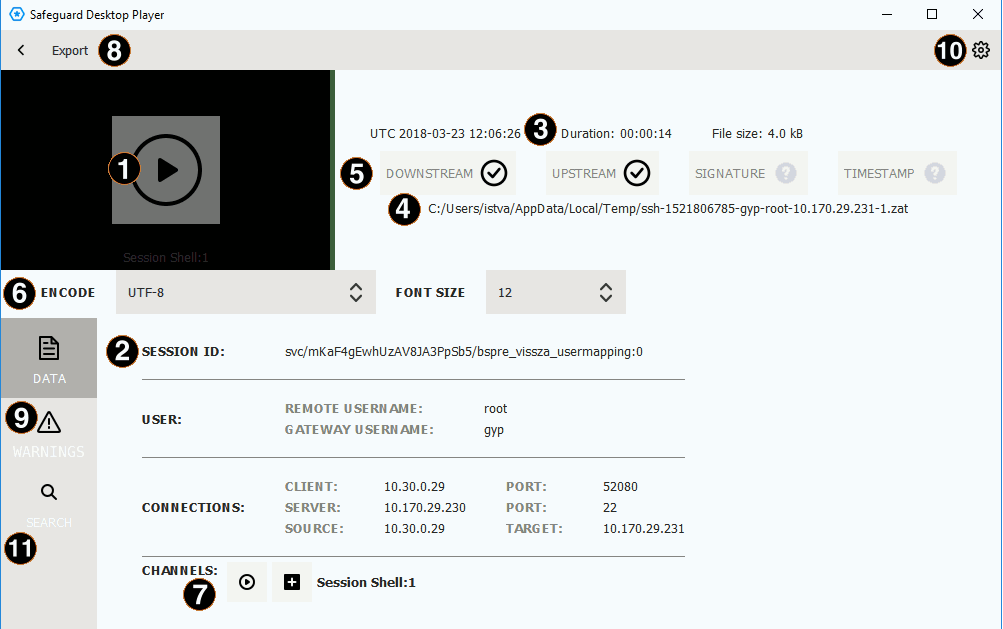
Play the audit trail
Click the thumbnail at the top, on the left, or click
in the Channels section of the screen. To play an encrypted audit trail, you need to have the appropriate certificates. For details, see "Replay encrypted audit trails" in the Safeguard Desktop Player User Guide.
-
Audit trail data
The most important data about the audit trail, including usernames (if available) and IP addresses. To display more metadata about a specific channel in the audit trail, click
in the list of channels. These details include the parameters available on the SPS Search page (for details, see "Searching audit trails: the One Identity Safeguard for Privileged Sessions (SPS) connection database" in the Administration Guide), and other parameters, for example, the size of the desktop or the terminal.
-
Date of the recording
Starting date and duration.
-
Location of the audit trail file
Click the path to open the folder in your file manager.
-
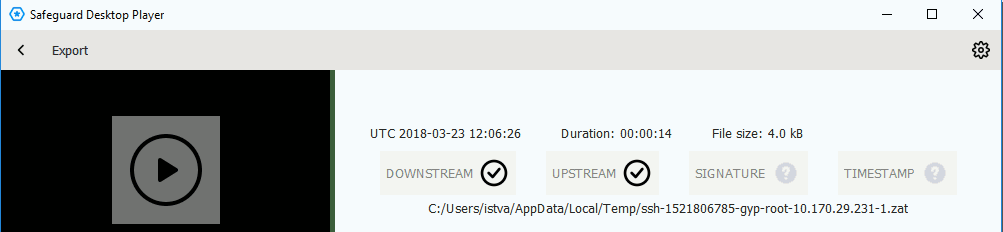
Validation results
When you open an audit trail, the Safeguard Desktop Player checks if you can access both the upstream and downstream traffic from the audit trail (you must have access at least to the downstream traffic to replay the audit trail), and validates the digital signature and the timestamp. The
icon means that the trail is not signed or timestamped. For details, see "Validate audit trails" in the Safeguard Desktop Player User Guide.
-
Terminal encoding and font size
When you are replaying terminal-based audit trails (for example, SSH or TELNET), you can set the character encoding and the font size of the displayed text. After changing the encoding or the font size, click Re-render trail.
-
Replay only this channel
Click
-
Export the audit trail into a video file
The exported files use the WEBM format with the VP8 codec. For details, see "Export the audit trail as video" in the Safeguard Desktop Player User Guide.
-
Warnings and errors
Warnings and errors that occurred during opening and processing the audit trail file.
-
Help
Open the documentation in your browser.
-
Search in trail content
Search in the contents of the current audit trail, for example, in commands that the user executed in the session, or to find a specific text that was displayed on the screen. Available only for terminal sessions. For details, see Search in the content of the current audit file.
-
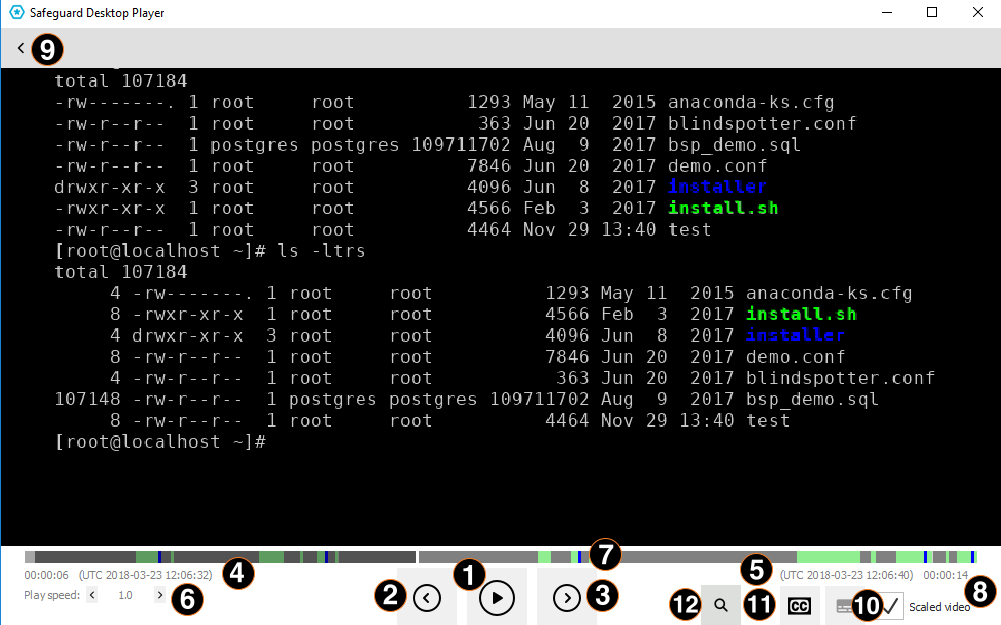
Play/pause replay
Start or stop replaying the audit trail. You can also click the video to start or stop replaying.
-
Jump to previous event
User events that occurred in the session (such as window titles that appeared on the screen, commands executed, mouse activity, keystrokes) are marked in the seeker. Click this button to jump to the previous event.
-
Jump to next event
User events that occurred in the session (such as window titles that appeared on the screen, commands executed, mouse activity, keystrokes) are marked in the seeker. Click this button to jump to the next event.
-
Current time and timestamp
Time elapsed since the beginning of the audit trail, and the corresponding date.
-
End time and timestamp
Length of the audit trail and the date when the session ended.
-
Change replay speed
-
Seek preview
Click the seeker to jump to a specific location in the audit trail.
-
Scale video
When enabled, the replayed audit trail is resized to fit the window. Clear to show the original size. You can also double-click on the video to toggle resizing.
-
Back to the summary page
Open the summary page of the audit trail
-
Configure seeker indicators
Click to configure the visibility of indicators for user events on the seeker. Seeker indicators show on a single timeline the user events that occurred during a session. Clicking a seeker indicator takes you to the relevant user event in the audit trail. User events are window titles that appeared on the screen, commands executed, mouse activity, keystrokes, and any on-screen change.
-
Display subtitles
Click to display subtitles for the video. Subtitles list user events as they occurred in the session. Events that are shown in subtitles are window titles that appeared on the screen, commands executed, mouse activity, and keystrokes.
-
Search in trail content
Search in the contents of the current audit trail, for example, in commands that the user executed in the session, or to find a specific text that was displayed on the screen. Available only for terminal sessions. For details, see Search in the content of the current audit file.
Validate audit trails
When you open an audit trail, the Safeguard Desktop Player application automatically validates it. You can see the results of this validation above the session details.
-
is displayed if the audit trail is valid.
-
is displayed if the timestamp or the signature is invalid, or the Safeguard Desktop Player could not decrypt the downstream traffic.
-
DOWNSTREAM
-
-
-
-
UPSTREAM
-
-
-
-
SIGNATURE
-
-
-
-
-
TIMESTAMP
-
-
-
-
Replay audit trails
The following describes how to replay an unencrypted audit trail.
To replay an encrypted audit trail, see Replay encrypted audit trails.
Prerequisites:
The audit trail must be available on the computer running the Safeguard Desktop Player, or you must access it on the SPS search interface from a browser on the computer running the Safeguard Desktop Player. You can use the SPS Search page to download an audit trail.
To replay an unencrypted audit trail
-
Open an audit trail to replay. Use one of the following methods:
-
Start the Safeguard Desktop Player application from the menu or the command line, then click OPEN. Select the audit trail you want to replay.
-
Navigate to the audit trail file in a file explorer (for example, Windows Explorer), and double-click on it.
-
-
The Safeguard Desktop Player application displays the details of the sessions stored in the audit trail file. It automatically starts to prepare (render) the audit trail for replay. You can start replaying the audit trail while rendering is in progress, this is especially useful for long audit trails.
To start playing the audit trail, click the thumbnail at the top, on the left. If the audit trail contains more than one channels that can be replayed, select the channel to replay. Alternatively, click the
-
The replay window opens.
You can use the following hotkeys to control the replay:
-
Play/Pause: SPACE
-
Jump to previous event: p
-
Jump to next event: n
-
Enable video scaling (Scale video): Ctrl+Z
-
Toggle fullscreen replay: f
-
Decrease replay speed: [
-
Increase replay speed: ]
-
Reset replay speed :=
-
Jump backward, short, medium, long: Shift + Left Arrow,Alt + Left Arrow,Ctrl + Left Arrow
-
Jump forward, short, medium, long: Shift + Right Arrow,Alt + Right Arrow,Ctrl + Right Arrow
-
Search in trail content: Ctrl + F
-
-
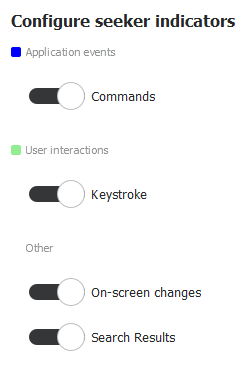
To configure the visibility of seeker indicators for events, click
. The Configure seeker indicators panel pops up:
Use the sliders to toggle between displaying and not displaying seeker indicators for a particular event type. By default, all indicators are on.
TIP: Indicator colors represent the importance of events. The darker the color, the more important the event is. In decreasing order of importance, the colors are: dark blue > light blue > white. Classifying events this way is required so that when events overlap, there is a clear guideline as to which one of the overlapping events is shown on the seeker. It is always the more important event that will have its indicator displayed.
In the case of the white indicators, which stand for on-screen changes, the degree of transparency signifies the volume of the change that occurred as compared to the previous on-screen change. Small changes are partly transparent white, while bigger ones are fully opaque white.
Event type Shown on panel Indicator color Application events Commands
Commands executed in the session-shell channel of SSH connections, or in Telnet connections.
For terminal-based protocols Dark blue Window titles
Text appearing as window titles in the case of RDP, Citrix ICA, VNC, and X11 connections.
This option is only displayed in the case of graphical protocols.
For graphical protocols User interaction Keystroke
Keystrokes in the session-shell channel of SSH connections, or in Telnet connections.
For all protocols Light blue Mouse activity
Any mouse activity (clicking, scrolling, or mouse movement) in the case of RDP, Citrix ICA, and VNC connections.
For all protocols Other On-screen changes
Any change that occurred on the screen.
For all protocols White
You can jump to interesting events by:
-
Clicking any of the colored bars on the seeker.
-
Clicking the
and
buttons.
-
-
To display subtitles for the audit trail, click
. By default, subtitles are not displayed.
Subtitles indicate application events (commands and window titles) and user interaction events (keystrokes and mouse activity) in the form of captions, using the colors of the event indicators.
Subtitles are generated for all audit trails.
When exporting audit trails as video files, you can choose to include the subtitles as well. For details, see Export the audit trail as video.

Replay encrypted audit trails
|
|
Caution:
Starting with SPS 5 F4, the way audit trails are encrypted has changed to make the encryption process more secure. Audit trails are now encrypted with AES-128-GCM and hashed with the SHA-512 method. This also means that in order to index and replay audit trails, you need to upgrade both your external indexers and your Safeguard Desktop Player. Earlier versions (and Audit Player) will not be able to handle audit trails (with or without encryption) recorded with SPS 5 F4 and later. |

The following describes how to replay an encrypted audit trail. To replay encrypted audit trails using the command line, see Replay encrypted audit trails from the command line.
Prerequisites:
-
To replay encrypted audit trails, the private key of the certificate used to encrypt the audit trail must be available on the host running the Safeguard Desktop Player. On Microsoft Windows, the Safeguard Desktop Player can retrieve this certificate from Windows Certificate Store > Current User > Personal Certificate Store.
-
To validate digitally-signed audit trails, the respective CA certificates that issued the certificates used to sign the audit trail must be available on the host running the Safeguard Desktop Player. (This is the CA of the certificates set at Policies > Audit policies > Enable signing on the SPS interface.) On Microsoft Windows, the Safeguard Desktop Player can retrieve this certificate from Windows Certificate Store > Local Computer > Trusted Root Certification Authorities.
-
To validate timestamped audit trails, the CA certificate of SPS must be available on the host running the Safeguard Desktop Player. (This is the CA certificate of SPS set at Basic Settings > Management > SSL Certificates > CA X.509 Certificate.) On Microsoft Windows, the Safeguard Desktop Player can retrieve this certificate from Windows Certificate Store > Local Computer > Trusted Root Certification Authorities.
The certificates and the private keys must be available as a file in PEM format, other formats are not supported. Note that on Microsoft Windows, you cannot import CA certificates from a shared drive. In this case, copy the certificate to a local folder and import it from there.
|
|
NOTE:
Certificates are used as a container and delivery mechanism. For encryption and decryption, only the keys are used. |
One Identity recommends using 2048-bit RSA keys (or stronger).
To replay an encrypted audit trail
-
Open the encrypted audit trail. The Safeguard Desktop Player will attempt to decrypt and validate it. If the decryption or validation fails, the Safeguard Desktop Player notifies you on the screen. Click Warnings to see the fingerprint of the required certificate.
-
Import the required certificate. At the top, on the right, click
> Key/Certificate import.
-
Click
, then select the certificate file. The certificates and the private keys must be available as a file in PEM format. Other formats are not supported.
-
Click Load. The Safeguard Desktop Player displays the details of the certificate.
-
Select how you want to store the certificate, then click Import. On Microsoft Windows, you can import the certificates into the Windows Certificate Store and reuse them later. On other platforms, Safeguard Desktop Player stores the certificates only temporarily, and automatically deletes them when you close the application.
-
If you want Safeguard Desktop Player to delete the certificate after you close the application, select Store temporarily only.
-
If you are importing a private key to decrypt an audit trail, select Store as personal certificate.
-
If you are importing a CA certificate to validate the timestamp or signature of the audit trails, select Store as trusted root certificate.
-
-
Repeat the previous steps to import other certificates if needed.
-
Click
, then
