The following describes how to configure e-mail alerts.
To configure e-mail alerts
-
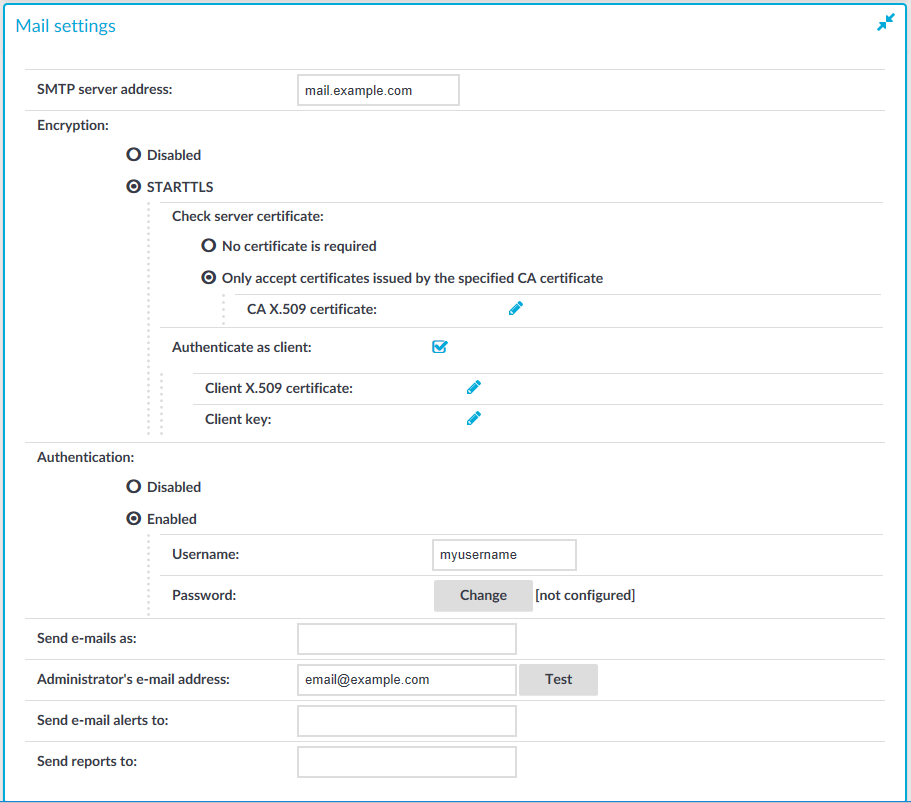
Navigate to Basic Settings > Management > Mail settings.
-
If you want to encrypt the communication between SPS and the SMTP server, in Encryption, select the STARTTLS option and complete the following steps:
-
If you want SPS to verify the certificate of the server, select Only accept certificates issued by the specified CA certificate and click the
icon in the CA X.509 certificate field. A pop-up window is displayed.
Click Browse, select the certificate of the Certificate Authority (CA) that issued the certificate of the SMTP server, then click Upload. Alternatively, you can paste the certificate into the Copy-paste field and click Set.
SPS will use this CA certificate to verify the certificate of the server, and reject the connections if the verification fails.
-
If the SMTP server requires mutual authentication, that is, it expects a certificate from SPS, enable Authenticate as client. Generate and sign a certificate for SPS, then click
TIP: One Identity recommends using 2048-bit RSA keys (or stronger).
-
-
If you want SPS to authenticate to the SMTP server, in Authentication, select the Enabled option. Enter the Username to authenticate with.
To configure or change the password to use to authenticate to the SMTP server, click Change and enter the password. Click Update. Click
.
NOTE: SPS accepts passwords that are not longer than 150 characters and supports the following characters:
-
Letters A-Z, a-z
-
Numbers 0-9
-
The space character
-
Special characters: !"#$%&'()*+,-./:;<>=?@[]\^-`{}_|
-
-
Enter the IP address or the hostname of the mail server into the SMTP server address field.
Use an IPv4 address.
Figure 93: Basic Settings > Management > Mail settings — Configuring e-mail sending
-
Enter the e-mail address where you want to receive e-mails from into the Send e-mails as field. This can be useful for e-mail filtering purposes. SPS sends e-mails from the address provided here. If no e-mail address is entered, e-mails will be sent from the default e-mail address.
-
Enter the e-mail address of the administrator into the Administrator's e-mail address field. SPS sends notifications related to system-events (but not alerts and reports) to this address.
-
Enter the e-mail address of the administrator into the Send e-mail alerts to field. SPS sends monitoring alerts to this address.
-
Enter the e-mail address the person who should receive traffic reports from SPS into the Send reports to field. For details on reports, see Reports.
-
Click
-
Click Test to send a test message.
If the test message does not arrive to the server, check if SPS can access the server. For details, see Troubleshooting One Identity Safeguard for Privileged Sessions (SPS).
-
Navigate to Basic Settings > Alerting & Monitoring and select in which situations should SPS send an e-mail alert. For details, see Configuring system monitoring on SPS.
-
Click