Wireless settings allow you to configure networks and profiles used by AirPort on macOS systems. The Wireless Profile Properties settings allow you to control wireless user profiles for macOS.
To open the Wireless Profile properties page
-
In the Group Policy Object Editor, navigate to User Configuration | Policies | Mac OS X Settings | Profile Manager Settings.
Wireless Networks apply only to users.
- Double-click the Wireless Networks node.
Related Topics
Adding wireless profiles
The Wireless Profiles tab settings control user options associated with wireless networks.
For the AD certificate and certificates profile, you can use a certificate created by vascert to work with Network preferences. One scenario for this is for a computer to use QoS supportive adaptive polling (QAP) protocol for wirelesswireless network. For more information, see vascert command reference.
To add wireless profiles
Click the Up or Down buttons to reorder the wireless profiles. Wireless profiles are added to the user profiles list on macOS systems in the order listed in the policy.
- From the Wireless Networks tab, click Add to open the Wireless Profiles dialog.
- On the Networks tab:
- Enter the name of the wireless profile in the Name box.
- Enter the SSID of the wireless network to which this profile applies in the SSID box.
- Select the type of wireless network from the Security Type drop-down list.
- Select the authentication type options that apply to this profile from the Protocols list.
- Select Hidden Network to allow users to join a network whose name is not broadcast.
- Select Auto Join so the network is joined automatically. If unselected, the user must click the network name to join it.
-
On the Proxy tab:
- Select the Proxy settings from the drop-down list. None is the default.
- Enter the Proxy server and port.
- Enter the Username (optional).
- Enter the Password (optional).
- Enter the Proxy Server URL.
- Select Allow direct connection if PAC is unreachable, if desired.
- On the Protocols tab:
- In the EAP-FAST section, identify the configuration of Protected Access Credentials (PAC) by selecting any combination of the following:
- Use PAC
- Provision PAC
- Provision PAC Anonymously
- Select Allow only two RAND values with EAP-SIM, if desired.
- Select the TTLS authentication protocol from the drop-down list.
- Identify Externally visible.
- Select the TLS minimum version from the drop-down list.
- Select the TLS maximum version from the drop-down list.
- On the Identity and Authentication tab:
- Select Use two factor authentication, if you will use a second authentication.
- Select Authenticate with host's directory credentials, if desired. If selected, enter the Username and Password.
- In Identity Certificate, note that you must have vascert on the client to use certificate identity. Select any combination of check boxes, as appropriate:
- Create a certificate identity with vascert
- Allow all apps to access the private key
- Allow a user to extract the private key from the keychain
The Preference Manifests node lists applications and settings that you can manage using preference manifests. Policy items contained in this node are specific to the Macintosh operating system. A preference manifest is a file that describes application settings and makes them manageable. Application developers create preference manifest files to make their application’s settings available for management through the Preference Manifests node.
When you install Group Policy console extensions, it creates preference manifests in sysvol at the following location:
Policies\Quest Software\Preference Manifest
In order to reduce GPO size, Preference Manifest files are stored in the GPT under the Policies\Quest Software\Preference Manifest folder. All of the Preference Manifest files found there are displayed in the Preference Manifests node. If the folder does not exist in the GPT, Preference Manifest files are loaded from the local installation directory.
Apple provides preference manifests for many built-in applications and systems. Group Policy includes preference manifests for Microsoft Office applications and other common third-party applications. You can also import custom preference manifests for policy configuration. The Safeguard Authentication Services installation process adds macOS, Workgroup Manager, and Preference Manifest Settings nodes to both the Computer Configuration and User Configuration nodes and stores all the Safeguard Authentication Services for macOS Desktop policies there.
Related Topics
Adding a preference manifest
You can add a preference manifest file to the Preference Manifests node in Group Policy Object Editor (GPOE)
To add a preference manifest
- Right-click on the Preference Manifests node and select Add/Remove Preference Manifests from the menu.
The Add/Remove Preference Manifest dialog is displayed.
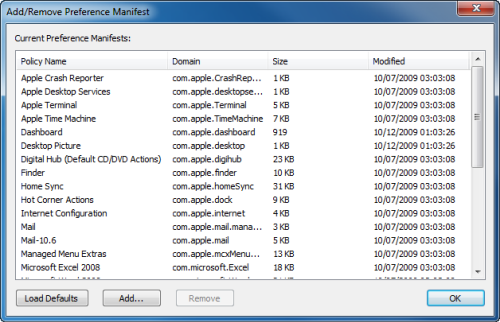
- Click Add to browse for the preference manifest file that you want to load.
- Click Load Defaults to reset the list to the default set of preference manifests.
- Click Remove to remove the selected preference manifests.
- Click OK to save changes and close the Add/Remove Preference Manifest dialog.
The Preference Manifest view is updated to reflect the changes.
