Chat now with support
Chat with Support

One Identity Safeguard for Privileged Sessions 6.0.5 - Administration Guide

Preface Introduction The concepts of One Identity Safeguard for Privileged Sessions (SPS) The Welcome Wizard and the first login Basic settings
Supported web browsers and operating systems The structure of the web interface Network settings Configuring date and time System logging, SNMP and e-mail alerts Configuring system monitoring on SPS Data and configuration backups Archiving and cleanup Forwarding data to third-party systems Joining to One Identity Starling
User management and access control Managing One Identity Safeguard for Privileged Sessions (SPS)
Controlling One Identity Safeguard for Privileged Sessions (SPS): reboot, shutdown Managing Safeguard for Privileged Sessions (SPS) clusters Managing a high availability One Identity Safeguard for Privileged Sessions (SPS) cluster Upgrading One Identity Safeguard for Privileged Sessions (SPS) Managing the One Identity Safeguard for Privileged Sessions (SPS) license Accessing the One Identity Safeguard for Privileged Sessions (SPS) console Sealed mode Out-of-band management of One Identity Safeguard for Privileged Sessions (SPS) Managing the certificates used on One Identity Safeguard for Privileged Sessions (SPS)
General connection settings HTTP-specific settings ICA-specific settings RDP-specific settings SSH-specific settings Telnet-specific settings VMware Horizon View connections VNC-specific settings Indexing audit trails Using the Search interface Searching session data on a central node in a cluster Advanced authentication and authorization techniques Reports The One Identity Safeguard for Privileged Sessions (SPS) RPC API The One Identity Safeguard for Privileged Sessions (SPS) REST API One Identity Safeguard for Privileged Sessions (SPS) scenarios Troubleshooting One Identity Safeguard for Privileged Sessions (SPS) Using SPS with SPP Configuring external devices Using SCP with agent-forwarding Security checklist for configuring One Identity Safeguard for Privileged Sessions (SPS) Jumplists for in-product help LDAP user and group resolution in SPS Appendix: Deprecated features Glossary

Changing log verbosity level of One Identity Safeguard for Privileged Sessions (SPS)

The logging level of One Identity Safeguard for Privileged Sessions (SPS) can be set separately for every protocol.

NOTE:

The Basic Settings > Management > Verbose system logs > Enable option is not related to the verbosity of traffic logs: it increases the log level of the non-network-related events, for example adds the commands executed by the SPS web interface to the logs, and so on.

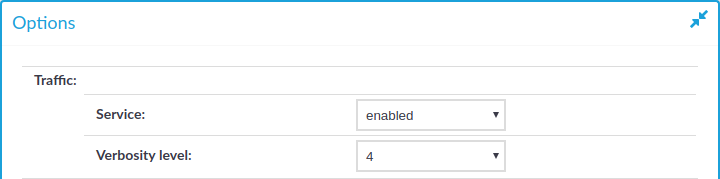
Figure 286: <Protocol name> Control > Global Options — Changing the verbosity level

To change the verbosity level of SPS

  1. Navigate to the Global Options page of the traffic you want to change the log level of, for example, to SSH Control > Global Options to change the log level of SSH traffic, RDP Control > Global Options for remote desktop traffic, and so on.

  2. Select the desired log level from the Verbosity level field. Note that the new verbosity level applies only to new sessions started after committing the change. The verbosity level of active sessions will not change.

    NOTE:

    The verbosity level ranges from 1 (no logging) to 10 (extremely detailed), with level 4 being the default normal level. To debug complex problems, you might have to increase the verbosity level to 7. Higher level is needed only in extreme cases.

    Caution:

    High verbosity levels generate very large amount of log messages and might result in a very high load on the machine.

    For log levels 8-10, the logs contain highly sensitive data for all connections, as well as passwords and private keys in plain text format.

  3. Click Commit.

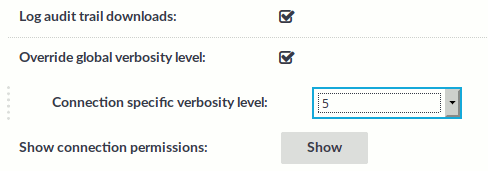
  4. Optional: To set a different verbosity level for sessions that belong to a specific Connection Policy, complete the following steps:

    • Navigate to the Connection Policy you want to modify.

    • Select Override global verbosity level.

    • Select the desired log level from the Connection specific verbosity level field. Note that the new verbosity level applies only to new sessions started after committing the change. The verbosity level of active sessions will not change.

    • Click Commit.

Related Documents

The document was helpful.

Select Rating

I easily found the information I needed.

Select Rating