To configure a property update rule for the user name, click Configure. This displays the Configure Value dialog, discussed in How to configure a Property Generation and Validation policy. You can use that dialog to set up a value for the ‘name’ must be condition, in the same way as you do when configuring a Property Generation and Validation policy.
To start configuring a value, click Add in the Configure Value dialog. This displays the Add Entry window.
A value is a concatenation of one or more entries. In the Add Entry window, you can select the type of the entry to add, and then configure the entry. The following table summarizes the available types of entries.
Table 22: Types of entries: Configuring a property update rule
|
Text |
Adds a text string to the value. |
|
User Property |
Adds a selected property (or a part of a property) of the user account being deprovisioned. |
|
Parent OU Property |
Adds a selected property (or a part of a property) of an Organizational Unit in the hierarchy of containers above the user account being deprovisioned. |
|
Parent Domain Property |
Adds a selected property (or a part of a property) of the domain of the user account being deprovisioned. |
|
Date and Time |
Adds the date and time when the account was deprovisioned. |
|
Initiator ID |
Adds a string that identifies the Initiator, that is, the user who originated the deprovisioning request. This entry is composed of Initiator-related properties, retrieved from the directory. |
Instructions on how to configure an entry depend on the type of the entry. For more information on how to configure each entry type, see the following resources:
The following subsections elaborate on the Date and Time and Initiator ID entries.
When you select Date and Time under Entry type in the Add Entry window, the Entry properties area looks as follows.
Figure 83: Entry type: Date and Time

Using this entry type, you can add an entry that represents the date and time when the user account was deprovisioned.
In the list under Date and time format, click the date or time format you want. Then, click OK to close the Add Entry window.
When you select Initiator ID under Entry type in the Add Entry window, the Entry properties area looks as follows.
Figure 84: Entry type: Initiator ID
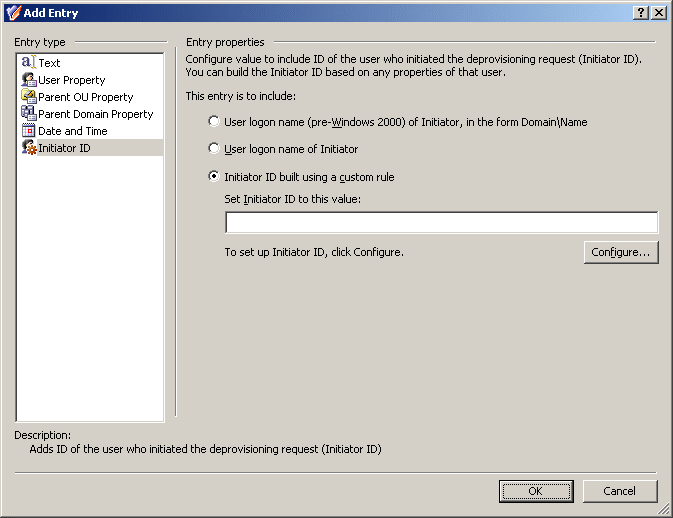
With this entry type, you can add a string that identifies the Initiator, that is, the user who originated the deprovisioning request. The policy generates the Initiator ID based on certain properties of the Initiator’s account, such as the user logon name. A custom rule can be configured to use other properties.
You can choose a pre-configured rule or configure a custom rule to generate the Initiator ID. The pre-configured rules allow you to set the Initiator ID to one of the following:
-
The pre-Windows 2000 user logon name of the Initiator, in the form DomainName\UserName.
-
The user logon name of the Initiator.
A custom rule allows you to compose the Initiator ID of other Initiator-related properties.
To configure a custom rule for Initiator ID, click the lowermost option under Entry properties, and then click Configure. This displays the Configure Value dialog, discussed in How to configure a Property Generation and Validation policy. You can use that dialog to set up a value for the ‘Initiator ID’ must be condition, in the same way as you do when configuring a Property Generation and Validation policy.
To start configuring a value, click Add in the Configure Value dialog. This displays the Add Entry window.
A value is a concatenation of one or more entries. In the Add Entry window, you can select the type of the entry to add, and then configure the entry. The following table summarizes the available types of entries.
Table 23: Available entries for Configuring a custom rule to build the Initiator ID
|
Text |
Adds a text string to the value. |
|
Initiator Property |
Adds a selected property (or a part of a property) of the Initiator’s user account. |
|
Parent OU Property |
Adds a selected property (or a part of a property) of an Organizational Unit in the hierarchy of containers above the Initiator’s user account. |
|
Parent Domain Property |
Adds a selected property (or a part of a property) of the domain of the Initiator’s user account. |
Instructions on how to configure an entry depend on the type of the entry. For more information on how to configure each entry type, see the following resources:
When you are done configuring a value for the ‘Initiator ID’ must be condition, click OK to close the Configure Value dialog. This will add the value to the Initiator ID entry properties. If necessary, you can modify the value by clicking the Configure button in the Add Entry window and then managing the list of entries in the Configure Value dialog.
When you are done configuring the Initiator ID entry, click OK to close the Add Entry window. The entry is added to the Configure Value dialog for the ‘name’ must be condition.
When you are done configuring a value for the ‘name’ must be condition, click OK to close the Configure Value dialog. This will add the rule to the Options to Prevent Logon page of the wizard. If necessary, you can modify the rule by clicking Configure on that page and then managing the list of entries in the Configure Value dialog.
Once you have completed the Options to Prevent Logon page, click Next to display the Properties to Be Updated page.
Figure 85: Properties to Be Updated

On this page, you can set up a list of user properties you want the policy to update. Each entry in the slist includes the following information:
-
Property: When deprovisioning a user, Active Roles will update this property of the user’s account.
-
LDAP Display Name: Uniquely identifies the property to be updated.
-
Value to Assign: After the deprovisioning operation is completed, the property has the value defined by this syntax.
You can use these buttons to manage the list on this page:
-
Add: Allows you to select a property and configure an update rule for that property. A property update rule specifies how to generate the new value to assign to the property.
-
Remove: If you want the policy to no longer update a given property, select the property from the list and click Remove.
-
View/Edit: Allows you to modify the update rule for the property you select from the list.
Clicking Add displays the Select Object Property dialog where you can choose user properties you want to the policy to update. To choose a property, select the check box next to the property name, and then click OK.
You can select multiple check boxes. If you do so, the properties you have selected are added to the list on the wizard page, with the update rule configured to clear those properties, that is, to assign them the empty value.
If you select a single property in the Select Object Property dialog, you are presented with the Add Value dialog so you can proceed to configuring a property update rule.
Figure 86: Add Value

You can select one of these update options:
With the second option, you must configure a value the policy will assign to the property upon the user deprovisioning. You can configure a value in the same way as you do when configuring a property update rule for the user name: Click Configure and follow the instructions provided in Configuring a property update rule.
When you are done configuring a value, click OK to close the Add Value dialog. The property name along with the property update rule is added to the wizard page. If necessary, you can modify the update rule by clicking View/Edit beneath the list of properties. This displays a dialog, similar to the Add Value dialog, allowing you to choose a different update option or set up a different value for the ‘property’ must be condition.
Once you have set up the list on the wizard page, click Next and follow the instructions in the wizard to create the Policy Object.
