Mail texts can be defined in these different languages in a mail template. This ensures that the language of the recipient is taken into account when the email is generated.
To create a new mail definition
-
In the Designer, select the Mail templates category.
-
Select the mail template and start Mail Template Editor using the Edit mail template task.
-
In the result list, select the language for the mail definition in the Language menu.
All active languages are shown. To use another language, in the Designer, enable the corresponding countries. For more information, see the One Identity Manager Configuration Guide.
-
Enter the subject in Subject.
-
Edit the mail text in the Mail definition view with the help of the Mail Text Editor.
- Save the changes.
To edit an existing mail definition
-
In the Designer, select the Mail templates category.
-
Select the mail template and start Mail Template Editor using the Edit mail template task.
-
In the Mail definition menu, select the language for the mail definition.
NOTE: If the Common | MailNotification | DefaultCulture configuration parameter is set, the mail definition is loaded in the default language for email notifications when the template is opened.
-
Edit the mail subject line and the body text.
- Save the changes.
Related topics
In the subject line and body text of a mail definition, you can use all properties of the object entered under Base object. You can also use the object properties that are referenced by foreign key relation.
To access properties use dollar notation. For more information, see the One Identity Manager Configuration Guide.
Example:
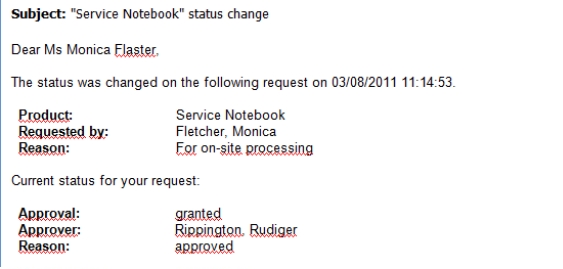
An IT Shop requester should receive email notification about the status of the request.
Table 19: Email notification properties
|
Base object |
PersonWantsOrg |
|
Subject |
"$DisplayOrg[D]$" status change |
|
Mail body |
Dear $FK(UID_PersonOrdered).Salutation[D]$ $FK(UID_PersonOrdered).FirstName$ $FK(UID_PersonOrdered).LastName$,
The status was changed on the following request on $DateHead:Date$.
Requested by: $DisplayPersonInserted$
Requested by: $DisplayPersonInserted$
Reason: $OrderReason$
Current status of your request:
Approval: granted
Approver: $DisplayPersonHead[D]$
Reason: $ReasonHead[D]$ |
The generated email notification could look like the following, for example, once it has been formatted.
Related topics
You can add hyperlinks to the Web Portal in the mail text of a mail definition. If the recipient clicks on the hyperlink in the email, the Web Portal opens on that web page and further actions can be carried out. In the default version, this method is implemented for IT Shop requests, in Identity Audit, policy checks and attestations.
Prerequisites for using this method
-
The QER | WebPortal | BaseURL configuration parameter is enabled and contains the URL to the API Server. You edit the configuration parameter in the Designer.
http://<server name>/<application>
with:
<server name> = name of server
<application> = path to the API Server installation directory
To add a hyperlink to the Web Portal in the mail text
-
Click the position in the mail text of the mail definition where you want to insert a hyperlink.
-
Open the Hyperlink context menu and enter the following information.
-
Display text: Enter a caption for the hyperlink.
-
Link to: Select the File or website option.
-
Address: Enter the address of the page in the Web Portal that you want to open.
NOTE: One Identity Manager provides a number of default functions that you can use to create hyperlinks in the Web Portal.
- To accept the input, click OK.
Related topics
Several default functions are available to help you create hyperlinks. You can use the functions directly when you add a hyperlink in the mail body of a mail definition or in processes
Direct function input
You can reference a function when you add a hyperlink in the Address field of the Hyperlink context menu.
Syntax:
$Script(<Function>)$
Example:
$Script(VI_BuildITShopLink_Show_for_Requester)$
$Script(VI_BuildAttestationLink_Approve)$
$Script(VI_BuildComplianceLink_Show)$
$Script(VI_BuildQERPolicyLink_Show)$
Default functions for requests
The VI_BuildAttestationLinks script contains a collection of default functions for composing hyperlinks to directly grant or deny approval of requests from email notifications.
Table 20: Functions of the VI_BuildAttestationLinks script
|
VI_BuildAttestationLink_Show |
Opens the attestation page in the Web Portal. |
|
VI_BuildAttestationLink_Approve |
Approves an attestation and opens the attestation page in the Web Portal. |
|
VI_BuildAttestationLink_Deny |
Denies an attestation and opens the attestation page in the Web Portal. |
|
VI_BuildAttestationLink_AnswerQuestion |
Opens the page for answering a question in the Web Portal. |
|
VI_BuildAttestationLink_Pending |
Opens the page with pending attestations in the Web Portal. |
Default functions for IT Shop requests
The VI_BuildITShopLinks script contains a collection of default functions for composing hyperlinks to directly grant or deny approval of IT Shop requests from email notifications.
Table 21: Functions of the VI_BuildITShopLinks script
|
VI_BuildITShopLink_Show_for_Approver |
Opens the overview page for request approval in the Web Portal. |
|
VI_BuildITShopLink_Show_for_Requester |
Opens the overview page for requests in the Web Portal. |
|
VI_BuildITShopLink_Approve |
Approves a request and opens the approvals page in the Web Portal. |
|
VI_BuildITShopLink_Deny |
Denies a request and opens the approvals page in the Web Portal. |
|
VI_BuildITShopLink_AnswerQuestion |
Opens the page for answering a question in the Web Portal. |
|
VI_BuildITShopLink_Reject |
Opens the page with denied requests in the Web Portal. |
|
VI_BuildAttestationLink_Pending |
Opens the page with pending requests in the Web Portal. |
|
VI_BuildITShopLink_Unsubscribe |
Creates the link for canceling email notification. This function is used in processes for unsubscribing email notifications. |
Default functions for identity audit
The VI_BuildComplianceLinks script contains a collection of default functions for composing hyperlinks for exception approval of rule violations.
Table 22: Functions of the VI_BuildComplianceLinks script
|
VI_BuildComplianceLink_Show |
Opens the exception approval page in the Web Portal. |
Default function for policy checking
The VI_BuildComplianceLinks script contains a collection of default functions for composing hyperlinks for exception approval of policy violations.
Table 23: Functions of the VI_BuildComplianceLinks script
|
VI_BuildQERPolicyLink_Show |
Opens the exception approval page in the Web Portal. |
Related topics
