Chat now with support
Chat mit Support

Safeguard Privilege Manager for Windows 4.5 - Administration Guide

TitlePageProxy Copyright Table of Contents About this guide What is Safeguard Privilege Manager for Windows? Installing Safeguard Privilege Manager for Windows Configuring Client data collection Configuring Instant Elevation Configuring Self-Service Elevation Configuring Temporary Session Elevation Configuring privileged application discovery Deploying rules Removing local admin rights Reporting Client-side UI customization Using Microsoft tools Maintaining a least privileged use environment Database Planning Product Improvement Program About us

Installing the Client

Detailed information about this topic

Once the Console is installed, you can deploy Clients to the computers on your domain in one of the following ways:

  • Client Deployment Settings Wizard: Deploy or uninstall clients on your computers in one pass.

    NOTE: Available only in Privilege Manager Professional Edition and Professional Evaluation Edition.

  • Client Windows Installer file: Use PAClient.msi to install the Client locally on a computer (administrative privileges are required).

  • Microsoft Group Policy Management Console: Use login scripts or other software deployment techniques for mass-deployment.

Using the Client Deployment Settings Wizard

To use the Client Deployment Settings Wizard to install the Privilege Manager Client

  1. Start the Client Deployment Settings Wizard.

    • To add the settings to any available GPO:

  2. Open the Console.

  3. Under the Getting Started section of the left navigation menu, click Setup Tasks.

  4. Select the Deploy Client Wizard icon in the Advanced Configuration pane on the right. It always shows the default settings.

    • To change the settings for a specific GPO, double-click Client Deployment Settings on the Advanced Policy Settings tab of the GPO. The changes made within the wizard are saved here.

  5. Choose one of the following options:

    • Not Configured: Enable child GPOs to inherit Client deployment settings from their parent.

    • Install Client: Install/upgrade Client software.

    • Remove Client: Remove Client software (for versions 3.0 and higher).

    • Unregister: Stop Client software installation GPO settings from applying.

  6. Click Next.

  7. Define the Server.

  8. Click Browse to locate a Server through Active Directory.

  9. Click Test to verify the connection of the selected Server to the ScriptLogic PA Reporting Service. If the test fails, check to see if there are network or firewall problems.

  10. Click the Clear the server name link if you want to configure another Server. The displayed service remains installed.

  11. Click Next to use Validation Logic to target the settings to specific client computers or user accounts within the GPO, or click Finish to save your settings and quit.

    If an error message indicates that the target GPO is not selected:

    1. Click OK to close the message window.

    2. Open the GPO tab and select the desired GPO.

    3. Click Save on the GPO toolbar to save the new settings.

  12. Double-click Client Deployment Settings on the Advanced Policy Settings tab of the GPO to view the Client Deployment Settings.

  13. Check that the Client is successfully deployed onto the computer. Ensure that:

    • The CSEHost.exe process is running.

    • The Client record is shown in the Add/Remove Programs tool.

    • The Privilege Manager icon and the right-click menu are available in the system tray on the client computer.

    • New GPO rules created by Privilege Manager are applied to Client computers following a group policy update.

Using the Client Windows Installer file

To use the Client Windows Installer file to install the Client locally on a computer

  1. To locate the Client MSI setup file, open the Console.

  2. Click Additional Resources > Open Client Installation Folder. The Client file appears in a browser window.

  3. Check that the Client is successfully deployed onto the computer. Ensure that:

    • The CSEHost.exe process is running.

    • The Client record is shown in the Add/Remove Programs tool.

    • The Privilege Manager icon and the right-click menu are available in the system tray on the client computer.

      New GPO rules created by Privilege Manager are applied to Client computers following a group policy update.

Using the Group Policy Management Console

To install Clients on your domain via the Microsoft Group Policy Management Console (GPMC)

  1. Copy the PAClient.msi file to a network share that can be read by all users. Or, just share the file folder (a share with the PAClient.msi file is configured automatically upon Server configuration).

    1. To locate the Client MSI setup file, open the Console.

    2. Click Additional Resources > Open Client Installation Folder. The Client file appears in the browser window.

  2. Right-click Group Policy Objects and select New from the pop-up menu to open the Group Policy Management Console on the Server to create a new Group Policy Object (GPO).

  3. Enter a name for the new GPO and click OK.

  4. Right-click the new GPO and select Edit to open it.

  5. In the Group Policy Management Editor, select Computer Configuration > Policies > Software Settings > Software installation. In the right pane, right-click the new GPO, and select New > Package.

    1. If the client distribution GPO is computer-based (defined under Computer Configuration), enable the Always wait for the network at computer startup and logon policy, located in Computer Configuration > Policies > Administrative Templates > System > Logon). Otherwise, the Client installs after the second reboot of the client computer.

    2. If the client distribution GPO is user-based (defined under User Configuration), then the Client installs after the first logon.

  6. In the dialog that appears, browse to the PAClient.msi file on the network share where it was copied to.

    1. Use the File name field to specify the Client location in the Universal Naming Convention (UNC) format:

      \\computername\sharename\filename.msi

    2. Click Open.

  7. Select Assigned in the Deploy Software dialog.

  8. Assign the new GPO to a domain or OU.

    1. To assign it to a domain, right-click the domain in GPMC and select Link an Existing GPO.

    2. Select the GPO in the dialog and click OK.

  9. Check that the Client is successfully deployed onto the computer.

    Ensure that:

    • The CSEHost.exe process is running.

    • The Client record is shown in the Add/Remove Programs tool.

    • The Privilege Manager icon and the right-click menu are available in the system tray on the client computer.

      New GPO rules created by Privilege Manager are applied to Client computers following a group policy update.

      NOTE: During updates, all Client settings and rule group policies are automatically updated. You have two options for initiating updates:

      • Using a console prompt or PowerShell terminal.

        To initiate update using the gpupdate command

        1. Open a console prompt or a PowerShell terminal supported by your operating system.

        2. Run gpupdate /force.

          NOTE: The system will find gpupdate.exe through PATH.

          After a successful update, you will see this message:

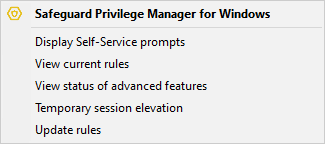
      • Using the built-in Update rules feature of the Safeguard Privilege Manager for Windows menu on the system tray.

        To initiate update using the Update rules built-in feature

        1. Navigate to the Client system tray on your desktop.

        2. Right-click the system tray.

          The Safeguard Privilege Manager for Windows menu opens:

        3. Click Update rules.

          A console window opens to automatically update the client machine Group Policies by synchronizing saved GPOs from Active Directory.

    NOTE: The automatic Server upgrade may be unavailable if the ScriptLogic PA Reporting Service is not running.

  10. If the Console detects that the Server component is installed on a remote computer, it instruct you to launch it on the remote computer.

  11. If a message prompts you to upgrade your Server and database (installed locally with the reporting functionality of some prior Privilege Manager versions):

    1. Click OK and follow the Privilege Manager Server Configuration Wizard to complete the following steps:

      1. Install the missing SQL Server components from the Internet.

      2. Back up your database.

      3. Configure a shared folder for client mass deployment.

    2. Click Finish to save the results and exit the wizard.

    3. If a message displays indicating that the Privilege Manager Host Service that needs to be updated is currently in use, click OK to ignore the message.

    4. To upgrade later, open the Privilege Manager Server Configuration Wizard and confirm that you are running the upgrade process before you configure the Server.

    5. Until you have upgraded the Server and database, you will have problems installing the Server locally.

      For more information, see Configuring the Server.

  12. Re-configure your Client data collection settings, if necessary.

    1. Select a GPO from the Group Policy Settings section.

    2. Switch to the Advanced Policy Settings tab.

    3. Double-click Client Data Collection Settings to configure settings using the Client Data Collection Settings Wizard. For more information, see Configuring Client data collection.

  13. After you upgrade, By Digital Certificate rules will be saved as By Path to the Executable rules.

  14. To upgrade Clients, install the newer version over the older one. For more information, see Installing the Client.

For more information, see Removing the Server.

Verwandte Dokumente

The document was helpful.

Bewertung auswählen

I easily found the information I needed.

Bewertung auswählen