Example of using the Generic SCIM Connector for data synchronization
Once you configured a connection with the Generic SCIM Connector as described in Configuring the Generic SCIM Connector for Starling Connect connections, you can configure import-based data synchronization tasks to import data from the SCIM-based SuccessFactors HR and ServiceNow connectors of Starling Connect to another target system supported by Active Roles .
Creating such a SCIM-based synchronization workflow has two main steps:
-
Mapping objects by configuring one or more mapping pairs and mapping rules. By mapping objects, you can specify logic checks by which Active Roles can identify if two data entries stored in two separate databases are the same or not.
-
With mapping pairs, you can establish a relationship between object types in two connected systems.
-
With mapping rules, you can define the conditions on how the objects specified in the mapping pair will be mapped during synchronization.
Example: Mapping objects by user ID
You can use object mapping, for example, to identify the same data entries between a SuccessFactors HR database (connected to Active Roles via a Generic SCIM Connector connection) and an SQL server (connected to Active Roles via a Microsoft SQL Server Connector).
To do so, you can set up a mapping that compares the User ID value of the data entries in the two systems. If the data entries in the two systems share the same User ID, Active Roles will consider them the same.
For more information on object mapping, see Mapping objects. For an example mapping procedure using the Generic SCIM Connector, see Creating object mapping between a SCIM connection and an SQL connection.
-
Setting up a synchronization workflow based on the configured object mapping, so that you can automate creating, removing or deprovisioning specific data entries between the connected systems.
For more information on synchronization workflows, see Getting started with identity data synchronization. For an example workflow configuration procedure using the Generic SCIM Connector, see Creating a synchronization workflow for synchronizing data from a SCIM-based Starling Connect connector.
The following chapters will provide an example for setting up a synchronization workflow that will import data from a SuccessFactors HR database via a Generic SCIM Connector connection, and synchronizing that data to an SQL database.
Creating object mapping between a SCIM connection and an SQL connection
Once you configured a connection with the Generic SCIM Connector as described in Configuring the Generic SCIM Connector for Starling Connect connections, you can configure import-based data synchronization tasks to import data from the SCIM-based SuccessFactors HR and ServiceNow connectors of Starling Connect to another target system supported by Active Roles .
The first step of creating this synchronization is mapping objects between the SCIM-based source system and a target system, so that Active Roles can detect identical data entries between the two system for proper data synchronization.
By mapping objects, you can specify logic checks by which Active Roles can identify if two data entries stored in two separate databases are the same or not.
-
With mapping pairs, you can establish a relationship between object types in two connected systems.
-
With mapping rules, you can define the conditions on how the objects specified in the mapping pair will be mapped during synchronization.
The following example procedures show how to create a mapping pair and a mapping rule between:
-
A SuccessFactors HR database connected to Active Roles with the Generic SCIM Connector. The SuccessFactors HR database will be the source system from which Active Roles imports the data.
-
An SQL database connected to Active Roles with the Microsoft SQL Server Connector. The SQL database will act as the target system to which Active Roles will synchronize the SuccessFactors HR data.
Prerequisites
You can perform the following procedures only if Active Roles Synchronization Service already contains the following working connectors:
To configure a mapping pair between a SuccessFactors HR database and an SQL database
-
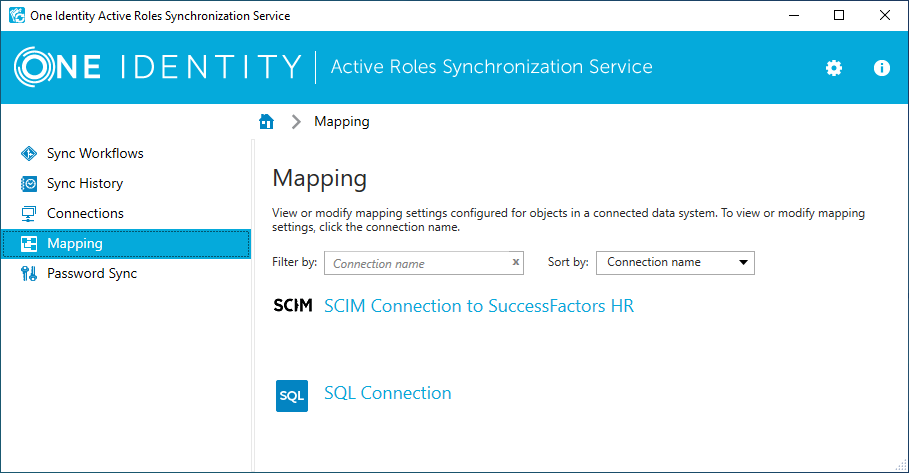
In the Active Roles Console, navigate to Mapping, then click the SCIM Connection to SuccessFactors HR connection.
Figure 14: Active Roles – Selecting a connector for mapping objects
-
To start configuring a new object mapping with the Add mapping pair dialog, click Add mapping pair.
-
In the Specify source step, under Connected system object type, select the resource object type you want the object mapping to check. In this example, we are using the Employees data entry of the SuccessFactors HR database, so click Select, then in the Select Object Type step, select Employees.
TIP: If the data entry is hard to find due to the length of the list, use the Filter by name field to find it quicker.
To apply your selection, click OK, then Next.
-
In the Specify target step, under Target connected system, configure the target system where the other resource object type is located. To do so, click Specify, and in the Add Connected System Wizard, select the Select existing connected system option, then the connector of the SQL server (in this example, SQL Connection). To apply your selection, click Finish.
-
Under Connected system object type, select sql-Object.
-
To create the mapping pair, click Finish.
-
(Optional) If needed, you can configure additional mapping pairs as well for your synchronization workflow. To do so, click Add mapping pair again, and repeat the procedure. This example procedure uses only one mapping pair.
Once the mapping pair is created, you can configure its associated mapping rule.
To configure a mapping rule between a SuccessFactors HR database and an SQL database
-
In the Active Roles Console, navigate to Mapping, then click the SCIM Connection to SuccessFactors HR connection.
-
The previously configured mapping pair appears. To open the available mapping pair settings, click the Employees object type in the mapping pair.
Figure 15: Active Roles – Mapping pair in a configured SCIM connection

-
To start configuring a new mapping rule, in the Mapping pair window, click Add mapping rule.

-
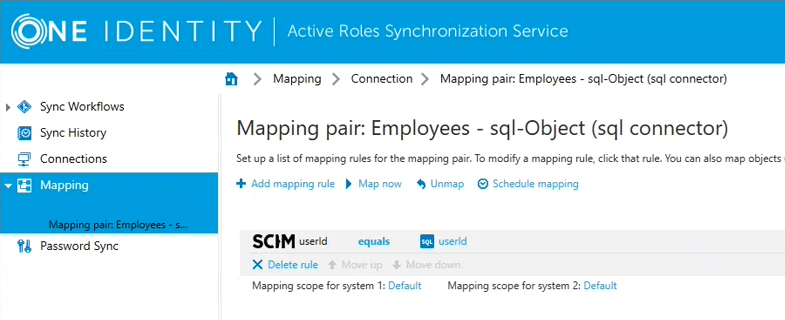
In the Define Mapping Rule window, specify the source and target resource object types that must be equal so that Active Roles can map the data pairs. In this example, we are using the UserID attribute for this purpose both in the SuccessFactors HR database and in the SQL database as well.
Therefore, at the Value generated for SCIM Connection to SuccessFactors HR by using field, click Attribute, then in the Select attribute window, select userId. This adds the userId object value to both the source and target fields.
TIP: If the data entry is hard to find due to the length of the list, use the Filter by name field to find it quicker.
-
To finish adding the mapping rule, click OK.
Figure 16: Active Roles – Mapping rule in a configured SCIM mapping pair
-
To start the mapping synchronization based on the configured value pair of the mapping rule, click Map now. Active Roles offers two mapping types:
-
Quick Map, using local cached data to speed up the mapping process.
-
Full Map, retrieving data from the source and target data system for accuracy.
As this is the first time of running this mapping, perform a Full Map.
Once the mapping rule finishes running successfully, it will indicate the unmapped, changed and mapped objects, along with the objects that do not meet the scope conditions of the configured mapping rule.
Creating a synchronization workflow for synchronizing data from a SCIM-based Starling Connect connector
Once you configured a connection with the Generic SCIM Connector as described in Configuring the Generic SCIM Connector for Starling Connect connections, you can configure import-based data synchronization tasks to import data from the SCIM-based SuccessFactors HR and ServiceNow connectors of Starling Connect to another target system supported by Active Roles .
The second step of creating this synchronization task is setting up a synchronization workflow based on the object mapping configured in Creating object mapping between a SCIM connection and an SQL connection. By configuring a workflow, you can automate creating, removing or deprovisioning specific data entries between the connected systems.
The following example procedure shows how to create a workflow that creates and updates data synchronization between:
-
A SuccessFactors HR database connected to Active Roles with the Generic SCIM Connector. The SuccessFactors HR database will be the source system from which Active Roles imports the data.
-
An SQL database connected to Active Roles with the Microsoft SQL Server Connector. The SQL database will act as the target system to which Active Roles will synchronize the SuccessFactors HR data.
Prerequisites
Before performing the procedure, make sure that the following conditions are met:
To configure a data synchronization workflow between a SuccessFactors HR database and an SQL database
-
In the Active Roles Console, click Sync Workflows > Add sync workflow.
Figure 17: Active Roles – Adding a new synchronization workflow

-
In the Sync workflow name step, name the workflow (for example, SuccessFactors HR to SQL Server), then click OK.
The new workflow then appears in the Sync Workflows tab.
-
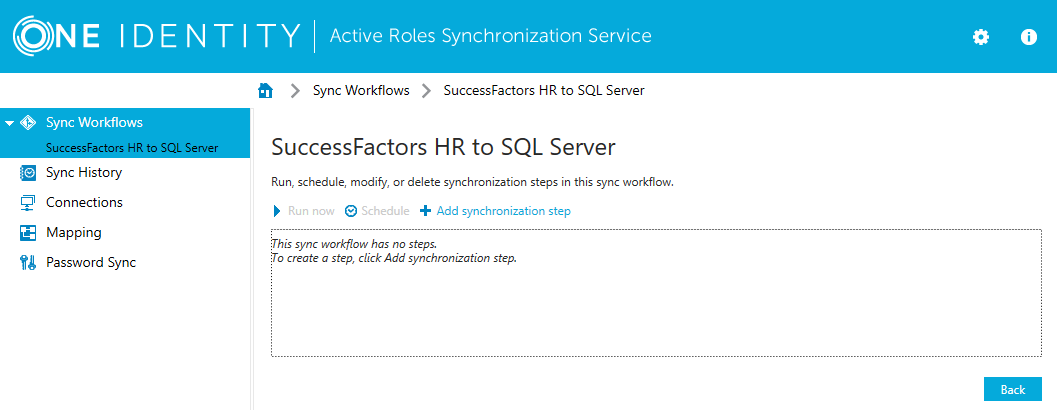
Configure a data synchronization creation step for the workflow. To do so, in Sync Workflows, click the name of the workflow (in this example, SuccessFactors HR to SQL Server), then click Add synchronization step.
Figure 18: Active Roles – Adding a new synchronization step
-
In the Select an action step, select Creation, then click Next.
The Creation step of the workflow will be used to create the synchronized data entries of the SuccessFactors HR database in the target SQL database. The Creation step performs data synchronization only for data entries that do not exist in the target system. Because of this, you typically run this step only once.
-
In the Specify source and criteria step, configure the following settings:
-
Source connected system: Specify the SuccessFactors HR database connection here, created with the Generic SCIM Connector. To do so, click Specify > Select existing connected system, then select the SCIM-based connection (in this example, SCIM Connection to SuccessFactors HR).
-
Source object type: Specify the source object type here (in this example, the Employees object type). To do so, click Select, then in the Select Object Type window, select Employees, and click OK.
TIP: If the data entry is hard to find due to the length of the list, use the Filter by name field to find it quicker.
-
(Optional) Creation Criteria: Specify additional conditions that the specified source object(s) must meet for synchronization in this workflow step. This setting is not used in this example.
-
In the Specify target step, configure the following settings:
-
Target connected system: Specify the SQL server connection here, created with the Microsoft SQL Server Connector. To do so, click Specify > Select existing connected system, then select the SQL server connection (in this example, SQL Connection).
-
Target object type: Specify the target object type here. By default, when selecting an SQL server connection in Target connected system, Active Roles sets this setting to sql-Object, the object type used in this example.
-
In the Specify creation rules step, configure the logic (called forward synchronization rules) that Active Roles will use to perform first-time synchronization and copy data entries from the SuccessFactors HR database over to the target SQL database.
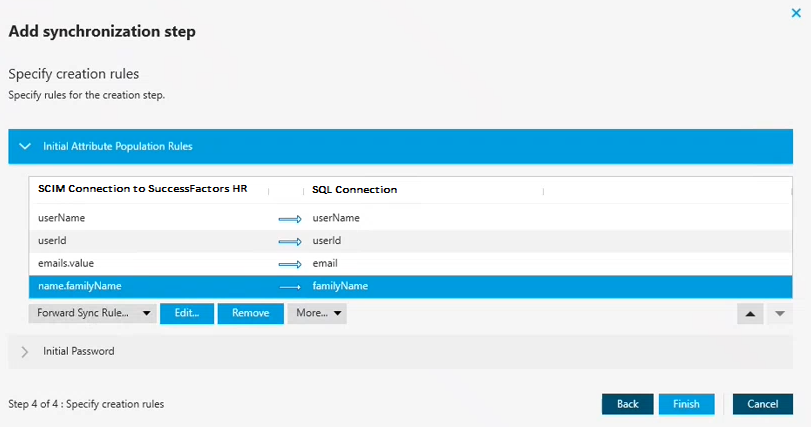
To do so, specify one or more unique attributes that Active Roles can use to link the corresponding data entries in the connected SuccessFactors HR and SQL data systems. In this example, four such SuccessFactors HR attributes are specified: userName, userId, emails.value and name.familyName.
To specify these creation rules:
-
Click Forward Sync Rule.
-
Click Source item > Attribute, and in the Select Object Attribute window, search for the user name attribute in the SuccessFactors HR database (for example, userName), then click OK.
TIP: If the data entry is hard to find due to the length of the list, use the Filter by name field to find it quicker.
-
Click Target item > Attribute, and search for the applicable user name attribute pair in the SQL database (for example, userName), then click OK.
TIP: If the data entry is hard to find due to the length of the list, use the Filter by name field to find it quicker.
Figure 19: Active Roles – Mapping attributes for a forward synchronization rule

-
To apply the forward synchronization rule created for the specified user name attributes, click OK.
-
To configure synchronization rules for the userId, emails.value and name.familyName SuccessFactors HR data entries too, click Forward Sync Rule again, and repeat the previous sub-steps by selecting the source and target attributes applicable to these data entries.
-
Once all forward synchronization rules are configured, to finish configuring the Creation step, click Finish.
Figure 20: Active Roles – Finalizing all forward synchronization rules
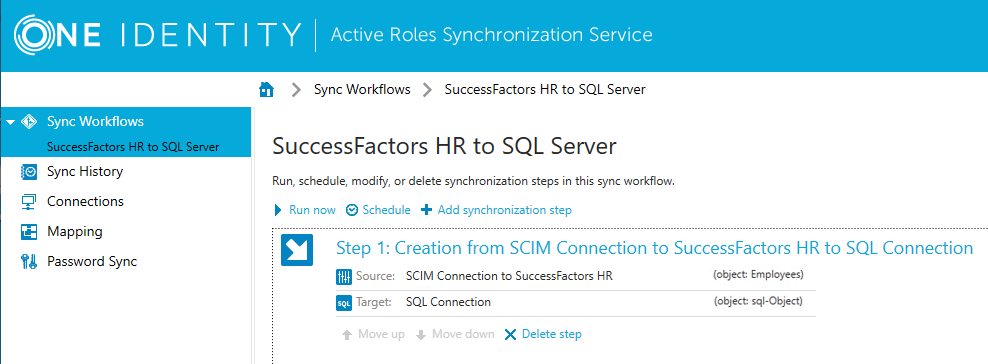
This creates the Creation step as the first step of the synchronization workflow.
Figure 21: Active Roles – Step 1 created for the SuccessFactors HR / SQL server workflow
-
Now that the Creation step of the workflow is configured, configure the Update step. To do so, click Add synchronization step again.
The Update step of the workflow will be used to update existing data entries mapped between the SuccessFactors HR database and the target SQL database. The Update step performs data synchronization only for existing data entries: it does not create new ones. Because of this, you typically run this step after running the Creation step, and run only the Update step later once the data entries have been created with the Creation step.
-
In the Select an action step, select Update, then click Next.
-
In the Specify source and criteria step, configure the following settings:
-
Source connected system: Specify the SuccessFactors HR database connection here, created with the Generic SCIM Connector. To do so, click Specify > Select existing connected system, then select the SCIM-based connection (in this example, SCIM Connection to SuccessFactors HR).
-
Source object type: Specify the source object type here (in this example, the Employees object type). To do so, click Select, then in the Select Object Type window, select Employees, and click OK.
TIP: If the data entry is hard to find due to the length of the list, use the Filter by name field to find it quicker.
-
(Optional) Creation Criteria: Specify additional conditions that the specified source object(s) must meet for synchronization in this workflow step. This setting is not used in this example.
-
In the Specify target step, configure the following settings:
-
Target connected system: Specify the SQL server connection here, created with the Microsoft SQL Server Connector. To do so, click Specify > Select existing connected system, then select the SQL server connection (in this example, SQL Connection).
-
Target object type: Specify the target object type here. By default, when selecting an SQL server connection in Target connected system, Active Roles sets this setting to sql-Object, the object type used in this example.
-
In the Specify update rules step, configure the forward synchronization rules that Active Roles will use to update existing data entries in the target SQL database from the SuccessFactors HR database. In this example, four such attributes are specified: userName, userId, SuccessFactors HR ID (displayed as sfid) and metadata information (displayed as meta).
To specify these creation rules:
-
Click Forward Sync Rule.
-
Click Source item > Attribute, and in the Select Object Attribute window, search for the user name attribute in the SuccessFactors HR database (for example, userName), then click OK.
TIP: If the data entry is hard to find due to the length of the list, use the Filter by name field to find it quicker.
-
Click Target item > Attribute, and search for the applicable user name attribute pair in the SQL database (for example, userName), then click OK.
TIP: If the data entry is hard to find due to the length of the list, use the Filter by name field to find it quicker.
-
To apply the forward synchronization rule created for the specified user name attributes, click OK.
-
To configure synchronization rules for the user ID, sfid and meta data entries too, click Forward Sync Rule again, and repeat the previous sub-steps by selecting the source and target attributes applicable to these data entries.
-
Once all forward synchronization rules are configured, to finish configuring the Update step, click Finish. The configured workflow will appear, containing both steps.
-
Start the workflow by clicking Run workflow. For the first-time run, select only Step 1 (Creation from SCIM Connection to SuccessFactors HR to SQL Connection), then select the running method:
-
Full Run fetches all data entries specified in the workflow steps directly from the source system. As such, One Identity recommends using this method when running the workflow the first time, even if the process takes longer than a Quick Run.
-
Quick Run uses cached data whenever possible, and is normally faster.
The run may take several minutes to complete.
Figure 22: Active Roles – Running a configured synchronization workflow for the first time
-
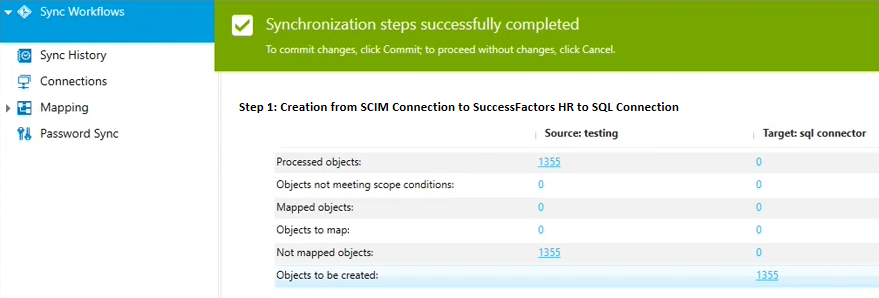
Once Active Roles found all mapped objects, apply the synchronization changes by clicking Commit.
Alternatively, to check detailed information about the processed objects, click the Processed objects number. The Objects processed in window then opens, listing all new data objects that Active Roles will synchronize to the target SQL database.
Synchronizing complex multi-value objects from a SCIM source system
Data synchronization workflows that import data with a connection based on the Generic SCIM Connector can import all three types of SCIM 2.0-based data entries:
-
Simple attributes, that is, data entries with a single simple value. For example, a user ID specified in a single string is a simple attribute.
-
Complex single-value attributes, that is, data entries specified with several sub-attributes. For example, the following name attribute is a complex single-value attribute, specifying the name of an employee with three simple sub-attributes:
"name": {
	"givenName": "Sam",
	"familyName": "Smith",
	"formatted": "Sam Smith"
	 },
The value of complex single-value attributes is the sum of the sub-attribute values.
-
Complex multi-value attributes, that is, data entries with multiple complex values, each of them specified with several simple sub-attributes. For example, the following addresses attribute is a complex multi-value attribute, specifying several addresses, each of them being a complex value containing several simple sub-attributes:
"addresses": [
	{
		"type": "work",
		"streetAddress": "22 Example Street",
		"region": "Springfield",
		"postalCode": "51487",
		"country": "United States",
		"primary": true
	},
	{
		"type": "home",
		"streetAddress": "12 Rue Exemple",
		"region": "Montreal",
		"postalCode": "46179",
		"country": "Canada"
	}
],
However, even though synchronization workflows using connections set with the Generic SCIM Connector can import all three of these value types, Active Roles does not recognize complex single-value attributes and complex multi-value attributes, as they contain more values than what Active Roles can identify for a single data entry by default.
To import complex single-value and multi-value attributes successfully, you can use the following methods:
-
For complex single-value attributes, you can map each individual sub-attribute of the complex single-value attribute to separate attributes in the target system. For example, in case of the name complex single-value attribute, you can map the givenName, familyName and formatted sub-attributes to separate name.givenName, name.familyName, and name.formatted attributes in the target system, respectively.
-
For complex multi-value attributes, you can use two methods:
-
When importing complex multi-value attributes, Active Roles can take a single value (and its sub-attributes), map the sub-attributes to a set of target values (similarly to complex single-value attributes), then discard the rest of the complex values of the attribute.
By default, Active Roles takes the primary value of the complex multi-value attribute (marked with a specific primary sub-attribute). If no primary value is specified within the complex multi-value attribute, Active Roles imports the first value (and its sub-attributes) only.
NOTE: This method imports only the primary value (or the first value, if no primary value is specified). Active Roles will discard all other values (and their sub-attributes).
-
If you map a complex multi-value attribute (such as the addresses attribute shown in the above example) when configuring a mapping rule for a workflow, you can configure an Active Roles workflow to process and extract every value (and their sub-attributes) of the complex multi-value attribute with script-based attribute mapping.
The following procedure will provide an example on how to apply such a PowerShell script to properly process the addresses complex multi-value attribute shown in this chapter.
To configure a custom PowerShell script for a workflow to import complex multi-value attributes
-
In the Active Roles , click Sync Workflow, then click the synchronization workflow that imports data from a SCIM-based source system (for example, the SuccessFactors HR to SQL Server workflow used in Creating a synchronization workflow for synchronizing data from a SCIM-based Starling Connect connector).
-
Click the first step of the workflow (in the example SuccessFactors HR to SQL Server workflow, this is named Step 1 (Creation from SCIM Connection to SuccessFactors HR to SQL Connection).
-
Under Creation Rules, to open the initial population rules, click Forward Sync Rule.
-
In the Forward Sync Rule window, at the Source item setting, open the Attribute drop-down, and click PowerShell Script.
-
In the PowerShell Script Editor, paste the following script example, and click OK:
$addressesJsonArray = $srcObj["addresses"] | ConvertFrom-Json

if ($addressesJsonArray) {
  for ($i = 0; $i -lt $addressesJsonArray.Length; $i++) {
    if ($addressesJsonArray[$i].type -eq "work") {
      return $addressesJsonArray[$i].streetAddress + ", " + $addressesJsonArray[$i].region + ", " + $addressesJsonArray[$i].locality
	}
  }
}
The example script contains the following key parts:
-
$srcObj refers to the source object that the script will act on.
-
$srcObj["addresses"] extracts the raw value of the addresses attribute. In this example, this attribute is a complex multi-value SCIM attribute, so the attribute value will be a JSON array.
-
$addressesJsonArray is a .NET array object containing the values of the complex multi-value attribute.
The rest of the script performs the following steps:
-
It checks that the array is valid.
-
It traverses the elements of the array, and looks for the first element with a type sub-attribute with a work value.
-
Once it finds an element with a work value type, it constructs a formatted string from the streetAddress, region and locality sub-attributes.
-
It returns the results.
-
Use the output to parse and extract the data into other target values in the target system.


