Replaying encrypted audit trails from the command line
This section describes how to replay an encrypted audit trail using the command line. Use this method if you want to import the private key only temporarily, or if you want to automate the process. To import the required certificates using the graphical interface of Safeguard Desktop Player, see Replaying encrypted audit trails.
Prerequisites
-
To replay encrypted audit trails, the private key of the certificate used to encrypt the audit trail must be available on the host running the Safeguard Desktop Player. On Microsoft Windows, the Safeguard Desktop Player can retrieve this certificate from Windows Certificate Store > Current User > Personal Certificate Store.
-
To validate digitally-signed audit trails, the respective certificates that issued the certificates used to sign the audit trail must be available and valid on the host running the Safeguard Desktop Player. (This is the certificate set at Policies > Audit policies > Enable signing on the SPS interface.) On Microsoft Windows, the Safeguard Desktop Player can validate this certificate from Windows Certificate Store > Local Computer > Trusted Root Certification Authorities.
NOTE: In case of certificate chains, the whole chain must be imported in this Certificate Store.
-
To validate timestamped audit trails, the CA certificate of SPS must be available on the host running the Safeguard Desktop Player. (This is the CA certificate of SPS set at Basic Settings > Management > SSL Certificates > CA X.509 Certificate.) On Microsoft Windows, the Safeguard Desktop Player can retrieve this certificate from Windows Certificate Store > Local Computer > Trusted Root Certification Authorities.
The certificates and the private keys must be available in PEM format, other formats are not supported.
NOTE: On Microsoft Windows, you cannot import CA certificates from a shared drive. In this case, copy the certificate to a local folder and import it from there.
NOTE: Certificates are used as a container and delivery mechanism. For encryption and decryption, only the keys are used.
TIP: One Identity recommends using 2048-bit RSA keys (or stronger).
To replay an encrypted audit trail using the command line
Start a command prompt and navigate to the installation directory of Safeguard Desktop Player.
By default, the installation directories on the different operating systems are the following:
-
On Microsoft Windows platforms: C:\Documents and Settings\<username>\Software\Safeguard\Safeguard Desktop Player\
-
On Linux: ~/SafeguardDesktopPlayer
-
On MacOS: /Applications/Safeguard Desktop Player.app/Contents/Resources/
-
(Optional) If the private key is password-protected, execute the following command:
player --key <path\to\your\private-key.pem>:<password-to-the-private-key>
For example, if the private key file is C:\temp\my-key.pem and its password is secret, the command is player --key C:\temp\my-key.pem:secret
Otherwise, use the following command:
player --key <path\to\your\private-key.pem>
-
(Optional) If the audit trail is timestamped or signed, you must have the proper certificate to validate the audit trail. Include the path to the certificate in the command line when starting the Safeguard Desktop Player:
player --cert <path\to\the\certificate.pem> --key <path\to\your\private-key.pem>:<password-to-the-private-key>
-
Open the encrypted audit trail. Safeguard Desktop Player tries to decrypt it with the private key you provided. If decryption is successful, you can replay the audit trail. Alternatively, you can specify the audit trail to open from the command line, for example:
player --cert <path\to\the\certificate.pem> --key <path\to\your\private-key.pem>:<password-to-the-private-key> <path\to\audit-trail.zat>
Replaying audit files in follow mode
This section describes how to follow active connections in semi-real time.
Prerequisites
To follow active connections, you must be allowed to authorize the sessions of the relevant connection policy. For details on how you can configure that, see Configuring four-eyes authorization in the Administration Guide.
Every time you open an .srs file in Safeguard Desktop Player, you must authenticate yourself to SPS through Safeguard Desktop Player. To access SPS and follow active sessions, you must have:
On Microsoft Windows, the Safeguard Desktop Player retrieves the SSL certificate from Windows Certificate Store > Local Computer > Trusted Root Certification Authorities.
On Linux or MacOS, import the SSL certificate to Safeguard Desktop Player as follows:
-
In SPS, navigate to Basic Settings > Management > SSL certificates.
-
Click the certificate in the CA X.509 certificate field.
-
In the pop-up window that is displayed, click PEM. This will download the the CA's X.509 certificate in PEM format. The certificate must be in PEM format, other formats are not supported.
-
In Safeguard Desktop Player, click  in the top-right. Select Key/Certificate import.
-
Click  , then select the certificate PEM file that you downloaded from SPS.
-
Click Load. The Safeguard Desktop Player displays the details of the certificate.
-
Click Import.
To follow active connections in semi-real time
-
On the web interface of SPS, go to Active Connections, and click  next to the connection you want to monitor in semi-real time.
-
In the Safeguard Desktop Player application, click OPEN, and select the audit trail to replay.
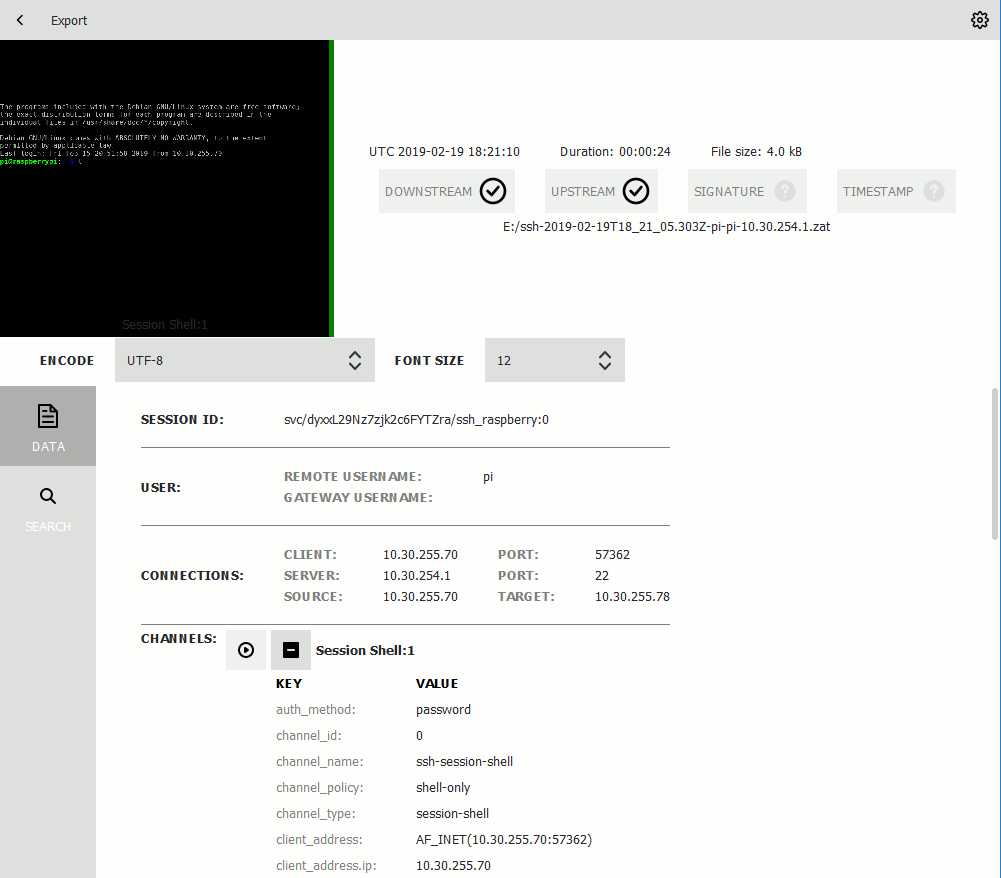
Safeguard Desktop Player displays the sessions stored in the audit trail file.

-
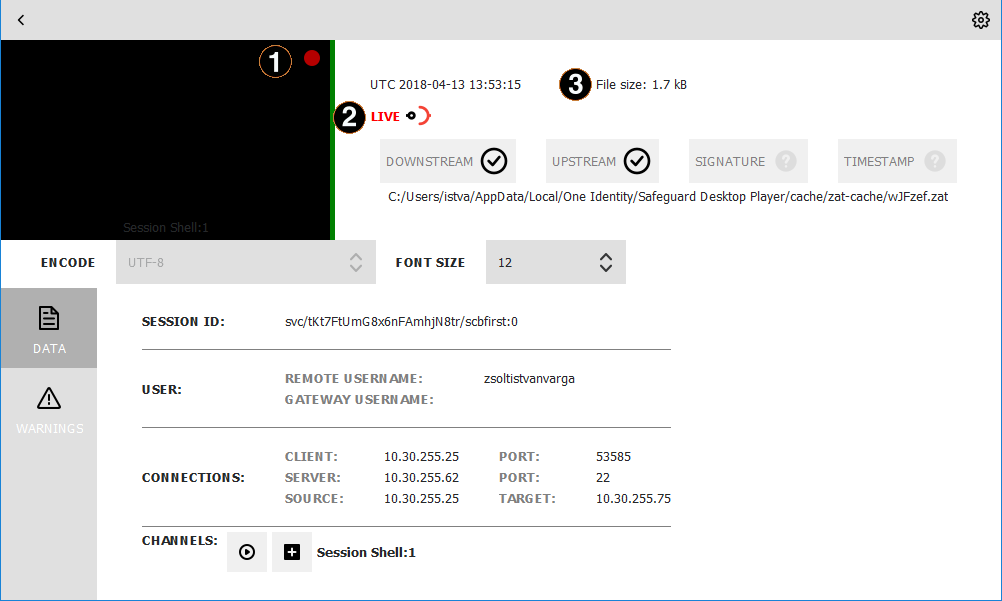
Red blinking light
When the red blinking light is displayed, it indicates an ongoing, active connection. When neither the LIVE label and icon nor the red blinking light are displayed, it indicates that the connection has ended.
-
LIVE status indicator
The indicator shows three different states:
-
 When it is completely red, it indicates that the connection is active and there is some user interaction on the client-side.
-
 When the LIVE label is red but the icon is half red, half black, it indicates that the connection is active but there is no user interaction on the client-side.
-
When neither the LIVE label and icon nor the red blinking light are displayed, it indicates that the connection has ended.
-
File size
It displays the size of the .zat file that is loaded. In the case of an active, live connection, the size continuously increases.
-
Click the thumbnail to start replaying the audit file. Alternatively, click the  icon next to the channel you want to replay.
-
The replay window opens.

-
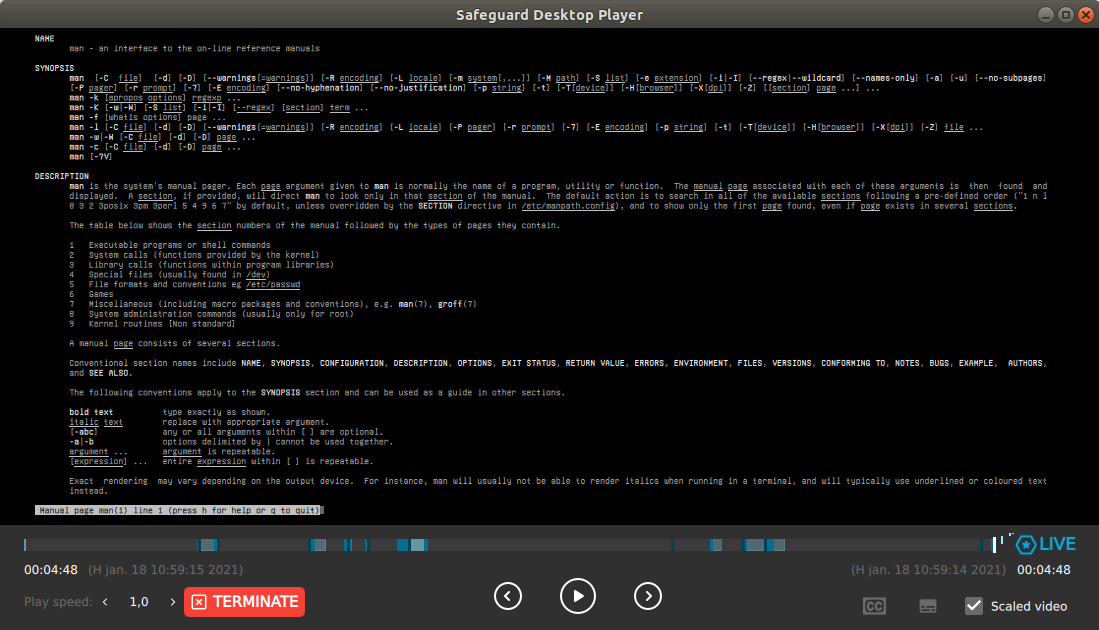
Terminate
Terminate the session that you are monitoring if you notice a user action that poses a security risk.
-
LIVE status indicator
The indicator shows two different states:
-
When the Safeguard logo is animated, it indicates that the connection is active and there is some user interaction on the client-side.
-
When the Safeguard logo is static, it indicates that the connection is active but there is no user interaction on the client-side.
The color of LIVE indicates whether the displayed frame is live (blue) or an earlier frame (gray). If you stopped the playback or rewound it, you can return to the live stream by clicking LIVE.
TIP: If you are replaying terminal-based audit trails, for example, SSH or TELNET, you can change the font size of the displayed text by holding down the Ctrl key and scrolling your mouse wheel.
When the session ends, a  button is displayed. If you click this button, the player reverts to normal replay mode, and you can change the replay speed, and the seeker becomes available again.
Searching in the content of the current audit file
Safeguard Desktop Player allows you to search in the contents of the recorded audit trails, for example, in commands that the user executed in the session, or to find a specific text that was displayed on the screen.
You can also search in the contents of the audit trails for trails of graphical sessions created and indexed with SPS 6.0.
To search in the content of an audit file
-
In the Safeguard Desktop Player application, click OPEN, and select the audit trail to replay. If the audit trail is encrypted, see Replaying encrypted audit trails.
Safeguard Desktop Player displays the sessions stored in the audit trail file.

-
Click SEARCH and enter your search keywords in the Search in content field.
NOTE:Safeguard Desktop Player creates the index of the content when opening the file, and searching is disabled until creating the index is finished. Depending on the length of the audit trail, this can take several minutes.
Safeguard Desktop Player displays the search results and highlights the periods of the audit trail when the search keywords were visible. For details on the search syntax, see Search query examples.
Click  to replay the audit trail. To search while replaying an audit trail, click the magnifying glass icon.
The following sections provide examples for different search queries.
For details on how to use more complex keyphrases that are not covered in this guide, see the Apache Lucene documentation.
Searching for exact matches
By default, One Identity Safeguard for Privileged Sessions (SPS) searches for keywords as whole words and returns only exact matches. Note that if your search keywords include special characters, you must escape them with a backslash (\) character. For details on special characters, see Searching for special characters. The following characters are special characters: + - & | ! ( ) { } [ ] ^ " ~ * ? : \ /
Example: Searching for exact matches
| Search expression |
example |
| Matches |
example |
| Does not match |
examples
example.com
query-by-example
exam |
To search for a string that includes a backslash characters, for example, a Windows path, use two backslashes (\\).
| Search expression |
C\:\\Windows |
| Matches |
C:\Windows |
Combining search keywords
You can use boolean operators – AND, OR, NOT, and + (required), – to combine search keywords. More complex search expressions can also be constructed with parentheses. If you enter multiple keywords,
Example: Combining keywords in search
| Search expression |
keyword1 AND keyword2 |
| Matches |
(returns hits that contain both keywords) |
| Search expression |
keyword1 OR keyword2 |
| Matches |
(returns hits that contain at least one of the keywords) |
| Search expression |
keyword1 NOT keyword2 |
| Matches |
(returns hits that contain the first phrase, but not the second) |
| Search expression |
+keyword1 keyword2 |
| Matches |
(returns hits that contain keyword1, and may contain keyword2) |
To search for expressions that can be interpreted as boolean operators (for example: AND), use the following format: "AND".
Example: Using parentheses in search
Use parentheses to create more complex search expressions:
| Search expression |
(keyword1 OR keyword2) AND keyword3 |
| Matches |
(returns hits that contain either keyword1 and keyword3, or keyword2 and keyword3) |
Using wildcard searches
You can use the ? and * wildcards in your search expressions.
Example: Using wildcard ? in search
The ? (question mark) wildcard means exactly one arbitrary character. Note that it does not work for finding non-UTF-8 or multibyte characters. If you want to search for these characters, the expression ?? might work, or you can use the * wildcard instead.
You cannot use a * or ? symbol as the first character of a search.
| Search expression |
example? |
| Matches |
example1
examples
example? |
| Does not match |
example.com
example12
query-by-example |
| Search expression |
example?? |
| Matches |
example12 |
| Does not match |
example.com
example1
query-by-example |
Example: Using wildcard * in search
The * wildcard means 0 or more arbitrary characters. It finds non-UTF-8 and multibyte characters as well.
| Search expression |
example* |
| Matches |
example
examples
example.com |
| Does not match |
query-by-example
example* |
Example: Using combined wildcards in search
Wildcard characters can be combined.
| Search expression |
ex?mple* |
| Matches |
example1
examples
example.com
exemple.com
example12 |
| Does not match |
exmples
query-by-example |
Searching for special characters
To search for the special characters, for example, question mark (?), asterisk (*), backslash (\) or whitespace ( ) characters, you must prefix these characters with a backslash (\). Any character after a backslash is handled as character to be searched for. The following characters are special characters: + - & | ! ( ) { } [ ] ^ " ~ * ? : \ /
Example: Searching for special characters
To search for a special character, use a backslash (\).
| Search expression |
example\? |
| Matches |
example? |
| Does not match |
examples
example1 |
To search for a string that includes a backslash characters, for example, a Windows path, use two backslashes (\\).
| Search expression |
C\:\\Windows |
| Matches |
C:\Windows |
To search for a string that includes a slash character, for example, a UNIX path, you must escape the every slash with a backslash (\/).
| Search expression |
\/var\/log\/messages |
| Matches |
/var/log/messages |
| Search expression |
\(1\+1\)\:2 |
| Matches |
(1+1):2 |
Searching in commands and window titles
For terminal connections, use the command: prefix to search only in the commands (excluding screen content). For graphical connections, use the title: prefix to search only in the window titles (excluding screen content). To exclude search results that are commands or window titles, use the following format: keyword AND NOT title:[* TO *].
You can also combine these search queries with other expressions and wildcards, for example, title:properties AND gateway.
Example: Searching in commands and window titles
| Search expression |
command:sudo su |
| Matches |
sudo su as a terminal command |
| Does not match |
sudo su in general screen content |
| Search expression |
title:settings |
| Matches |
settings appearing in the title of an active window |
| Does not match |
settings in general screen content |
To find an expression in the screen content and exclude search results from the commands or window titles, see the following example.
| Search expression |
properties AND NOT title:[* TO *] |
| Matches |
properties appearing in the screen content, but not as a window title. |
| Does not match |
properties in window titles. |
You can also combine these search filters with other expressions and wildcards.
| Search expression |
title:properties AND gateway |
| Matches |
A screen where properties appears in the window title, and gateway in the screen content (or as part of the window title). |
| Does not match |
Screens where both properties and gateway appear, but properties is not in the window title. |
Searching for fuzzy matches
Fuzzy search uses the tilde ~ symbol at the end of a single keyword to find hits that contain words with similar spelling to the keyword.
Example: Searching for fuzzy matches
| Search expression |
roam~ |
| Matches |
roams
foam |
Proximity search
Proximity search uses the tilde ~ symbol at the end of a phrase to find keywords from the phrase that are within the specified distance from each other.
Example: Proximity search
| Search expression |
keyword1 keyword2 ~10 |
| Matches |
(returns hits that contain keyword1 and keyword2 within 10 words from each other) |
Adjusting the relevance of search terms
By default, every keyword or phrase of a search expression is treated as equal. Use the caret ^ symbol to make a keyword or expression more important than the others.
Example: Adjusting the relevance of search terms
| Search expression |
keyword1^4 keyword2 |
| Matches |
(returns hits that contain keyword1 and keyword2, but keyword1 is 4-times more relevant) |
| Search expression |
keyword1^5 keyword2 |
| Matches |
(returns hits that contain keyword1 and keyword2, but keyword1 is 5-times more relevant) |

 in the top-right. Select Key/Certificate import.
 , then select the certificate PEM file that you downloaded from SPS.
 next to the connection you want to monitor in semi-real time.
 When it is completely red, it indicates that the connection is active and there is some user interaction on the client-side.
 When the LIVE label is red but the icon is half red, half black, it indicates that the connection is active but there is no user interaction on the client-side.
 icon next to the channel you want to replay.
 button is displayed. If you click this button, the player reverts to normal replay mode, and you can change the replay speed, and the seeker becomes available again.