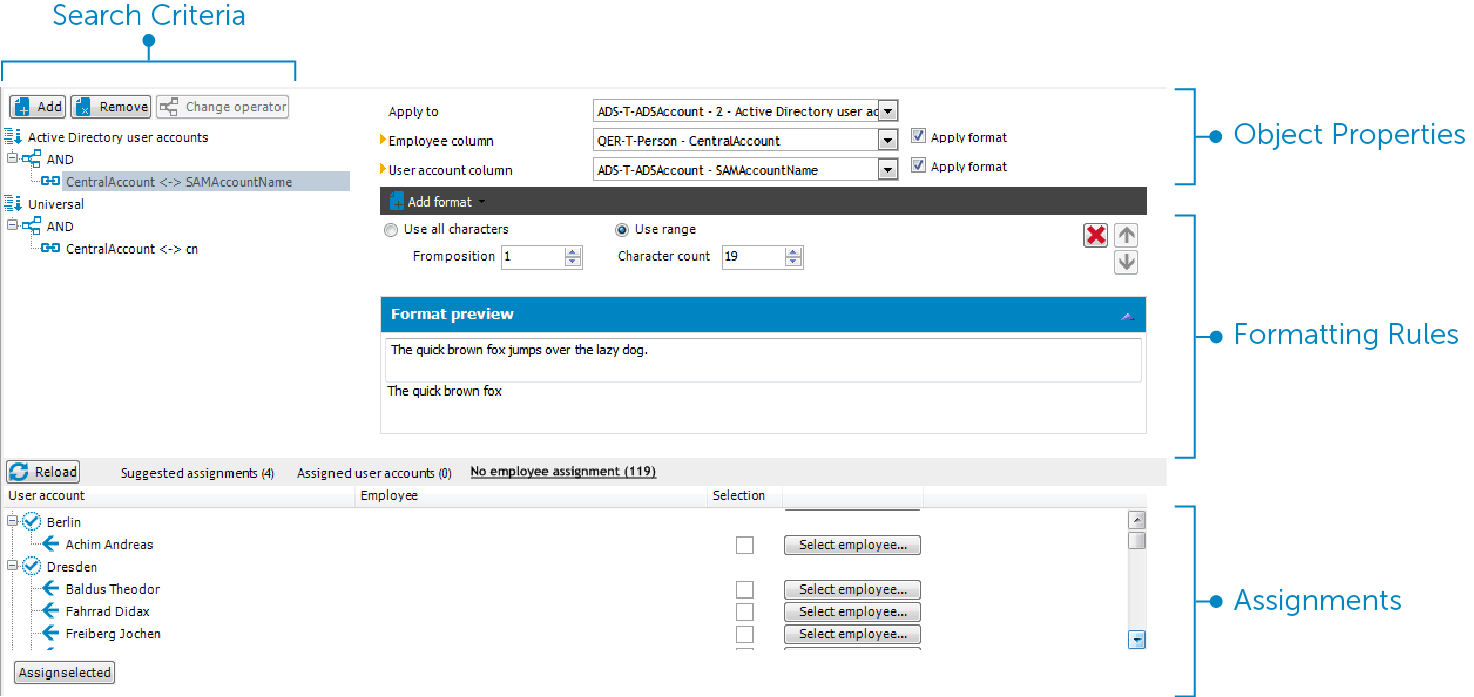
Figure 5: Search criteria for employee assignment
NOTE: One Identity Manager supplies a default mapping for employee assignment. Only carry out the following steps when you want to customize the default mapping.
To define search criteria for employee assignment
-
In the Manager, select the Target system type > <target system> category.
-
Select the target system in the result list and run the Define search criteria for employee assignment task.
-
Select the object definition for the mapping.
NOTE: Object definitions for user accounts that can have search criteria applied to them are predefined. For example, if you require other objects definitions that limit a preselection of user accounts, set up the respective custom object definitions in the Designer. For more information, see the One Identity Manager Configuration Guide.
-
To add a new object definition, click Add > Criteria. Use the Apply to menu item to select the object definition that the search criteria was defined for.
The search criteria is applied to all user accounts if no object definition is selected.
-
To change the object definition of an existing search criterion, select the search criterion in the Search criteria view. Use the Apply to menu item to select the object definition that the search criteria was defined for.
If the existing selection is deleted, the search criterion is applied to all user accounts.
-
Select the object properties to map.
-
Column for employee: Select the column in the Employee table on which the search is carried out.
-
Column for user account: Select the column in the user account table that supplies the value for searching for a person.
-
Define the formatting rule to limit the search criteria.
In the Add format menu, select a format template. Define the formatting rule to apply to the search string. You can combine different format templates.
Table 4: Format templates
|
Character range |
Characters in the character string to be used as the search criterion. |
|
Crop to fixed length |
Defines the length of the character string to search for. Use fill characters at the beginning or end of the string to ensure it reaches the fixed length. |
|
Remove leading or trailing characters |
Characters that are to be removed at the start or end of the character string. The remaining string forms the search criteria. |
|
Split value |
Characters for which the character string should be split and for which the remaining parts should be used as a search criterion. |
-
Test the format rules.
In the Format preview view, enter a character string to which the formatting is applied. Use this to test the effects of your search criteria formatting.
-
Apply the formatting rules.
Enable Use format on the columns on which to limit the search criteria.
- Save the changes.
Different object properties can be joined for search criteria. Both AND and OR operators can be used.
Example: AND operator
To assign employees to Notes user accounts, the surname as well as first name must be the same for the employee and the user account. The following table columns are mapped:
AND
Person.Firstname – NotesUser.Firstname
Person.LastName – NotesUser.LastName
Example: OR operator
To assign employees to Active Directory user accounts, either the employee's central user account and the user account's login name must be identical or the employee's full name and the user account's display name. The following table columns are mapped:
OR
Person.CentralAccount – ADSAccount.SAMAccountName
Person.InternalName – ADSAccount.DisplayName
To link object properties in search criteria
-
In the Search criteria view, select the operator to which you want to add another object property. Click Change operator to select the operator for the link.
-
Click Add > Criteria.
-
Select the object properties to map.
-
Select the object properties to be mapped.
-
If you want to nest links, click Add > AND operator or Add > OR operator and rerun steps 2 to 4.
- Save the changes.
To delete search criteria
-
Mark the search criteria and click Delete.
- Save the changes.
Related topics
Based on the search criteria, you can create a suggestion list for the assignment of employees to user accounts and make the assignment directly. User accounts are grouped in different views for this.
Table 5: Manual assignment view
|
Suggested assignments |
This view lists all user accounts to which One Identity Manager can assign an employee. All employees are shown who were found using the search criteria and can be assigned. |
|
Assigned user accounts |
This view lists all user accounts to which an employee is assigned. |
|
Without employee assignment |
This view lists all user accounts to which no employee is assigned and for which no employee was found using the search criteria. |
To apply search criteria to user accounts
-
At the bottom of the Define search criteria for employee assignment form, click Reload.
All possible assignments based on the search criteria are found in the target system for all user accounts. The three views are updated.
TIP: By double-clicking on an entry in the view, you can view the user account and employee main data.
The assignment of employees to user accounts creates connected user accounts (Linked state). To create managed user accounts (Linked configured state), you can assign an account definition at the same time.
To assign employees directly over a suggestion list
To remove assignments
Automatic employee assignments are controlled through scripts. In SEARCH mode, these scripts assign existing employees to the user accounts based on the defined search criteria. The scripts for CREATE mode also define the properties that are initialized when a new person is generated. These scripts are implemented in a default One Identity Manager installation for each target system type. The name of this script is:
<target system type>_PersonAuto_Mapping_<account type>
where:
<target system type> = short name of the addressed target system type
<account type> = Table containing the user accounts
TIP: You can customize scripts to extend search criteria for automatic employee assignment or the properties of new employees. The scripts can be overwritten. To do this, create a copy of the existing script and customize the copy.
In automatic employee assignment in CREATE mode, some properties of the user account are transferred to the new employee object. Initializing the employee properties is done using "VI_PersonAuto_<target system>". Initializing the properties when an employee is being created for a user account is done by evaluating the entry in the table DialogNotification. In this table the connected properties are mapped as a bidirectional pair through the formatting rules. Evaluation of entries in DialogNotification are exemplified in the following by showing initialization of an employee’s surname:
Example:
The last name of an Active Directory user account is made up of the surname of the employee.
Value template for ADSAccount.Surname:
Value = $FK(UID_Person).Lastname$
If the employee’s surname changes, the last name of the Active Directory Jo User1anges, too. The column Person.Lastname is therefore the sender and the column ADSAccount.Surname is the receiver.
Relationship as in the table Dialognotification:
Person.Lastname -- > ADSAccount.Surname
The table DialogNotification can be used to help with the initialization of the properties for a new employee in that the relationships can be removed in reverse. The surname of an employee can be replaced with the surname of the Active Directory user. Thus, certain presets for the employee object can be automatically generated. However, only explicit relationships can be removed.
Example:
The display name of an Active Directory user account should be made up of the surname and the first name of an employee.
Relationships as in the table DialogNotification:
Person.Lastname -- > ADSAccount.Displayname
Person.Firstname -- > ADSAccount.Displayname
The Person.Firstname and Person.Lastname cannot be determined from the ADSAccount.Displayname, since this is a compound value.
You can use the script TSB_PersonAuto_GetPropMappings to make it easier to map employee properties to user account properties. This script evaluates the relationship of the properties as used in the table DialogNotification. The script creates a VB.Net script code and the possible assignments, when it is run by the System Debugger. This code can subsequently be inserted into the script <target system type>_PersonAuto_Mapping_<account type>.
Example: Generated TSB_PersonAuto_GetPropMappings script
' PROPERTY MAPPINGS ADSAccount - Person
' ADSAccount.Initials -- > Person.Initials
' ADSAccount.Locality-- > Person.City
...
Try
myPers.PutValue("Initials", myAcc.GetValue("Initials").String)
Catch ex As Exception
End Try
Try
myPers.PutValue("City", myAcc.GetValue("Locality").String)
Catch ex As Exception
End Try
...
How employees are handled, particularly in the case of permanent or partial withdrawal of an employee, varies between individual companies. There are companies that never delete employees, and only deactivate them when they leave the company. Other firms delete the employee, but only after they have ensured that all the user accounts are removed.
How employees are handled when they are deactivated or deleted depends on the type of user account management. The following scenarios apply:
-
User accounts are linked to employees and managed through account definitions.
-
User accounts are linked to employees. No account definition is applied.
The following methods are available in the One Identity Manager standard version:
