By default, the data to be replicated is divided into segments by a segment size (100 KB). Data can also be divided into segments according to a specified segment number.
You can also change the name of the storage container (by default, PMReplication) and the location for storing this container (by default, the Users container of a managed application directory partition), and the names of user accounts used to store data segments.
You can change replication settings by modifying the QPM.Service.Host.exe.config file located in the <Password Manager installation folder>\Service folder.
|

|
Caution: Editing the configuration file may cause serious problems. It is recommended to back up the file before modifying it. Edit the QPM.Service.Host.exe.config file at your own risk. |
To change replication settings
- On the computer where Password Manager is installed, open the QPM.Service.Host.exe.config file located in the <Password Manager installation folder>\Service folder with a text editor.
- In the replication node, specify the following:
- To divide the configuration data into segments by a segment size, set the packetLimitMode to LimitSize (packetLimitMode="LimitSize").
- To divide the configuration data into segments by a number of segments, set the packetLimitMode to LimitCount (packetLimitMode="LimitCount").
- If you set the packetLimitMode to LimitSize, specify the maximum segment size in bytes in the maxPacketSize parameter. For example, maxPacketSize="100000". Set the maxPacketsCount parameter to zero (maxPacketsCount="0").
- If you set the packetLimitMode to LimitCount, specify the maximum number of segments to be created in the maxPacketsCount parameter. For example, maxPacketCount="10". Note, that this value must be greater than 1. Set the maxPacketsSize parameter to zero (maxPacketsSize="0").
- In the storageManager node, specify the following:
- To change the name of the storage container, in the storageContainerReplicationPath element specify the required name. The default value is CN=PMReplication.
- To change the container for storing replication data, in the storageContainerPath element specify the required container. The default value is CN=Users.
- To change the names of user accounts used to store data segments, in the storageContainerPartName element specify the required name. The default value is strg.
- Save the QPM.Service.Host.exe.config file.
- Restart the Password Manager Service in the Services console. Type services.msc at a command prompt, select Password Manager for AD LDS Service in the console, and click Restart.
- Repeat steps 1-4 on each instance belonging to a Password Manager realm.
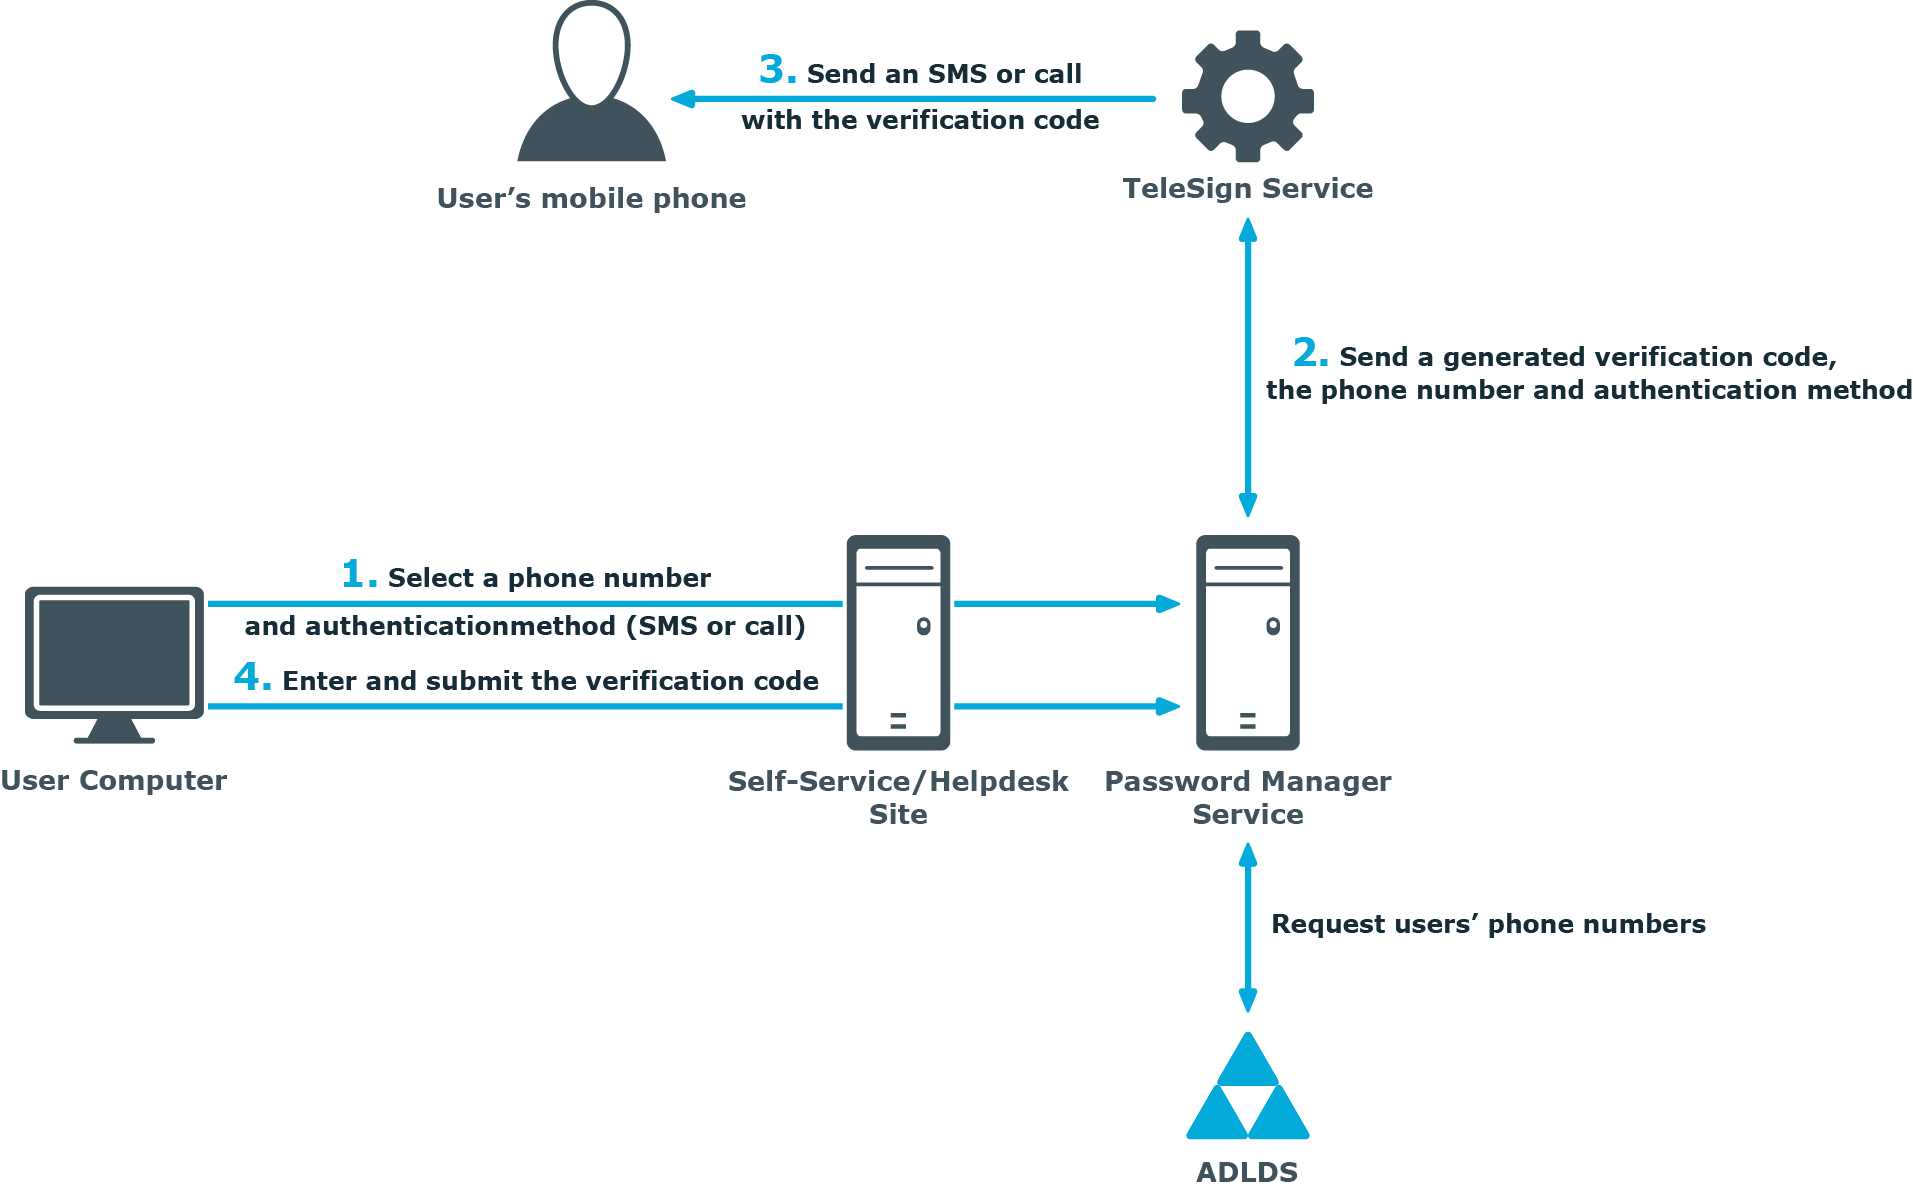
One of the authentication options offered by Password Manager is a phone-based authentication. It enables you to require users to enter a verification code on the Self-Service or Helpdesk site. The verification code can be sent as an SMS or automated call. The phone-based authentication service is by provided by TeleSign.
When starting a workflow containing phone-based authentication, Password Manager checks whether the phone-based authentication service is enabled in the provided license. The workflow is executed only if this service is enabled in the license.
- On the Self-Service or Helpdesk site, a user selects their preferred phone number and verification method (SMS or automated call). This data is sent to Password Manager Service. Password Manager Service gets the phone numbers from the AD LDS attributes specified in the workflow settings.
- Password Manager Service generates a verification code and transfers the code, selected phone number and verification method to TeleSign Service. HTTPS is used to send the data. The generated verification code is stored until the workflow is ended. Only one code is stored at a time.
- TeleSign Service sends an automated call or SMS to the user’s mobile phone with the verification code. The language of the automated call depends on the user interface language of the Self-Service or Helpdesk site.
- The user enters the verification code on the Self-Service site, then the code is sent to Password Manager Service.
- Password Manager Service checks the verification code, if it is correct, the user is granted access to further steps on the Self-Service site.
To use phone-based authentication on the Self-Service and Helpdesk sites, add the Authenticate via Phone activity in self-service and helpdesk workflows. When configuring this activity, you can specify AD LDS attributes from which phone numbers can be retrieved, and available authentication methods, i.e. SMS or automated voice call.
Phone numbers that belong to Private Branch Exchange (PBX) are also supported. PBX phones require either a live switchboard operator or an automated attendant to complete the call. By default, Password Manager supports automated attendant scenario. It can be configured for live operators by changing PhoneNumberExtensionType parameter in QPM.Service.Host.exe.config file. For automated attendants, set PhoneNumberExtensionType to 1 and for live operators, set PhoneNumberExtensionType to 2.
For PhoneNumberExtensionType set to 1 (DTMF digits are dialed), include commas in the PhoneNumberExtensionTemplate, where each comma represents one second pause in the dialing sequence. To increase the pause in the dialing sequence, add the required number of commas in PhoneNumberExtensionTemplate in the configuration file.
|

|
NOTE: The phone number extension must be configured with extension separator in the Active Directory. Phone number with extension must have 'x' or 'X' in it to separate the extension number from the phone number as given in the following examples:
- +91-98881234567 Extension 1234
- +91-98881234567 Ext 1234
- +91-98881234567 Extn 1234
- +91-98861234567 x 1234
- +91-98861234567 Ex 1234
|
For more information on configuring this activity, see Authenticate via Phone.
