
Step 1: Configure ServiceNow
In this step, you need to configure your ServiceNow instance to make it accessible to Quick Connect.
To configure ServiceNow
- Open the Web site of your ServiceNow instance.
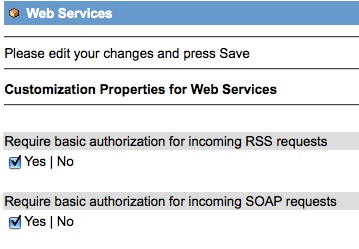
- In the left pane of the ServiceNow Web site, under System Properties, click Web Services.
- Make sure ServiceNow requires basic authorization for incoming RSS and SOAP requests, as shown on the screenshot below:
Figure 1:
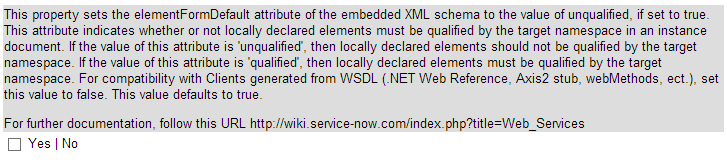
- In the right pane, make sure you clear the following check box:
Figure 2:
- Click the Save button.
Step 2: Create a new connection to ServiceNow
To create a new connection
- In the Quick Connect Administration Console, open the Connections tab.
- Click Add connection, and then use the following options:
- Connection name. Type a descriptive name for the connection.
- Use the specified connector. Select ServiceNow Connector.
- Click Next.
- On the Specify connection settings page, use the following options:
- ServiceNow instance name. Type the name of the ServiceNow instance to which you want to connect.
- Access ServiceNow instance using. Type the user name and password of the account with which you want to access the specified ServiceNow instance.
- Use a proxy server for your LAN. Select this check box if your LAN uses a proxy server. Then enter the proxy server address in the Proxy server box.
- Use credentials for proxy. Select this check box if your proxy server requires authentication. Use the appropriate text boxes to specify the user name and password with which you want to authenticate.
- Test Connection. Click this button to verify the specified connection settings.
- Click Finish to create a connection to ServiceNow.
- Synchronize the ServiceNow Connector schema with that of the connected ServiceNow instance.
This step is required to pass information about object classes and attributes existing in the connected ServiceNow instance to the ServiceNow Connector, so that the connector could correctly read and write data in the connected ServiceNow instance.
To synchronize the connector schema, do the following:
- Below the ServiceNow connection you have just created, click the Connection settings link.
- On the Connection Settings tab, click the Update connector schema item to expand it.
- Click the Update Schema button.
Modifying a ServiceNow connection
To modify connection settings
- In the Quick Connect Administration Console, open the Connections tab.
- Click Connection settings below the existing ServiceNow connection you want to modify.
- On the Connection Settings tab, click to expand the following items and use the options they provide:
Specify connection settings item:
- ServiceNow instance name. Type the name of the ServiceNow instance to which you want to connect.
- Access ServiceNow instance using. Type the user name and password of the account with which you want to access the specified ServiceNow instance.
- Use a proxy server for your LAN. Select this check box if your LAN uses a proxy server. Then enter the proxy server address in the Proxy server box.
- Use credentials for proxy. Select this check box if your proxy server requires authentication. Use the appropriate text boxes to specify the user name and password with which you want to authenticate.
- Test Connection. Click this button to verify the specified connection settings.
Update connector schema item:
- Update Schema. Synchronizes the ServiceNow Connector schema with changes in the connected ServiceNow instance. Use this button whenever schema changes occur in the connected ServiceNow instance (for example, object classes or attributes are added or deleted in the ServiceNow instance). In order the ServiceNow Connector could correctly read and write data in the ServiceNow instance, the connector schema must be completely in sync with that of the ServiceNow instance.
- When you are finished, click Save.
ServiceNow data supported out of the box
The ServiceNow Connector supports all object classes and attributes existing in the connected ServiceNow instance, provided that the ServiceNow Connector schema and the ServiceNow instance schema are completely in sync.
To synchronize the ServiceNow Connector schema with the connected ServiceNow instance schema, use the Update Connector Schema button in the ServiceNow connection settings. For more information, see Modifying a ServiceNow connection.