
Delegation configuration in different systems
Depending on the functional level of your domain, there are various delegation options which may be available and presented to you for configuration.
Windows Server 2003 and Windows Server 2008 delegation
Before you can configure delegation options for these domain functional levels, you must have set up at least one SPN mapping in the account. Option choices for delegation configuration are not available in the Windows interface until a mapping has been set.
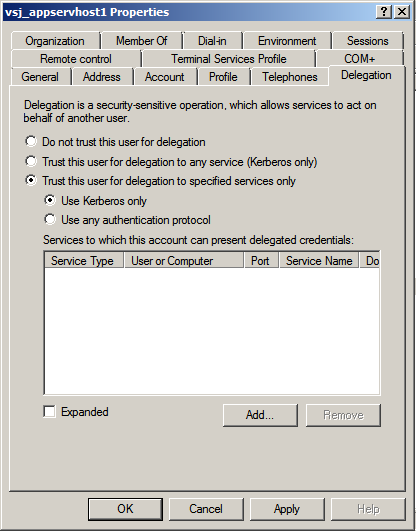
Delegation options are configured from the separate Delegation tab in the Properties pane for the service account. Options here include:
- Delegation Disallowed (Do not trust this user for delegation): Single Sign-on for Java is not to be trusted for delegation at all. If you select this option, any existing (separate) delegation setting is toggled off.
- Delegation Allowed for all services (Trust this user for delegation to any service (Kerberos only)): The Unconstrained delegation option for Kerberos operations, using a TGT.
- Delegation to specified services only (Trust this user for delegation to specified services only): Constrained delegation (S4U2Proxy) option involving service tickets.
The Constrained delegation choice has further configuration sub-options to either permit the Protocol transition (S4U2Self) extension (Use any authentication protocol), or exclude it (Use Kerberos only).
Figure 8: Configuration options in Delegation tab
The Constrained delegation option requires further action: to select all the Active-Directory services and computers to which the service account is permitted to delegate. To start this process, click the Add button. An Add Services window opens, holding a list box for Available Services. Above that, a Users and Computers choice leads to a further search and selection window (Select Users or Computers).
Figure 9: Finding and adding services for delegation
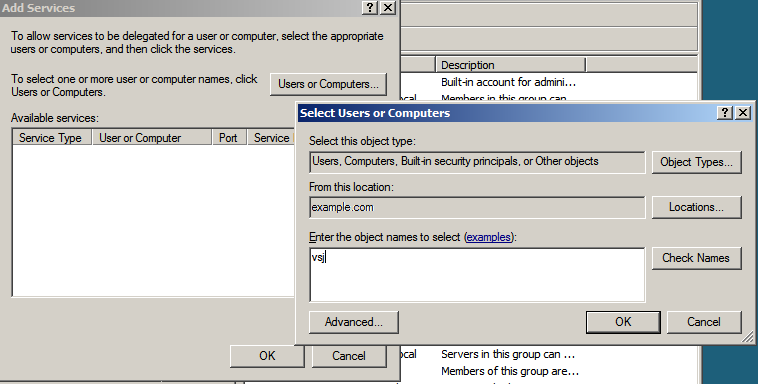
The search panel Check Names button permits a “begins with...” type of name searching, while an Advanced button opens a sub-panel with more complex facilities for pattern search options.
Figure 10: Nominating a host with services to delegate to
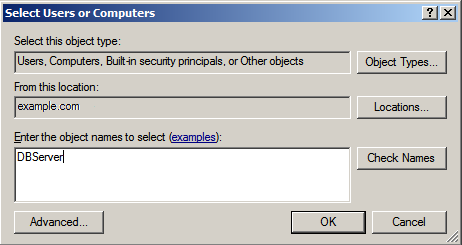
Figure 11: Selecting a service account object for its mapped services
Select an object name in the Select Users or Computers window, and click OK.
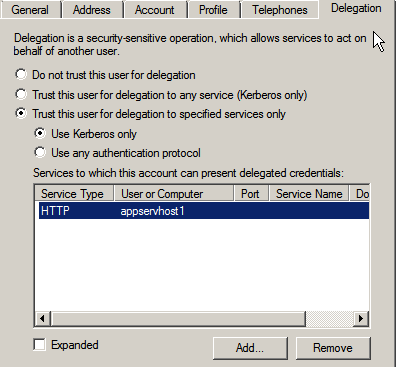
You are returned to the Add Services window, populated with a listing of the services which are available for you to delegate to on the computer host or service account chosen. Make a selection from the Add Services list, and click OK, to return to your Delegation tab in the Properties window, where your selections have been collected in a list panel.
Figure 12: Collected services list
|
|
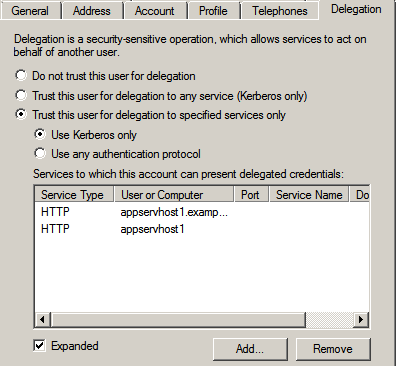
Note: If you have configured more than one SPN for a service (for example, using both a fully-qualified hostname and an unqualified hostname), the list in the panel initially displays only one instance of that service, even though both are actually selected. To view all instances selected, set the Expanded option in this window: |

Figure 13: Expanded selection of services for delegation
If you need to, you can remove one or more services from this display of selected services. When satisfied that your selected list is correct, click OK to finalize your configuration.
Setting up a Java application server host
See the release notes (HTML) for a comprehensive list of application servers supported by Single Sign-on for Java. It is presumed here that you have installed one such server using standard procedures laid down for the server concerned.
If your application server and Active Directory are separated by a firewall, you need to open the following ports on the firewall to allow Kerberos to work properly:
- Ticket requests: (88/TCP, 88/UDP),
- LDAP to Directory Service: (389/TCP, 389/UDP),
- DNS: (53/TCP, 53/UDP)
- LDAP to Global Catalog (3268/TCP)
Creating keytab files
Single Sign-on for Java supports two mechanisms for storing key information required to authenticate users — setting a password and using keytabs. In general, use of keytabs is to be preferred for production systems, but for ease of initial setup and evaluation, the password approach is probably more convenient.
To create a keytab file
-
First, generate keytab files for each service that requires authentication. This can be done with the tools included with the Single Sign-on for Java release. For more information, see Appendix: Using the JKTools.
From the bin/ directory of your Single Sign-on for Java distribution, run the jktutil tool and take the following steps:
- Create a keytab entry using the RC4 encryption type. The commands below create a keytab entry with a key version number of 255 (a value which acts as a wildcard):
jktutil (type '?' for help): add_entry -password -p
vsj_appservhost1@EXAMPLE.COM -k 255 -e rc4-hmac
Password for vsj_appservhost1@EXAMPLE.COM:
Note: You may use addent as an alias for add_entry.
- If the domain controller is running at Windows Server 2008 or higher functional level, you also need to create keytab entries using the AES encryption type.
jktutil (type '?' for help): add_entry -password -p
vsj_appservhost1@EXAMPLE.COM -k 255 -e aes256-sha1
Password for vsj_appservhost1@EXAMPLE.COM:
jktutil (type '?' for help): add_entry -password -p
vsj_appservhost1@EXAMPLE.COM -k 255 -e aes128-sha1
Password for vsj_appservhost1@EXAMPLE.COM:
- Write the created keytab to a file and quit jktutil.
jktutil (type '?' for help): write_kt
-o vsj_appservhost1.keytab
jktutil (type '?' for help): quit
To confirm the contents of the created keytab, run the jklist tool with the arguments -e -k vsj_appservhost1.keytab. The output should look similar to this:
Keytab name: FILE:vsj_appservhost1.keytab
KVNO Principal EncType
---- --------------------------- -----------
255 vsj_appservhost1@EXAMPLE.COM rc4-hmac
255 vsj_appservhost1@EXAMPLE.COM aes256-cts-hmac-sha1-96
255 vsj_appservhost1@EXAMPLE.COM aes128-cts-hmac-sha1-96
To use the keytab file with Single Sign-on for Java
- When configuring an application for Single Sign-on for Java you need to set the idm.keytab parameter. For more information, see Appendix: Configuration Parameters.
The idm.keytab parameter value should point to the keytab file you generated for this service when you set up the application server.
- Copy the generated keytab to the location specified by the idm.keytab parameter.
The new keytab contains sensitive information that could be used to subvert the security of your Single Sign-on for Java installation. Ensure that you set appropriate access permissions on this file. Do not send it over unsecured networks unencrypted.