In object creation wizards and properties dialogs, some property labels may be displayed as hyperlinks. This indicates that Active Roles enforces policy restrictions on the property.
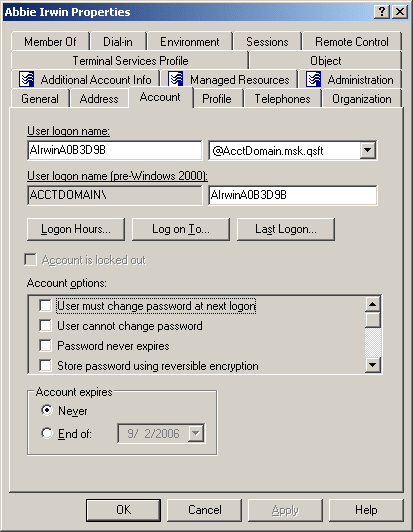
In the following figure, the User logon name and User logon name (pre-Windows 2000) labels are underlined, which means that these properties are under the control of a certain policy defined with Active Roles.
Figure 2: Getting policy-related information
To examine the policy in detail, click the label. For example, if you click User logon name (pre-Windows 2000), the Active Roles Console presents you with a window similar to the following figure.
Figure 3: Policy description
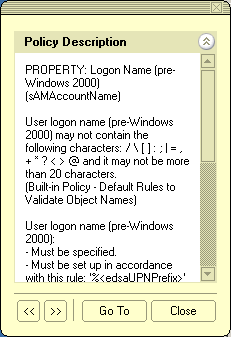
The window may display the following information:
You can click arrows in the lower-left corner to display description of other policies enforced on the given property.
The Message section is displayed whenever the specified property value violates the policy. The following figure illustrates the situation where a value has not been supplied for a mandatory property.
Figure 4: Policy violation message
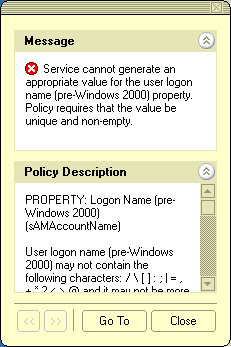
When you click Go To in this window, the Console moves the pointer to the field that needs to be corrected. You can type or select an appropriate value to correct your input.
User or service account management
Active Roles allows you to perform administrative tasks such as create, copy, rename, modify, and delete user accounts in Active Directory. You can also use this tool to unlock accounts, add and remove accounts from groups, and reset user passwords. Active Roles also supports Exchange tasks, such as create, delete, and move user mailboxes.
The following section guides you through the Active Roles Console to manage user accounts. You can also perform these tasks using the Active Roles Web Interface.
NOTE: If your environment has a large number of Microsoft Exchange mailboxes (or a complex Microsoft Exchange deployment), Active Roles may retrieve the properties of users with Exchange mailboxes slower than for users without Exchange mailboxes.
To solve this problem, enable a performance fix by creating a new registry key as described in Knowledge Base Article 4336544:
-
On the machine(s) running the Administration Service and the Web Interface, launch the Windows Registry Editor.
-
In the Registry Editor, navigate to the following registry path:
HKEY_LOCAL_ MACHINE\SOFTWARE\One Identity\Active Roles\Configuration
-
Create a new DWORD (32-bit) Value named PerformanceFlag.
-
Double-click the new PerformanceFlag DWORD, and set its Value data to 1.
-
To apply the fix, restart the Active Roles Administration Service and IIS. If the fix is enabled successfully, the following Active Roles event log with Event ID 2508 will appear in the Event Viewer:
Performance flag value set to 1.
-
(Optional) To deactivate the fix later, set the Value data of the PerformanceFlag DWORD to 0.
The PerformanceFlag registry key accepts only a value of 1 (to activate the fix) or 0 (to deactivate it).
You can create new Active Directory user accounts with the Active Roles Console.
To create a user account
-
In the Console tree, locate and select the folder in which you want to add the user account.
-
Right-click the folder, point to New and click User to start the New Object - User wizard.
-
Follow the wizard pages to specify properties of the new user account, such as the user first name, last name, full name, display name, logon name, pre-Windows 2000 logon name, password, and Exchange mailbox settings.
Figure 5: Creating a user account

-
If you want to set values for additional properties (those for which the wizard pages do not provide data entries), click Edit Attributes on the completion page of the wizard.
-
After setting any additional properties, click Finish on the completion page of the wizard.
NOTE: Consider the following when creating a user account:
-
The behavior of the wizard pages may vary depending on the configuration of Active Roles policies. To determine whether a given item on a page is under the control of a certain policy, observe the text label next to the item: the underlined text label indicates that some policy restrictions are in effect. Click underlined text labels to examine the policies that govern the behavior of the wizard pages. For more information, see Getting policy-related information.
The policy information is also displayed whenever you supply a property value that violates a policy restriction. The wizard cannot proceed until you enter an acceptable value.
-
You can start the New Object - User wizard by clicking  on the toolbar.
-
To create a user account, you can also copy a previously created user account. For more information, see Copying a user account .
-
A new user account with the same name as a previously deleted user account does not automatically assume the permissions and group memberships of the previously deleted account because the security ID (SID) for each account is unique. To duplicate a deleted user account, you must manually reconfigure all of its permissions and memberships.
To find a user account, right-click the container you want to search and click Find. In the Find window, select Users from the Find list, specify your search criteria, and start the search. In the search results list, you can right-click user accounts and use commands on the shortcut menu to perform management tasks.
For step-by-step instructions on how to search for user accounts, see Searching for a user, contact, or group.
