
Dell™ One Identity Cloud Access Manager 8.1.1 - How to Configure Microsoft SharePoint
Cloud Access Manager configuration prerequisites
Adding Microsoft® SharePoint™ to Cloud Access Manager using WS-Federation
Configuring a SharePoint™ 2010 or 2013 WS-Federation Trust using the Cloud Access Manager for Microsoft® SharePoint™ utility
Protecting your SharePoint™ website with Cloud Access Manager
Enabling SharePoint™ People Picker functionality
Using the SharePoint™ People Picker
Adding Microsoft® SharePoint™ to Cloud Access Manager using the reverse proxy
Troubleshooting
Legal notices
Installing Cloud Access Manager for SharePoint
Establishing a trust between Cloud Access Manager and SharePoint™
Manual configuration of a SharePoint™ 2013 Server WS-Federation Trust
Manual configuration of a SharePoint™ 2010 Server WS-Federation Trust
Dell™ One Identity Cloud Access Manager 8.1.1 - How to Configure Microsoft SharePoint
This guide describes how to configure Microsoft® SharePoint™ for use with Dell™ One Identity Cloud Access Manager. Cloud Access Manager now supports two configuration options for Microsoft SharePoint, the Cloud Access Manager WS-Federation application template supports both SharePoint™ 2010 and SharePoint™ 2013 to simplify and automate application configuration.
In addition, you can configure the Cloud Access Manager reverse proxy to provide Single Sign-On (SSO) to web applications by automatically filling in the login form, or using either Integrated Windows Authentication (IWA) or Basic Authentication. You can also use the reverse proxy to enable secure access to internal web apps from the internet. For further information, please refer to the Dell™ One Identity Cloud Access Manager Security and Best Practice Guide.
Cloud Access Manager configuration prerequisites
|
1 |
Install Cloud Access Manager as described in the Dell™ One Identity Cloud Access Manager Installation Guide and configure an Active Directory® front-end authentication method as recommended in the Dell™ One Identity Cloud Access Manager Configuration Guide. |
Adding Microsoft® SharePoint™ to Cloud Access Manager using WS-Federation
|
1 |
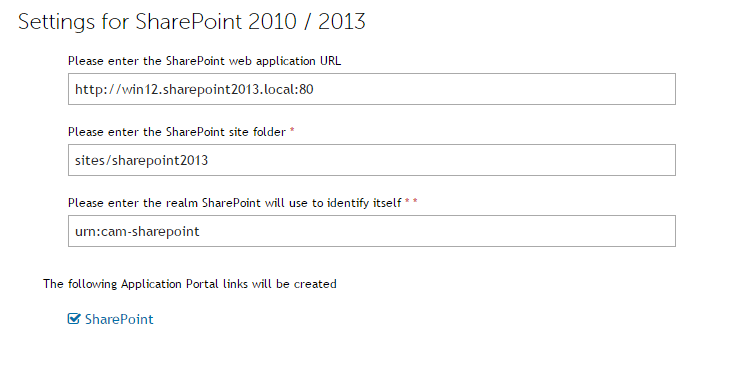
Add the SharePoint application to Dell™ One Identity Cloud Access Manager using the SharePoint 2010/2013 template. |
|
4 |
Click Save & Next. Note: While SharePoint server may include multiple sites, the Cloud Access Manager template will only auto-configure one of them for you. You can add others manually as extra application portal links when the initial SharePoint application has been created. |
Note: The relying party realm may be any value you choose, with urn: as its prefix, for example urn:cam-sharepoint. You will enter this value in SharePoint later when you create the new authenticator.
|
5 |
In Subject Mapping you must specify the attribute that Cloud Access Manager will use to derive the user's name for log in. The default attribute is mail. Click Next. |
On the Claim Mapping page you can configure the values Cloud Access Manager will pass to SharePoint in the form of claims. By default only a user’s email address is required to successfully authenticate. If you need to pass other values, for example employee id, you can add further claims on the Claim Mapping page and populate them with the appropriate values from the relevant front-end authenticator.
You will also need to create the associated claim type mappings when you create the new claims-based authenticator in SharePoint. The Cloud Access Manager for Microsoft SharePoint utility will do this for you automatically, or you can add the claim type mappings manually using the New-SPClaimTypeMapping command. For further details, please refer to Manual configuration of a SharePoint™ 2013 Server WS-Federation Trust.
You will also need to create the associated claim type mappings when you create the new claims-based authenticator in SharePoint. The Cloud Access Manager for Microsoft SharePoint utility will do this for you automatically, or you can add the claim type mappings manually using the New-SPClaimTypeMapping command. For further details, please refer to Manual configuration of a SharePoint™ 2013 Server WS-Federation Trust.
|
6 |
When complete, click Next. |

|
7 |
You will now see the Permissions page. This enables you to control which users can access the application. By default, all Cloud Access Manager users have access to the application. You can restrict access to the application to users who belong to a specific role, but for this example click Next to allow all users to access the application. |
|
8 |
|
9 |
To configure how the application is displayed on the Cloud Access Manager Portal, enter the Title and Description you want to display on the Cloud Access Manager Portal. |
|
11 |
Click Get Application Icon to locate and display the icon of the application or upload an icon of your choice. |
|
12 |
Click Finish to complete the configuration of the application. |
Configuring a SharePoint™ 2010 or 2013 WS-Federation Trust using the Cloud Access Manager for Microsoft® SharePoint™ utility
- Herramientas de autoservicio
- Base de conocimientos
- Notificaciones y alertas
- Soporte de productos
- Descargas de software
- Documentación técnica
- Foros de usuarios
- Tutoriales en video
- Aviso de actualizaciones de páginas web (RSS)
- Comuníquese con nosotros
- Obtenga asistencia con las licencias
- Soporte Técnico
- Ver todos