Mail Configuration setting
You can use this setting to configure options for sending token activation codes to users via e-mail. With this setting configured, an option to send token activation codes by e-mail becomes available in the Defender Token Programming Wizard.
To enable this setting,
- Click Enabled.
- Set the following options, and then click OK.
- SMTP Server Type the IP address or DNS name of the SMTP server you want to use for sending e-mail messages containing token activation codes.
- SMTP Server Port Specify the communication port used by the SMTP server.
- Address from which to send mails Type the e-mail address you want to appear in the From field of the e-mail messages containing token activation codes.
- CC address to which mails are sent Type the e-mail address to which you want to send copies of the e-mail messages containing token activation codes.
- Send message as plain text Select this check box if you want to send the e-mail messages containing token activation codes in a plain text format. Note, that plain text messages do not contain QR codes or links for token activation. If you want to include QR codes and links for token activation in a message, clear this check box. When this check box is cleared, the e-mail messages are sent in an HTML format.
- Text to include at the bottom of activation code mails Type the text you want to include in each e-mail message containing token activation codes.
With the Mail Configuration setting enabled and configured, you can use the Defender Token Programming Wizard to send an e-mail containing token activation codes to the user:
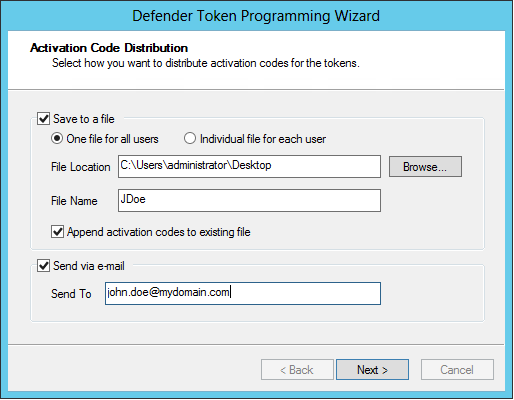
Select the Send via e-mail check box, and then use the Send To text box to type the recipient’s e-mail address.
ADSI Configuration setting
This setting provides a configurable performance enhancement for large installations by ensuring that for read and write operations, Defender always uses the domain controller to which the Active Directory Users and Computer (ADUC) tool is connected.
When this setting is enabled and the Allow serverless bind check box is cleared, Defender reads and writes data in Active Directory by using the domain controller to which ADUC is connected.
When this setting is enabled and the Allow serverless bind check box is selected, Defender relies on the Active Directory Service Interfaces Editor (ADSI Edit) tool to select a domain controller through which it can read and write data in Active Directory. This is also the default Defender behavior when this setting is not enabled.
Updating Administrative templates from .adm to .admx
You can follow the steps mentioned below to update administrative templates from .adm to .admx on both Domain Controller and Client computer.
Domain Controller
Before updating the templates, you should remove the existing .adm templates and then proceed updating the templates.
To remove the administrative templates on Domain Controller
- Open the Group Policy Management (gpmc.msc).
- Right click on the GPO you have created, set Enforced to disable.
- Again, right click on the GPO, and on the shortcut menu, click Edit.
Group Policy Management Editor opens.
- In the left pane (console tree) of Group Policy Management Editor, expand Computer Configuration\Policies.
- Right-click the Administrative Templates node, and then click Add/Remove Templates.
- In the Add/Remove Templates dialog box, select DefenderGroupPolicy.adm and DefenderBindingGroupPolicy.adm files and click Remove.
To update the administrative templates on Domain Controller
- Navigate to %windir%\SYSVOL\sysvol\<DomainName>\Policies directory.
- Create a folder PolicyDefinitions and copy the DefenderGroupPolicy.admx file into this folder.
- In the PolicyDefinitions folder, create a language specific folder, such as en-US, and then copy the DefenderGroupPolicy.adml file into this folder.
- Open the Group Policy Management Editor and navigate to the Computer Configuration\Administrative Templates\One Identity\Defender directory to see the policy settings.
|

|
NOTE: Make sure that the policy configuration settings are retained after updating into .admx templates in the Group Policy Management Editor. |
- Right click the GPO in Group Policy Management, and then click Enforced to enable.
