Chatee ahora con Soporte
Chat con el soporte

One Identity Safeguard for Privileged Sessions 7.2 - Administration Guide

Preface Introduction The concepts of One Identity Safeguard for Privileged Sessions (SPS)
The philosophy of One Identity Safeguard for Privileged Sessions (SPS) Policies Credential Stores Plugin framework Indexing Supported protocols and client applications Modes of operation Connecting to a server through One Identity Safeguard for Privileged Sessions (SPS) Archive and backup concepts Maximizing the scope of auditing IPv6 in One Identity Safeguard for Privileged Sessions (SPS) SSH host keys Authenticating clients using public-key authentication in SSH The gateway authentication process Four-eyes authorization Network interfaces High Availability support in One Identity Safeguard for Privileged Sessions (SPS) Versions and releases of One Identity Safeguard for Privileged Sessions (SPS) Accessing and configuring One Identity Safeguard for Privileged Sessions (SPS)
Cloud deployment considerations The Welcome Wizard and the first login Basic settings
Supported web browsers The structure of the web interface Network settings Configuring date and time System logging, SNMP and e-mail alerts Configuring system monitoring on SPS Data and configuration backups Archiving Cleaning up audit data Using plugins Forwarding data to third-party systems Starling integration
User management and access control
Login settings Managing One Identity Safeguard for Privileged Sessions (SPS) users locally Setting password policies for local users Managing local user groups Managing One Identity Safeguard for Privileged Sessions (SPS) users from an LDAP database Authenticating users to a RADIUS server Authenticating users with X.509 certificates Authenticating users with SAML2 Managing user rights and usergroups Creating rules for restricting access to search audit data Displaying the privileges of users and user groups Listing and searching configuration changes
Managing One Identity Safeguard for Privileged Sessions (SPS)
Controlling One Identity Safeguard for Privileged Sessions (SPS): reboot, shutdown Managing One Identity Safeguard for Privileged Sessions (SPS) clusters Managing a High Availability One Identity Safeguard for Privileged Sessions (SPS) cluster Upgrading One Identity Safeguard for Privileged Sessions (SPS) Managing the One Identity Safeguard for Privileged Sessions (SPS) license Accessing the One Identity Safeguard for Privileged Sessions (SPS) console Sealed mode Out-of-band management of One Identity Safeguard for Privileged Sessions (SPS) Managing the certificates used on One Identity Safeguard for Privileged Sessions (SPS)
General connection settings HTTP-specific settings ICA-specific settings MSSQL-specific settings RDP-specific settings SSH-specific settings Using Sudo with SPS Telnet-specific settings VMware Horizon View connections VNC-specific settings Indexing audit trails Using the Search interface Advanced authentication and authorization techniques Reports The One Identity Safeguard for Privileged Sessions (SPS) REST API One Identity Safeguard for Privileged Sessions (SPS) scenarios Troubleshooting One Identity Safeguard for Privileged Sessions (SPS)
Network troubleshooting Gathering data about system problems Viewing logs on One Identity Safeguard for Privileged Sessions (SPS) Changing log verbosity level of One Identity Safeguard for Privileged Sessions (SPS) Collecting logs and system information for error reporting Collecting logs and system information of the boot process for error reporting Support hotfixes Status history and statistics Troubleshooting a One Identity Safeguard for Privileged Sessions (SPS) cluster Understanding One Identity Safeguard for Privileged Sessions (SPS) RAID status Restoring One Identity Safeguard for Privileged Sessions (SPS) configuration and data VNC is not working with TLS Configuring the IPMI from the BIOS after losing IPMI password Incomplete TSA response received Using UPN usernames in audited SSH connections
Using SPS with SPP Configuring external devices Using SCP with agent-forwarding Security checklist for configuring One Identity Safeguard for Privileged Sessions (SPS) Jumplists for in-product help Configuring SPS to use an LDAP backend Glossary

Managing the One Identity Safeguard for Privileged Sessions (SPS) license

The Basic Settings > System > License page displays the following information of the current license:

Figure 139: Basic Settings > System > License — Updating the license
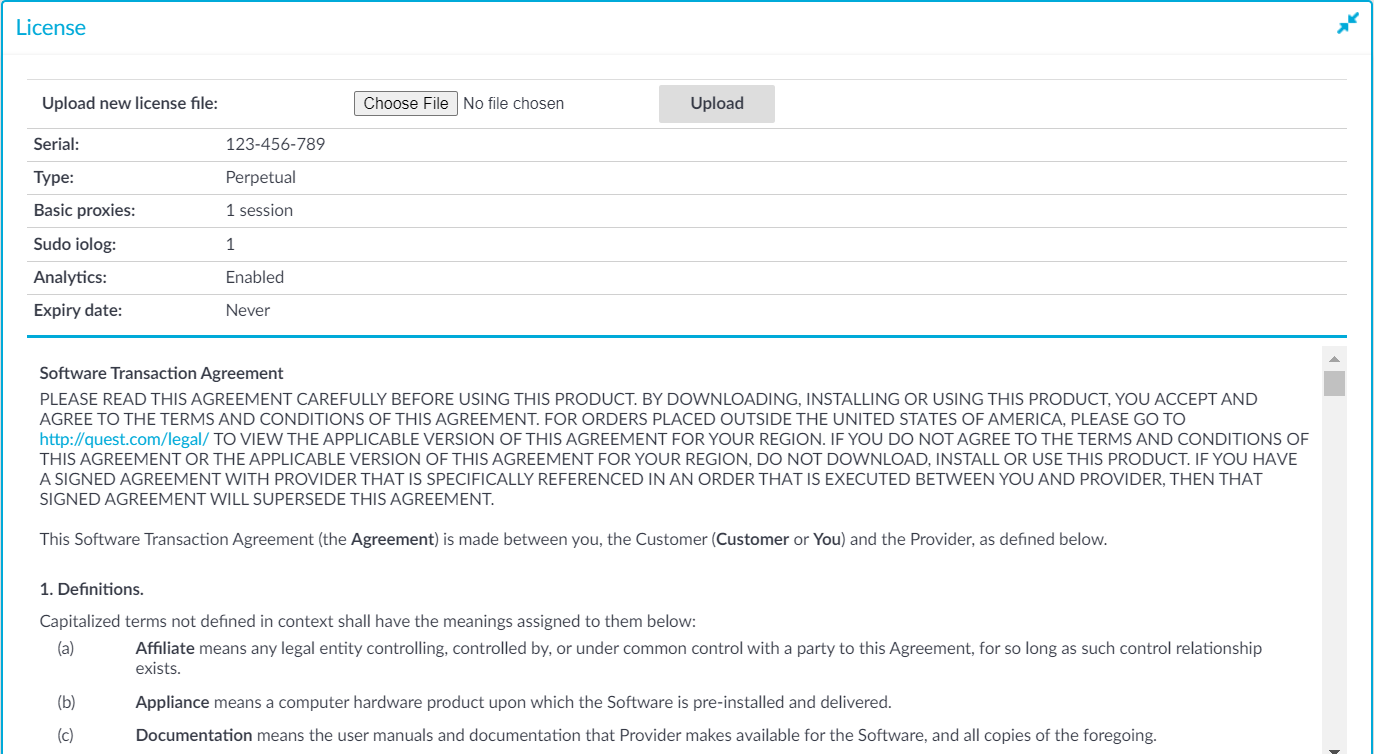
  • Serial: The unique serial number of the license.

  • Type: The license type, for example: Perpetual.

  • Basic proxies: The actual value of the sessions or hosts. You can select the following sub-options:

    • Host: Limits the number of servers (individual IP addresses) that can be connected through SPS.

    • Session: Limits the number of concurrent sessions (parallel connections) that can pass through SPS at a time (for example 25).

  • Sudo iolog: Number of enabled Sudo iolog connections.

    For more information, see Using Sudo with SPS.

  • Analytics: Enables the Analytics option.

    For more information, see Analyzing data using One Identity Safeguard for Privileged Analytics.

  • Expiry Date: The license expiration date. The date is displayed in YYYY-MM-DD format.

SPS starts sending automatic alerts daily, 60 days before the license expires.

Updating the SPS license

One Identity recommends that you update the SPS license before the existing license expires or when you purchase a new license.

Caution:

After upgrading to version 7.0 LTS, SPS requires a new license. To avoid possible downtimes due to certain features not being available, before starting the upgrade, ensure that you have a valid SPS license for 7.0 LTS.

Upgrade as follows:

  1. Perform the upgrade to 7.0 LTS with your current license.

  2. Update your SPS license to 7.0 LTS.

For a new SPS license for 7.0 LTS, contact our Licensing Team.

Caution:

Before uploading a new license, One Identity recommends that you back up the configuration of SPS. For more information, see Exporting the configuration of One Identity Safeguard for Privileged Sessions (SPS).

To update the license

  1. Navigate to Basic Settings > System > License.

  2. Click Browse and select the new license file.

  3. Click Upload, then Commit.

Accessing the One Identity Safeguard for Privileged Sessions (SPS) console

The following topics describe how to use the console menu of One Identity Safeguard for Privileged Sessions (SPS), how to enable remote SSH access to SPS, and how to change the root password from the web interface.

Topics:

Using the console menu of One Identity Safeguard for Privileged Sessions (SPS)

Connecting to One Identity Safeguard for Privileged Sessions (SPS) locally or remotely using Secure Shell (SSH) allows you to access the console menu of SPS. The console menu provides access to the most basic configuration and management settings of SPS. It is mainly used for troubleshooting purposes, the primary interface of SPS is the web interface.

The console menu is accessible to the root user using the password set during completing the Welcome Wizard.

Figure 140: The console menu
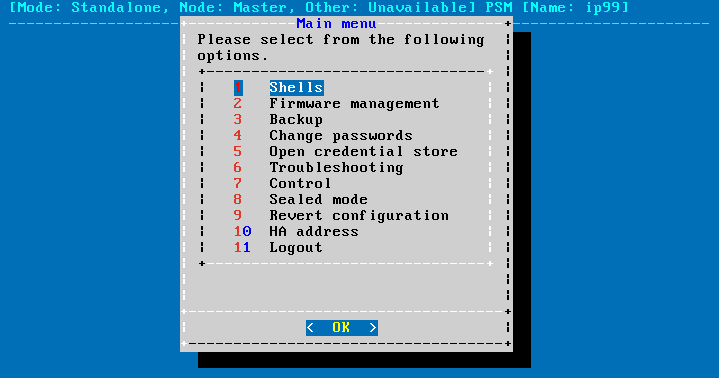
The console menu provides allows you to perform the following actions.

Access the local core and boot shells.

This is usually not recommended and only required in certain troubleshooting situations. Select the boot/core shell's keyboard layout for the local console. This will not affect the keyboard layout if you have accessed the shell via SSH.

The boot firmware boots up SPS, provides High Availability support, and starts the core firmware. The core firmware, in turn, handles everything else: provides the web interface, manages the connections, and so on.

Select the active firmware, and delete unneeded firmwares.

Accessing the firmware management is useful if after an update the new firmware does not operate properly and the web interface is not available to activate the previous firmware.

Start backup processes.

For more information about backup processes, see Data and configuration backups.

Change the passwords of the root and admin users.

For details, see Changing the root password of One Identity Safeguard for Privileged Sessions (SPS).

Access the network-troubleshooting functions and display the available log files.

If the web interface is inaccessible, it can be the result of an internal locking error. To resolve this issue, delete the lock files. After deletion, they are archived, and included in the support bundle if they are not older than 30 days. To create a support bundle, if the web interface is inaccessible, select Create support bundle.

NOTE: If deleting the lock files did not resolve the issue, contact our Support Team.

Reboot and shutdown the system.

For details, see Controlling One Identity Safeguard for Privileged Sessions (SPS): reboot, shutdown.

Enable and disable sealed mode.

For details, see Sealed mode.

Set the IP address of the HA interface.

For more information about assigning an IP address to the HA interface of a node, see Resolving an IP conflict between cluster nodes.

NOTE: Note that logging in to the console menu automatically locks the SPS interface, meaning that users cannot access the web interface while the console menu is used. The console menu can be accessed only if there are no users accessing the web interface. The connection of web-interface users can be terminated to force access to the console menu.

Documentos relacionados

The document was helpful.

Seleccionar calificación

I easily found the information I needed.

Seleccionar calificación