Sealed mode
When sealed mode is enabled, the following settings are automatically applied:
-
The syslog-ng Store Box (SSB) appliance cannot be accessed remotely via SSH for maintenance. Also, configuration settings related to remote SSH access are deleted.
-
The root password of SSB cannot be changed in sealed mode.
-
Sealed mode can be disabled only from the local console. For details, see Disabling sealed mode.
To enable sealed mode use one of the following methods:
-
Select the Sealed mode option during the Welcome Wizard.
-
Navigate to Basic Settings > System > Sealed mode > Activate sealed mode on the SSB web interface and click Enable.
-
Log in to SSB as root using SSH or the local console, and select Sealed mode > Enable from the console menu.
Disabling sealed mode
This section describes how to disable sealed mode.
To disable sealed mode
-
Go to the syslog-ng Store Box (SSB) appliance and access the local console.
-
Log in as root.
-
From the console menu, select Sealed mode > Disable.
-
Select Back to Main menu > Logout.
-
If you want to access SSB remotely using SSH, configure SSH access. Disabling sealed mode does not restore any previous SSH configuration. For details, see Enabling SSH access to the SSB host.
Out-of-band management of SSB
Physical syslog-ng Store Box (SSB) appliances include a dedicated out-of-band management interface conforming to the Intelligent Platform Management Interface (IPMI) v2.0 standards. The IPMI interface allows system administrators to monitor the system health of SSB and to manage the computer events remotely, independently of the operating system of SSB. SSB is accessible using the IPMI interface only if the IPMI interface is physically connected to the network.
Note that the IPMI interface supports only 100Mbps Full-Duplex speed.
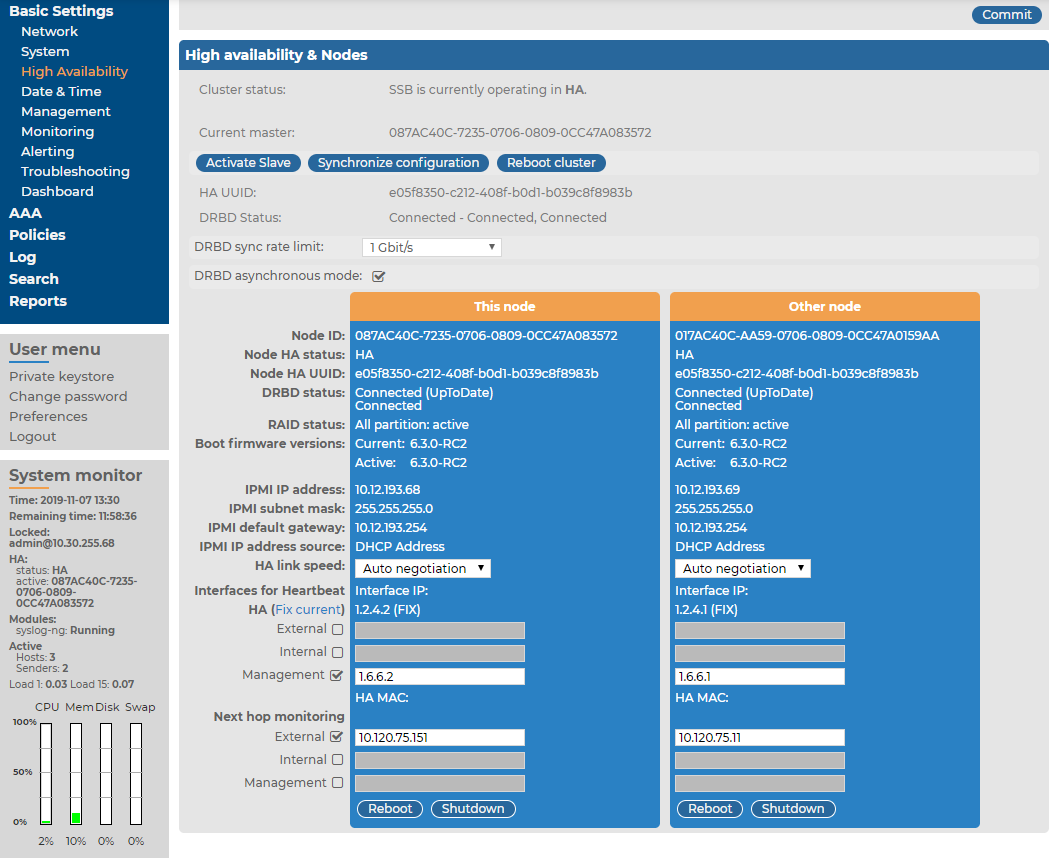
Basic information about the IPMI interface is available also on the SSB web interface on the Basic Settings > High Availability page. The following information appears:
Figure 96: Basic Settings > High Availability — Information about the IPMI interface SSB

-
Hardware serial number: The unique serial number of the appliance.
-
IPMI IP address: The IP address of the IPMI interface.
-
IPMI subnet mask: The subnet mask of the IPMI interface.
-
IPMI default gateway IP: The address of the default gateway configured for the IPMI interface.
-
IPMI IP address source: Shows how the IPMI interface receives its IP address: dynamically from a DHCP server, or it uses a fixed static address.
Configuring the IPMI interface from the console
The following describes how to modify the network configuration of IPMI from the console of syslog-ng Store Box(SSB).
Prerequisites:
SSB is accessible using the IPMI interface only if the IPMI interface is physically connected to the network. For details on connecting the IPMI interface, see Installing this hotfix in the Installation Guide.
|

|
Caution:
IPMI searches for available network interfaces during boot. Make sure that IPMI is connected to the network through the dedicated ethernet interface before SSB is powered on. |
It is not necessary for the IPMI interface to be accessible from the Internet, but the administrator of SSB must be able to access it for support and troubleshooting purposes in case vendor support is needed. The following ports are used by the IMPI interface:
-
Port 623 (UDP): IPMI (cannot be changed)
-
Port 5123 (UDP): floppy (cannot be changed)
-
Port 5901 (TCP): video display (configurable)
-
Port 5900 (TCP): HID (configurable)
-
Port 5120 (TCP): CD (configurable)
-
Port 80 (TCP): HTTP (configurable)
To modify the network configuration of IPMI from the console of SSB
-
Use the local console (or SSH) to log in to SSB as root.
-
Choose Shells > Boot shell.
-
Check the network configuration of the interface:
# ipmitool lan print
This guide assumes that channel 1 is used for LAN. If your setup differs, adjust the following commands accordingly.
-
Configure the interface. You can use DHCP or configure a static IP address manually.
-
To use DHCP, enter the following command:
# ipmitool lan set 1 ipsrc dhcp
-
To use static IP, enter the following command:
# ipmitool lan set 1 ipsrc static
Set the IP address:
# ipmitool lan set 1 ipaddr <IPMI-IP>
Set the netmask:
# ipmitool lan set 1 netmask <IPMI-netmask>
Set the IP address of the default gateway:
# ipmitool lan set 1 defgw ipaddr <gateway-IP>
-
To configure IPMI to use the dedicated Ethernet interface, run the following command. The command works for all appliances. Those appliances, for syslog-ng Store Box are Appliance 3000, syslog-ng Store Box Appliance 3500, and syslog-ng Store Box Appliance 4000:
ipmitool raw 0x30 0x70 0xc 1 0
-
Verify the network configuration of IPMI:
# ipmitool lan print 1
Use a browser to connect to the reported network address.
-
Change the default password:
-
Log in to the IPMI web interface using the default login credentials (username: ADMIN, password: ADMIN).
NOTE: The login credentials are case sensitive.
NOTE: The syslog-ng Store Box Appliance 4000 series features a stricter password strength policy than previous appliance versions, and may require a password with higher complexity. You can find the default IPMI credentials on a sticker at the backplate of the hardware.
-
Navigate to Configure > Users.
-
Select ADMIN, and choose Modify User.
-
Change the password, and save the changes with Modify.


