The Printing Properties settings allow you to specify network printers you want to configure for use on client computers.
You can apply the Printing Properties settings under both Computer Configuration and User Configuration.
The Printing Properties settings allow you to specify network printers you want to configure for use on client computers.
You can apply the Printing Properties settings under both Computer Configuration and User Configuration.
The Printers tab settings of the Printing Properties, control printers that are configured for use on client computers and support the following management modes: Never, Always.
Printers tab settings allow you to set up printers that will be available on client computers.
The following options are supported:
Allow printers that connect directly to user's computer
Select to allow printing to printers that connect directly to the user's computer through FireWire or USB ports etc.
Require an administrator password
If you have selected the Allow printers that connect directly to user's computer option, select this option to require an administrator password in order to print to a printer that is connected directly.
This section describes how to add a printer that will be available on macOS clients.
To add a printer
To determine the proper printer settings, One Identity recommends to first configure the printer on a single macOS host system. Add the printer as described in the macOS documentation and verify that you can print with it.
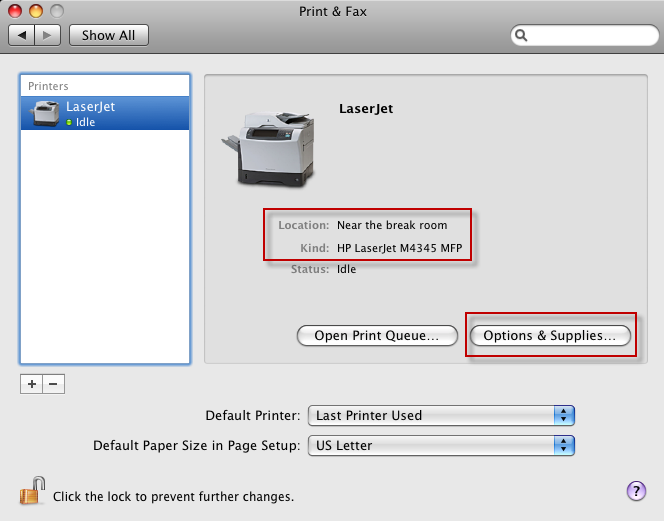
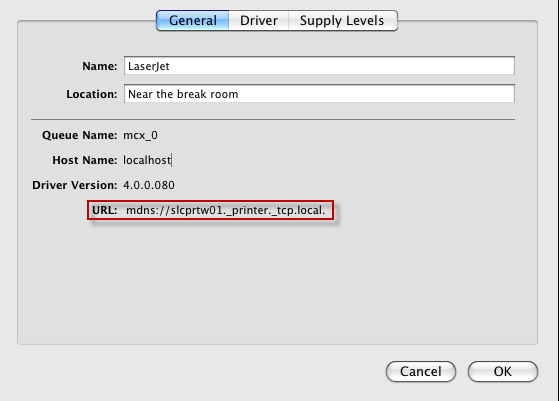
Once you set up the printer, open the printer properties, and take note of the following settings: Name, Location, Kind and URL. The following images show where you can find these settings:

To determine the URL, click Options & Supplies:

This is all of the information you will need to configure the printer for all of your macOS systems using Group Policy.
In Group Policy Management Editor, open the Printing policy (Computer Configuration > Policies > Mac OS X Settings > Workgroup Manager Settings) and select the Printers tab.
Select the Always management mode.
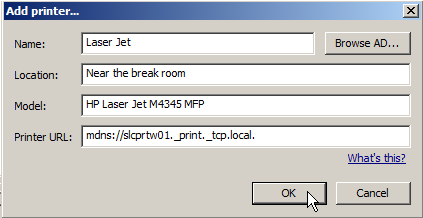
Click Add to add a new printer to the policy. The Add printer dialog appears. Enter the Name, Location, Model and Printer URL, then click OK. The best way to determine the printer URL is to configure a printer on a macOS client and enter the URL specified in the Options and Supplies dialog. See step 1.

You can also add SMB printers by browsing for the printer in Active Directory.
If you want the selected printer to be the default printer click Make Default.
If you want to require the user to enter an administrator password before printing to the selected printer, click the Require an administrator password option.
Click OK to save settings and close the Printing dialog.
The Footer tab settings of the Printing Properties control footer display and formatting. They support the following management modes: Never, Always.
Footers are additional information appended at the bottom of each printed page containing the date and the name of the user that initiated the print job.
The following options are supported:
Print Page Footer
Select to enable page footers.
Include MAC address
Select to include the client computer's network card MAC address in the footer information when page footers are enabled.
Font name
Select the page footers font name.
Font size
Select the page footers font size.
© 2025 One Identity LLC. ALL RIGHTS RESERVED. Términos de uso Privacidad Centro de preferencias de cookies