Active Roles performs operations on directory objects on behalf of delegated users. Because of this, the Active Roles service account that is used to manage the Active Directory domain requires adequate permissions.
NOTE: One Identity strongly recommends to manage the Active Directory domain using an account that is a member of the Domain Admins role group. If this condition is not met, the information and instructions provided in the official One Identity product documentation may not be applicable to your Active Roles installation.
TIP: One Identity recommends using separate service accounts for service tasks and for domain management duties. Doing so can ensure that you can use the service account with the minimum required permissions listed below. However, consider that the proxy account must still be a member of the Domain Admins role group to stay within the support model of Active Roles.
The service account credential has the following five main roles.
Accessing the Administration Service computer
To meet this requirement, the service account must be a member of the Administrators group on the computer running the Active Roles Administration Service.
Service publication in Active Directory
Once configured, the Administration Service attempts to publish itself in Active Directory, so that Active Roles clients can automatically discover the Administration Service instance.
NOTE: While this functionality is not critical, if the service publication permissions are not granted, Active Roles clients will not be able to automatically discover the Active Roles Administration Service instance. However, they can still connect to the Administration Service if they specify in Active Roles Console either the service name or the IP address of the computer running the instance.
For more information, see Service publication in Active Directory in the Active Roles Installation Guide.
Running all Script Modules under the security context of the Active Roles Service Account
The permissions required by custom scripts vary according to the requirements of the individual scripts. As such, review them on a case-by-case basis as a Best Practice security model.
Connecting to the Microsoft SQL database
In some Active Roles configurations, assigning the SQL database connection permissions to the service account is optional, as you can also use an SQL Authentication credential (which then receives the required permissions instead of the service account).
For more information on the necessary SQL Server permissions, see SQL Server Permissions in the Active Roles Quick Start Guide.
Synchronizing native permissions to Active Directory
The service account must have the Read Permissions and Modify Permissions rights on the Active Directory objects and containers where you want to use the Active Roles security synchronization feature.
Configuring rule-based administrative views
To provide additional flexibility beyond the default Active Directory and Azure AD capabilities in managing directory resources, Active Roles supports creating, editing and deleting securable, flexible, rule-based administrative views, known as Managed Units (MUs).
With MUs, administrators can configure distributed administration units independent of the OU hierarchy. As such, MUs are dynamic virtual collections of AD or Azure AD directory objects, and may include them regardless of their location in the organization network.
TIP: For more information on Managed Units and their main features, see Managed Units in the Active Roles Feature Guide.
This section guides you through the Active Roles Console to administer Managed Units.
You can create a new Managed Unit (MU) in the Active Roles Console.
Prerequisites
To create MUs in the Active Roles Console, you must use an Active Roles Administration Service account. For more information, see Configuring the Administration Service account in the Active Roles Quick Start Guide.
To create a new Managed Unit (MU) in the Active Roles Console
-
In the Active Roles Console, on the Console tree, navigate to Configuration > Managed Units.
-
To open the New Object - Managed Unit wizard, right-click the Managed Units node, then click New > Managed Units.
TIP: If you need to manage a large number of MUs in your organization, One Identity recommends creating separate MU containers for your specific MUs.
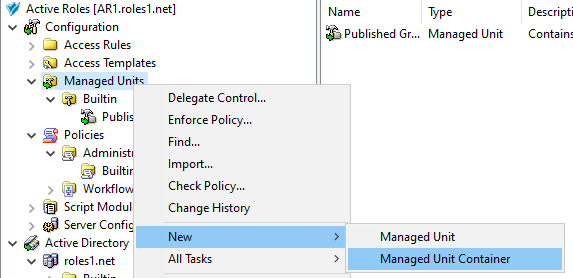
To create a new container for the configured MU, right-click on the Managed Units node, then click New > Managed Unit Container.
Figure 1: Active Roles Console – Launching the Managed Unit Container dialog
Once the new container is created, right-click it in the Console tree and select New > Managed Unit to create a new MU in the container. To move an existing, non built-in MU to the container, right-click the MU, and select Move.
-
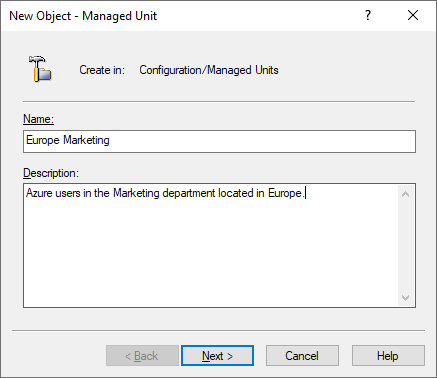
In the Name step, specify a Name and optionally, a Description for the new MU. This name and description will appear in the Active Roles details pane when selecting the MU.
Figure 2: New Object - Managed Unit wizard – Specifying the Name and Description
To continue, click Next.
-
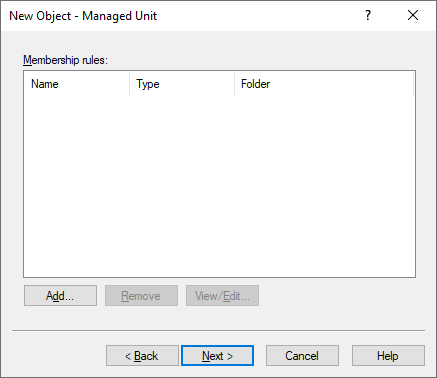
To specify a new membership rule for the MU, in the Membership rule step, click Add.
Membership rules define which directory objects get assigned to the MU. Active Roles populates the MU dynamically based on the configured rules, adding objects that match their criteria and removing those later that no longer do.
Figure 3: New Object - Managed Unit wizard – Membership rule list
-
In the Membership Rule Type dialog, select the rule type used to populate the MU. A membership rule can be a search query, a static object inclusion or exclusion rule, or group membership inclusion and exclusion rule.
Figure 4: New Object - Managed Unit wizard – Membership rule type selection
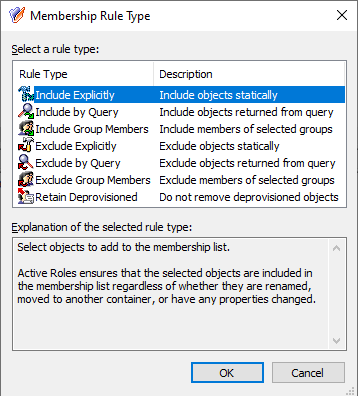
Active Roles supports the following membership rule types:
Table 1: Managed Unit membership rules
| Include Explicitly |
Includes the Active Directory (AD) or Azure Active Directory (Azure AD) objects you select in the wizard.
Once selected, Active Roles will keep the objects included in the MU even if they are updated, renamed, or moved elsewhere within your organization directory. |
| Include by Query |
Lets you define a custom query that the AD or Azure AD objects must match to be included in the MU. The query editor dialog lets you select the object type and location (such as AD domain or Azure tenant), then dynamically populates the dialog with settings according to the object type you selected.
The dialog also offers Advanced query settings to configure queries by specifying the following elements to check:
Once you configure a query, you can test it with the Preview Rule button.
NOTE: Consider the following when configuring a custom query:
-
The Include by Query membership rule does not support Azure contacts and Azure distribution groups. To include Azure contacts or Azure distribution groups in an MU, use the Include Explicitly rule type.
-
The contents of the Condition drop-down list are static, and may contain logical conditions that do not work with the selected object attribute (for example, selecting Greater or equal for the edsaAzureManager Azure AD attribute returns no results). Always make sure to select a logical condition against which Active Roles can enumerate the value of the selected Azure attribute.
-
When querying Azure object attributes, the Ends with condition returns results only if you specify whole words. The only exceptions to this behavior are the mail, otherMails, userPrincipalName and proxyAddresses attributes, which you can also query with the Ends with condition by specifying them partially.
-
You can query the edsaAzureManager attribute with the Is not condition only if the query rule is used in an AND relationship with another query rule. Querying the edsaAzureManager attribute with the Is not condition returns no results if the query rule is used alone or in an OR relationship. |
| Include Group Members |
Includes the members of the selected AD or Azure AD groups.
Once selected, Active Roles will keep the MU membership dynamically up-to-date: if new members are added to the selected groups, Active Roles will also include them in the MU; and likewise, members removed from the included groups will also be removed from the MU. |
| Exclude Explicitly |
Excludes the AD or Azure AD object you select in the MU.
Once selected, Active Roles will keep the objects excluded from the MU even if they are updated, renamed, or moved elsewhere within your organization directory.
NOTE: Consider the following when selecting this membership rule:
-
The Exclude Explicitly rule takes precedence over all other membership rule types. Because of this, Active Roles will exclude the objects specified with this rule, even if another rule specifies that Active Roles must include them in the MU.
-
This rule excludes only objects that match one of the inclusion rules of the MU. |
| Exclude by Query |
Lets you define a custom query that the AD or Azure AD objects must match to be excluded from the MU. Once configured, Active Roles will automatically exclude objects that meet the query conditions.
The query editor works and functions the same way as it does when configuring an Include by Query rule, and also shares the same limitations listed there.
NOTE: This rule excludes only objects that match one of the inclusion rules of the MU. |
|
Exclude Group Members |
Excludes the members of the selected AD or Azure AD groups.
Once selected, Active Roles will keep the MU membership dynamically up-to-date: if new members are added to any of the selected groups, Active Roles will exclude them from the MU. Likewise, if a member is removed from all specified groups, Active Roles will add them to the MU, provided that the member meets a configured inclusion rule.
NOTE: This rule excludes only objects that match one of the inclusion rules of the MU. |
|
Retain Deprovisioned |
Configures the MU to also include and keep deprovisioned objects that meet the membership rules.
If this rule is not selected, Active Roles automatically removes deprovisioned objects from the MU. |
NOTE: The exclusion rules affect only objects that match one of the inclusion rules configured for the MU.
For example, if a container is explicitly included in an MU, then all objects held in that container are also included in the MU. However, you cannot exclude any of those objects themselves with exclusion rules, as it is their container that meets the inclusion rules in this case. To exclude the objects of the container, you must configure an exclusion rule for the container instead.
-
Configure the selected membership rule:
-
If you selected the Include Explicitly or Exclude Explicitly rule type, the Select Objects dialog appears. Select the objects you want to include or exclude from the MU, click Add, and then click OK.
-
If you selected the Include Group Members or Exclude Group Members rule type, the Select Objects dialog appears, listing the available groups. Select the AD or Azure AD groups you want to include, click Add, and then click OK. All members of the selected groups will be included or excluded from the MU.
-
If you selected the Include by Query or Exclude by Query rule type, the Create Membership Rule dialog appears. Use the dialog to configure your inclusion or exclusion rule.
-
(Optional) To configure additional rules, click Add again.
NOTE: If you add several membership rules to an MU, Active Roles runs them in the order you configured them. If some of the configured rules conflict with each other, Active Roles resolves the conflict by prioritizing the configured Exclude rules over the configured Include rules.
-
Once you finished adding all membership rules, click Next.
-
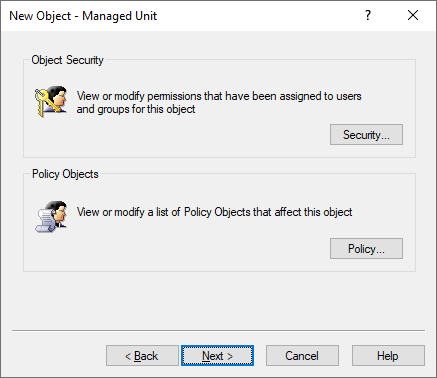
(Optional) In the Object Security / Policy Objects step, specify the permissions and policy objects related to the configured MU.
Figure 5: New Object - Managed Unit wizard – Access Template and Policy Object links
-
To finish configuring the MU, click Next and Finish.


