You can create the Group Membership AutoProvisioning policy that is described in Example: Adding users to a specified group with the New Provisioning Policy Object Wizard.
To assign users to a specific group with the Group Membership AutoProvisioning Policy Object
-
In the Console tree, navigate to Configuration > Policies > Administration.
-
To open the New Provisioning Policy Object Wizard dialog, right-click Administration, then select New > Provisioning Policy.
-
On the Name and Description page, provide a unique Name for the new Policy Object. Optionally, also provide a Description. To continue, click Next.
-
Select the Group Memberships AutoProvisioning policy type for configuration.
For more information, see Configuring a Group Membership Removal policy.
-
To accept the default object type (User) for the policy, on the Object Type Selection page, click Next.
-
To display the Set Up Condition dialog, on the Policy Conditions page, click Add.
-
Configure the condition as follows:
-
Click the Property button, then select the Department property. To apply your change, click OK.
-
In the Value field, enter Sales.
After you complete these steps, the Set Up Condition dialog must look as follows:
Figure 28: Set Up Condition
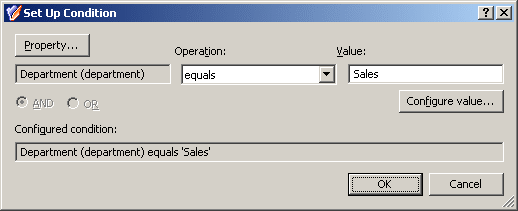
To close the Set Up Condition dialog, click OK.
-
On the Policy Conditions page, click Next.
-
On the Policy Action page, click Add object to groups if object satisfies policy conditions, then click Next.
-
On the Group Selection page, click Add and use the Select Objects dialog to locate the Sales group.
-
Click Next, then follow the instructions in the wizard to create (and optionally, immediately apply) the Policy Object.
-
To apply the Policy Object:
-
Use the Enforce Policy page in the New Policy Object Wizard.
-
Alternatively, complete the New Policy Object Wizard, then use the Enforce Policy command on the domain, OU, or Managed Unit where you want to apply the policy.
For more information on how to apply a Policy Object, see Linking Policy Objects to directory objects.
TIP: When provisioning cloud-only Azure users or guest users, you can either select the respective object category (such as the Azure user or Azure guest user node) in this step, or the Azure tenant that contains the Azure objects.
Home Folder AutoProvisioning policies automate the creation or renaming of user home folders and home shares when creating or renaming user accounts via Active Roles.
With this policy, you can:
-
Specify the server on which to create home folders and home shares.
-
Define how to set permissions for new home folders and shares.
-
Specify naming conventions for new home folders and home shares.
-
Limit the number of concurrent connections to home shares.
For example, using the Home Folder AutoProvisioning policy, you can define a corporate rule so that every time a user account is created with Active Roles, the system also creates a folder on a network file share and assigns it as the user’s home folder.
For a detailed description of this policy, see Concept: Home Folder AutoProvisioning in the Active Roles Feature Guide.
You can create a new Home Folder AutoProvisioning policy with the Active Roles Console.
To configure a Home Folder AutoProvisioning policy
-
On the Policy to Configure page, select Home Folder AutoProvisioning, then click Next.
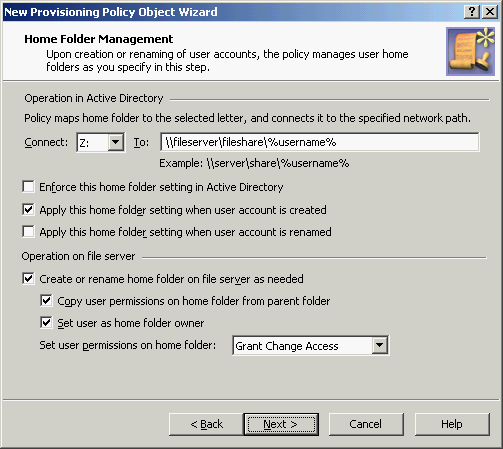
Figure 29: Home folder management
-
On the Home Folder Management page, do the following:
-
From the Connect list, select the drive letter to which you want the policy to map the home folder.
-
In the To box, specify a network path to the home folder. The path must include a common share at one level above the home folders. For example, if you want to create home folders on the share Home of the server Ant, use the following path:
\\Ant\Home\%username%
NOTE: Paths containing just the server and username, like \\SERVER\%username% are not valid.
-
To have the policy verify that the home folder path and name on user accounts are set in compliance with this policy, select Enforce this home folder setting in Active Directory.
When this check box is cleared, the policy allows home folder paths and names that differ from the path and name prescribed by the policy.
-
To have Active Roles automatically set the home folder properties in accord with this policy upon user account creation in Active Directory, select Apply this home folder setting when user account is created.
-
To have Active Roles automatically set the home folder properties in accord with this policy upon user account renaming in Active Directory, select Apply this home folder setting when user account is renamed.
-
To have Active Roles attempt creation or renaming of a (non-local) home folder on the file server when home folder properties are set or changed on a user account in Active Directory, select Create or rename home folder on file server as needed.
If you want to configure the policy so that it not only sets home folder properties on user accounts in Active Directory but also creates or renames home folders and home shares in accord with the policy settings, you must keep the Create or rename home folder on file server as needed check box selected (this is the default setting). If the check box is cleared, then the policy can only set or verify home folder properties on user accounts in Active Directory.
-
Specify how you want the policy to configure permission settings on home folders. You can choose from the following options:
-
Copy user permissions on home folder from parent folder: Upon creation or renaming of a home folder for a user account, ensures that the user account has the same rights on the home folder as on the folder in which the home folder resides.
-
Set user as home folder owner: Upon creation or renaming of a home folder for a user account, ensures that the user account is set as the owner of the home folder.
-
Set user permissions on home folder: Upon creation or renaming of a home folder for a user account, ensures that the user account has the specified access rights on the home folder (such as Change Access or Full Access).
Click Next.
-
On the Home Share Management page, specify settings for user home shares. Do the following:
-
Select Create home share when home folder is created or renamed for the policy to create or rename the home share when creating or renaming the home folder.
-
(Optional) In Share name prefix and Share name suffix, type a prefix and suffix for the name of the home share.
-
(Optional) In Description, type a comment to add to the home share.
-
If you want to limit the number of users that can connect to the share at a time, click Allow this number of users and specify the maximum number of users in the box next to that option. Otherwise, click Maximum allowed.
Click Next.
-
On the Enforce Policy page, you can specify objects to which this Policy Object is to be applied:
-
Click Next, then click Finish.
Upon creation or renaming of a user account, the policy can configure the user account in Active Directory to connect the home folder to the specified network path. From the Connect list, select the drive letter to which you want the policy to map the home folder. In the To box, specify a network path to the home folder. Ensure that the path meets the following requirements:
-
A valid network path must begin with the UNC name of a network file share, such as \\Server\Share\, and should normally include the %username% notation. For example, with the Connect: Z: To: \\Server\Share\%username% option, the policy can configure a user account in Active Directory so that the Home Drive property of the user account is set to Z: and the Home Directory property of the user account is set to \\Server\Share\LogonName where LogonName stands for the pre-Windows 2000 logon name of the user account.
-
The path must include a common share at one level above the home folders. For example, if you type \\Comp\Home\%username%, the policy creates home folders on the share Home on the server Comp, with the name of the folder being the same as the user logon name (pre-Windows 2000). The path \\Comp\%username% is invalid.
-
The folder on the network file share in which you want the policy to create home folders must be listed in the Home Folder Location Restriction policy. For instructions on how to view or modify the list see Configuring the Home Folder Location Restriction policy.
-
If you want the policy to create home shares (see Set user permissions on home folder), you should not specify an administrative share, such as C$, as the common share in the To box. Otherwise, the policy may be unable to create home shares when creating home folders. Thus, if you specify \\Comp\C$\%username%, the policy can successfully create home folders in the folder C:\ on the computer Comp, but it may fail to create home shares.
