Setting the Privilege Manager software path
When you install from the product ISO, the setup wizard copies available software packages to a default location on the local computer.
The default directories are:
- On Windows platforms: %SystemDrive%:\Program Files\Quest Software\Management Console for Unix\software\qpm\default
- On Unix and Linux platforms: /opt/quest/mcu/software/qpm/default
Note: If you install Management Console for Unix from the Privilege Manager for Unix ISO, the "default" directory is replaced with the product version number.
If you plan to install Privilege Manager software onto your hosts from the console, you must ensure the path to the packages is correctly set in System Settings.
To ensure the path to the Privilege Manager software packages is correctly set
- Make note of where your Privilege Manager software packages are located.

- Log into the mangement console with the supervisor account or an Active Directory account with rights to change System Settings; that is, an account in the Console Administration role. See Console Roles and Permissions system settings for details.
- From the top-level Settings menu, navigate to System settings | Privilege Manager | Software & Licenses.
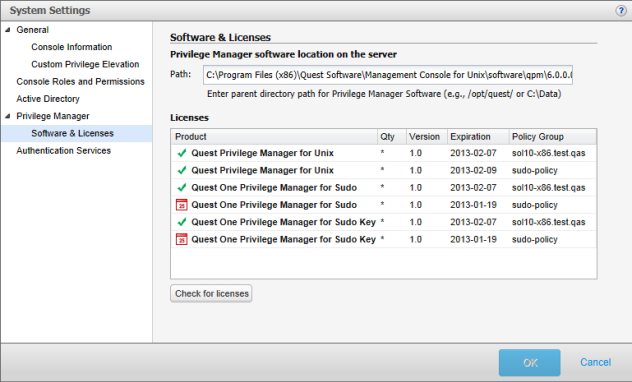
- In the Path box, enter the path to where the Privilege Manager software packages are located on the server and click OK.
Notes:
- The path to the software packages must point to the folder containing the agent, server, and sudo_plugin directories. It is typically the version number of Privilege Manager for Unix.
- When running Management Console for Unix on Windows, the location of the Privilege Manager software packages must be accessible to the mangement console service which runs as 'NT AUTHORITY\NetworkService.
Checking for Privilege Manager licenses
You cannot add Privilege Manager licenses to the primary server by means of the mangement console. You must install the One Identity license files using the pmlicense command. See the Privilege Manager for Unix Administration Guide for details.
Note: You must have a Privilege Manager Policy Server configured in order to update licensing.
To refresh Privilege Manager license information in the console
- Log onto the mangement console using the supervisor account or an Active Directory account with rights to change System Settings; that is, an account in the Console Administration role.
- From the top-level Settings menu, navigate to System settings | Privilege Manager | Software and Licenses.
- Click Check for licenses.
- Click OK to save the System Settings and return to the mangement console.
Note: The mangement console automatically updates the license information each time you login.
Privilege Manager license alerts
While the mangement console always allows you to add Unix hosts and manage local users and groups without a license, One Identity provides a free 30-day unlimited-use trial license that allows you to manage any number of hosts with Privilege Manager for Unix and Privilege Manager for Sudo. After the evaluation period expires, you will receive a "License" alert if you continue to use the Privilege Manager products after the expiration date, and a "Usage" alert if you exceed the number of hosts allowed. It may take up to 60 minutes for the primary policy server to update the license information. The console will report the correct information next time you log into the console, update licenses from System Settings, run the Product License Usage report, or when you configure a service account for a policy group.
License Alerts
When the policy server license expires, you will receive an alert on the console.
Usage Alerts
When you exceed the number of hosts allows by your current product license, you will receive an alert on the console.
After the free 30-day unlimited-use trial license expires:
- Privilege Manager for Unix does not allow you to manage any Privilege Manager Agents without an alert.
- Privilege Manager for Sudo allows you to manage up to 10 Sudo Plugin hosts without an alert.
Authentication Services system settings
Use the Authentication Services System Settings to change the Authentication Services path to the Authentication Services software packages, validate the Authentication Services licenses, and configure the mangement console to use the Windows 2003 R2 schema.

The Authentication Services settings lists the Authentication Services product licenses found during the installation/configuration process.
