The Active Roles Web Interface is a highly customizable Web application that provides administrative coverage for all aspects of Active Directory data management. In the new version, the Web Interface has been redesigned for greater clarity and ease of use, to ensure consistent look and feel, and to improve user experience by adding new navigation options, optimizing search pages, and enhancing the point-and-click interface for creating and reusing search conditions. Also, steps have been taken to decrease response time and improve performance of the Web Interface.
The brand-new user experience simplifies and streamlines the management tasks in the Web Interface. Key highlights include:
- Single-page lists You no longer need to page through search results. All results are now listed on a single page. The single-page list starts displaying search results much faster, and makes it easier to sort, filter, locate and select the objects you want to find.
- Enhanced search tools Unified toolbar for configuring search conditions or filter conditions includes a flexible condition builder allowing you to choose predefined conditions, configure a wide variety of property-based conditions, or specify complex conditions using LDAP syntax.
- Pop-up property pages Pages for creating, viewing or changing objects are now displayed on top of the list of objects, which allows you not to lose the entire list while selecting and managing individual objects.
- Views You can create, save and reuse your personal views of containers. Each view is essentially a search query for objects held in a particular container that returns the list of objects matching the specified search conditions, with the specified set of list columns and list sorting order.
The new Web Interface retains and improves upon all the enterprise-class features of its predecessor, including individually customizable Web Interface sites, user permission-based view of the Web Interface pages, and support for self-administration. It combines an attractive design with superior flexibility and many advanced features. The result is a solution that can be tailored for any category of administrative personnel, whether day-to-day administrators, business data owners, help desk operators, or even regular end-users.
The Web Interface is now easier to navigate. It features simplified layout and large UI elements. Most of UI areas can be resized, collapsed or expanded. This allows you to adapt your workspace on UI to your needs.
The main UI elements include the Header area at the top of the page; the Navigation bar and the Browse pane (Views/Tree) on the left side; the list of objects next to the Browse pane; the Command pane on the right side; and the Summary pane under the list of objects, as shown in the figure that follows.
Figure 1: UI Elements
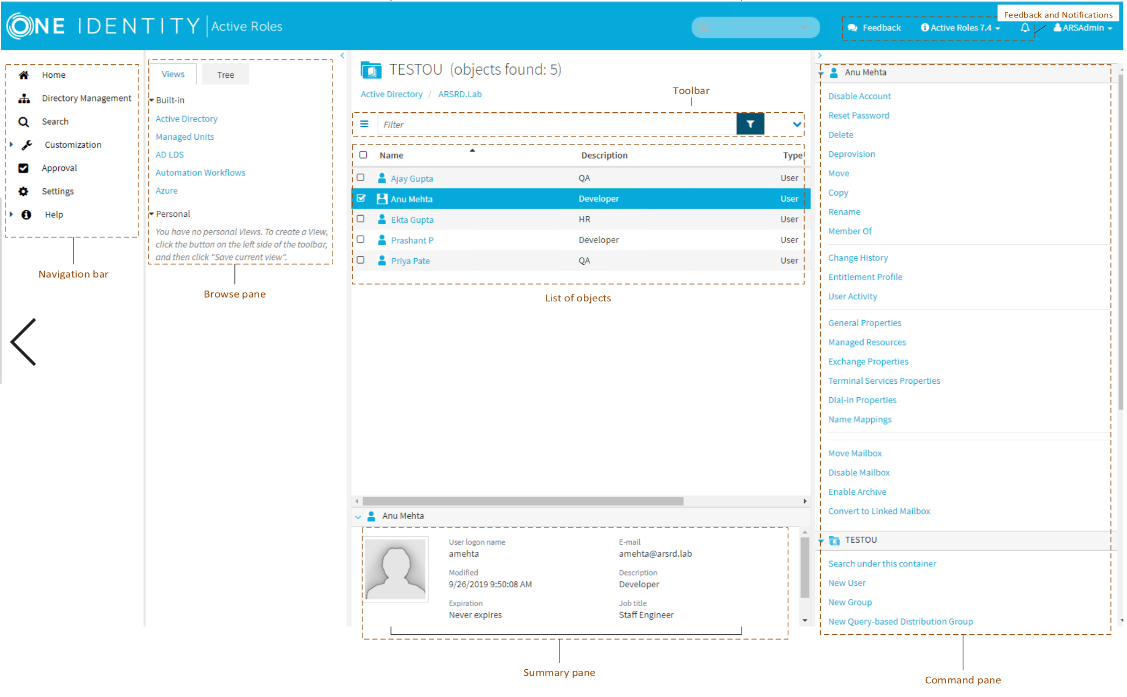
Navigation bar
Located on the left side of the page, the Navigation bar provides the first level of navigation for most of the tasks you can perform in the Web Interface. The Navigation bar is organized by Web Interface areas, and includes the following items:
- Home Go to the Web Interface home page.
- Directory Management Browse for, and administer, directory objects in your organization.
- Search Search for, and administer, directory objects in your organization.
- Customization Customize Web Interface pages. Available to Active Roles Admin only.
- Approval Perform the tasks relating to approval of administrative operations.
- Settings View or change your personal settings that control the display of the Web Interface.
Browse pane
Located next to the Navigation bar, the Browse pane lists the built-in views and personal views, and allows you to access the tree view:
- Built-in views provide entry points to browsing for objects in the directory. Personal views are filter or search queries you build and save to use them again at a later time.
- The tree view helps you browse for directory objects by using the directory tree to navigate through the hierarchical structure of containers.
List of objects
When you select a container or view in the Browse pane, you’ll see a list of objects. If you select a container, the list includes the objects held in that container. If you select a view, the list includes the objects that match the view settings.
The list of objects is no longer divided into multiple pages. Instead, the Web Interface now loads all objects on a single page. This allows you to see the entire contents of an OU or all results of a search operation at a time.
You can use various built-in conditions or create custom conditions to filter the list of objects. It is also possible to customize the list by sorting and filtering, and by adding or removing list columns.
You can select objects from the list and apply commands to the selected object or objects. When you click the name of a container object, such as a domain or an organizational unit, the list changes to display the objects held in that container, thereby enabling you to browse through containers in the directory.
Toolbar
Located above the list of objects, the Toolbar contains a number of controls allowing you to manage the current list of objects:
- Click the Menu button on the left side of the Toolbar to save the current list as a personal view, add or remove list columns, or export the list to a text file.
- Type in the Filter field and then click the button next to that field to have the list include only those objects whose naming properties match what you typed.
- Click the Expand/Collapse button on the right side of the Toolbar to configure filtering criteria based on object properties. To have the list include only the objects that match your filtering criteria, click the button next to the Filter field.
Command pane
Located to the right of the list of objects, the Command pane provides commands you can apply to objects you select from the list as well as commands you can apply to the current container:
- If no objects are selected in the list, the menu includes only the commands that apply to the current container. These commands are grouped under a heading that shows the name of the current container.
- If a single object is selected in the list, the commands that apply to the selected object are added in the top of the menu, under a heading that shows the name of the selected object.
- If multiple objects are selected from the list, the commands that apply to all of the selected objects are added in the top of the menu, under a heading that shows the number of the selected objects.
Summary pane
When you select an object from the list, information about that object is displayed in the Summary pane under the list of objects. The information includes some commonly used properties of the object, and depends upon the object type. For example, user properties provide more detailed information about a user account, such as the logon name, e-mail address, description, job title, department, expiration date, and the date and time that the account was last changed. If you don’t see the Summary pane, click in the area beneath the list of objects.
Personal views
Personal views is a new feature of the Web Interface. Each view displays a filter-based list of objects held in a given OU or container, or a list of search results. You can search a container or filter the contents of a container using search conditions or filter conditions as needed, and then save the resulting search or filter query as your personal view. The view displays the list of objects that match the specified conditions, with the specified list sorting order and set of list columns. Personal views are stored on a per-user basis, so each end-user can have his own views.
Locating directory objects in the Web Interface
The Web Interface provides search and filtering tools to help you locate directory objects quickly and easily. By creating and applying an appropriate search or filter query, you can build shorter lists of objects, which makes it easier to select the objects needed to accomplish your administrative tasks.
You can also save search and filter queries as your personal views, and use them again at a later time. Each view saves the following settings that you specify: the container to search or filter; the search or filtering criteria; the set of columns and the sort order in the list of search or filtering results.
Searching for directory objects
To search for directory objects, you can use the Search page that allows you to select the container to search and specify criteria for the objects you want to find. The Web Interface searches in the container you select and in all of its subcontainers.
The Web Interface opens the Search page when you do any of the following:
- Type in the Search field located in the upper right corner of the Web Interface window, and then press Enter or click the magnifying glass icon in the Search field. In this case, the Web Interface searches all managed Active Directory domains for objects whose naming properties match what you typed and the Search page lists the search results. The naming properties include name, first name, last name, display name, and logon name.
- Click Search on the Navigation bar. The Search page opens, allowing you to configure and start a search.
To configure and start a search
- Click the Search in box on the Toolbar, and then select the container that you want to search. You can select more than one container.
The Web Interface will search in the selected container and all of its subcontainers.
- Specify criteria for the objects that you want to find:
- To search by naming properties, type in the Search field on the Toolbar. The Web Interface will search for objects whose naming properties match what you typed. The naming properties include name, first name, last name, display name, and logon name.
- To search by other properties, click the button on the right side of the Toolbar to expand the Toolbar, click Add criteria, choose the properties by which you want to search, click Add, and then configure the criteria as appropriate. The Web Interface will search for objects that match the criteria that you configured.
- Press Enter to start the search.
The search results are listed on the Search page. You can customize the list by adding or removing list columns and sorting the list by column data. To add or remove list columns, click the Menu button on the left side of the Toolbar and then click Choose columns. To sort the list by column data, click column headings.
Example: Searching by object type
The following steps demonstrate how you can use the search function to list all groups that exist in the Active Directory domains managed by Active Roles:
- Click Search on the Navigation bar.
- Click the button on the right side of the Toolbar to expand the Toolbar, click Add criteria, select the check box next to Object type is User/InetOrgPerson/Computer/Group/Organizational Unit, and then click the Add button.
- On the Toolbar, click Group in the list next to The object type is, and then press Enter.
Filtering the contents of a container
If a container, such as an organizational unit in your Active Directory, holds large number of objects, you can narrow down the displayed list of objects by filtering the objects held in that specific container.
To filter the objects held in a container
- Navigate to the container in the Web Interface.
To navigate to a container, you can search for the container object (see Searching for directory objects) and then click its name in the list of search results on the Search page. Alternatively, you can browse for the container objects by using the Browse pane and the List of objects.
|

|
IMPORTANT: The scope of filtering is always set to the current container, and does not include any subcontainers of that container. Filtering is essentially a search for objects held in a given container only. If you want to search the current container and all of its subcontainers, click Search under this container in the Command pane, and then configure and perform a search as described in Searching for directory objects earlier in this document. |
- Specify how you want to filter the objects held in the container:
- To filter objects by naming properties, type in the Filter field on the Toolbar and then press Enter or click the button next to the Filter field. The list of objects will include only the objects whose naming properties match what you typed. The naming properties include name, first name, last name, display name, and logon name.
- To filter objects by other properties, click the button on the right side of the Toolbar to expand the Toolbar, click Add criteria, choose the properties by which you want to filter, click Add, and then configure the criteria as appropriate. The list of objects will include only the objects that match the criteria you configured.
- To apply the filter, press Enter or click the button next to the Filter field on the Toolbar.
When a filter is applied to a container, the Web Interface lists a subset of all objects held in that container. You can remove the filter to view all objects: If you did not add criteria, clear the Filter field on the Toolbar and then press Enter; otherwise, expand the Toolbar, click Clear all, and then press Enter.
Example: Filtering by object type
The following steps demonstrate how you can configure a filter that lists only user accounts held in a particular organizational unit, removing objects of any other type from the list:
- Navigate to the organizational unit in the Web Interface.
- Click the button on the right side of the Toolbar to expand the Toolbar, click Add criteria, select the check box next to Object type is User/InetOrgPerson/Computer/Group/Organizational Unit, and then click the Add button.
- On the Toolbar, confirm that the field next to The object type is reads User and then click the button next to the Filter field, or press Enter.
Using personal views
In the Web Interface, you can use search or filter queries to locate directory objects. To create a query, you specify a set of rules that determine the contents of the resulting list of objects. You can, for instance, specify that only user accounts held in a particular organizational unit should be listed. In addition, you can adjust the set of columns and the sort order in the list of search or filtering results.
The ability to locate the objects you target is crucial as you need to focus your attention on only those objects that apply to the task you are performing. However, creating a search or filter query that displays the objects you are interested in for a particular task can be time-consuming. Personal views provide a way for you to save that work. Once you have created a query that displays just the objects you need, you can provide the query with a name and save it to use later. That saved query is a personal view. Each view saves the following settings that you specify: the container to search or filter; the search or filtering criteria; the set of columns and the sort order in the list of search or filtering results.
Creating a personal view
Personal views are like search or filter queries that you have named and saved. After creating a personal view, you will be able to reuse it without re-creating its underlying search or filter query. To reuse a personal view, click the name of that view on the Views tab in the Browse pane. The Web Interface applies the search or filter query saved in the view, and displays the results in the list with the same set of columns and sort order as when you created the view.
To create a personal view
- Do one of the following:
- Click the Menu button on the left side of the Toolbar, and then click Save current view.
- In the dialog box that appears, type a name for the personal view, and then click Save.
How to start
To connect to the Web Interface, you need to know the name of the Web server running the Web Interface and the name of the Web Interface site you want to access. The default site names are as follows:
- ARWebAdmin Site for administrators; supports a broad range of administrative tasks
- ARWebHelpDesk Site for Help Desk; supports the most common administrative tasks
- ARWebSelfService Site for self-administration; enables end users to manage their personal accounts
To connect to the Web Interface, type the address of the Web Interface site in the address box of your Web browser, and then press Enter.
For example, to connect to the default site for administrators, you might type http://server/ARWebAdmin where server stands for the name of the Web server running the Web Interface.
