You can configure manual Azure back synchronization (Azure BackSync) by using the existing features of Active Roles components. When setting up manual Azure BackSync, you must configure sync workflow to identify Azure AD-specific users or groups, and to map them to the corresponding on-premises Active Directory (AD) users or groups. After a manual Azure BackSync operation is completed, Active Roles will display the configured Azure attributes for the synchronized objects.
For more information on setting up automatic Azure back-synchronization, see Configuring automatic Azure BackSync.
Prerequisites
The hybrid environment must meet the following requirements to configure Azure BackSync manually:
-
Azure AD Connect must be installed and configured.
-
Azure Active Directory (Azure AD) module version 2.0.0.131 or later must be installed and configured.
-
You must authenticate the Azure tenant of the Azure AD for which you configure back-synchronization. Also, you must consent Active Roles as an Azure application.
For more information, see Configuring Active Roles to manage Azure AD using the GUI in the Active Roles Administration Guide.
-
For the container where Active Roles performs back-synchronization, you must enforce the built-in Azure AD policy that automatically sets the attribute edsvaazureOffice365enabled to true.
- Your Active Roles user must have write permissions for the following attributes:
-
Your Active Roles user must also have local administrator privileges on the machine where Active Roles is running.
To configure a manual Azure BackSync workflow
-
Create a connection to Azure AD using the Azure AD Connector. The configuration requires the following data:
-
Create an Azure Web Application (or use any relevant existing Azure Web Application) under the Azure tenant of your Azure AD. The application must have Application Permissions to read and write directory data in Azure AD.
-
Open the application properties and copy the following:
-
Use the Client ID and Client Key when creating a new Azure AD connection or modifying an existing one. For more information, see Creating a Microsoft Azure Active Directory connection.
NOTE: Two applications are required for Azure BackSync operations:
-
The Web Application that you created in this step, or is already available for the Azure AD Connector.
-
An Azure application that you created while configuring Azure AD in the Active Roles Administration Service.
For details, see Configuring Active Roles to manage Azure AD using the GUI in the Active Roles Administration Guide).
Both applications are required for Azure BackSync operations.
-
Create a connection to Active Roles using the Active Roles Connector. The configuration requires the local domain details and the version of Active Roles you use. Define the scope to select the container from which Active Roles will select the objects for synchronization.
-
In the Active Roles , create a new sync workflow with Sync Workflows > Add sync workflow. Use the Azure AD and Active Roles connections configured previously, and add a synchronization step to synchronize the Azure AD users or groups with the on-premises users or groups in Active Roles.
-
In the on-premises Active Roles users or groups, set the edsvaAzureAssociatedTenantIdattribute attribute to the value of the Azure tenant ID.
NOTE: If you did not configure edsvaAzureAssociatedTenantIdattribute, an error will be logged for each object in the Event Viewer.
-
Configure the Forward Sync Rule to synchronize the following:
-
The Azure Object ID property of the Azure AD user or group to the edsvaAzureObjectID property of the corresponding on-premises Active Roles user or group.
-
Set the edsvaAzureOffice365Enabled attribute in the on-premises Active Roles user or group to true.
-
Set the edsvaAzureAssociatedTenantId attribute to the value of the Azure tenant ID.
-
Create a Mapping Rule. A mapping rule has two functions:
For example, the property userprincipalname can be used to map users between the on-premises AD and Azure AD in a federated environment.
|

|
CAUTION: Based on the environment, make sure to create the correct mapping rule to identify the user or group uniquely. Incorrect mapping rules may create duplicate objects, resulting in Azure BackSync not working as expected. |
NOTE: Consider the following when configuring manual Azure back synchronization:
-
You must perform the initial configuration and back synchronization of Azure AD user IDs only once.
-
Azure AD groups cannot be created in Federated or Synchronized environments. Instead, Azure AD groups are created in Active Roles and are synchronized to Azure AD using native Microsoft tools, such as Azure AD Connect. To manage the Azure AD group through Active Roles, you must perform periodic back synchronization to the on-premises AD.
You can configure automatic Azure BackSync via the  (Settings) > Configure Azure BackSync option of Active Roles . After you finish configuration, the Azure BackSync registration, its required connections, mappings and workflows will be created automatically by Active Roles .
For more information on setting up manual Azure BackSync, see Configuring automatic Azure BackSync.
To configure an automatic Azure BackSync workflow in Active Roles
-
Open the Configure BackSync operation in Azure with on-prem Active Directory objects window of Active Roles . To do so, click (Settings) > Configure Azure BackSync.
-
Select the number of Azure AD services in your Azure tenant:
-
If you have a single Azure AD in your Azure tenant, select I have one Azure AD in my Azure tenant.
-
If you have multiple Azure AD services in your Azure tenant, select I have more than one Azure AD in my Azure tenant.
-
Authenticate your access to Azure AD:
-
If you have selected I have one Azure AD in my Azure tenant, authenticate your access to Azure AD by clicking Log in to Azure.
-
If you have selected I have more than one Azure AD in my Azure tenant, then in the Tenant ID text box, specify the GUID of the Azure AD for which you want to set up synchronization.
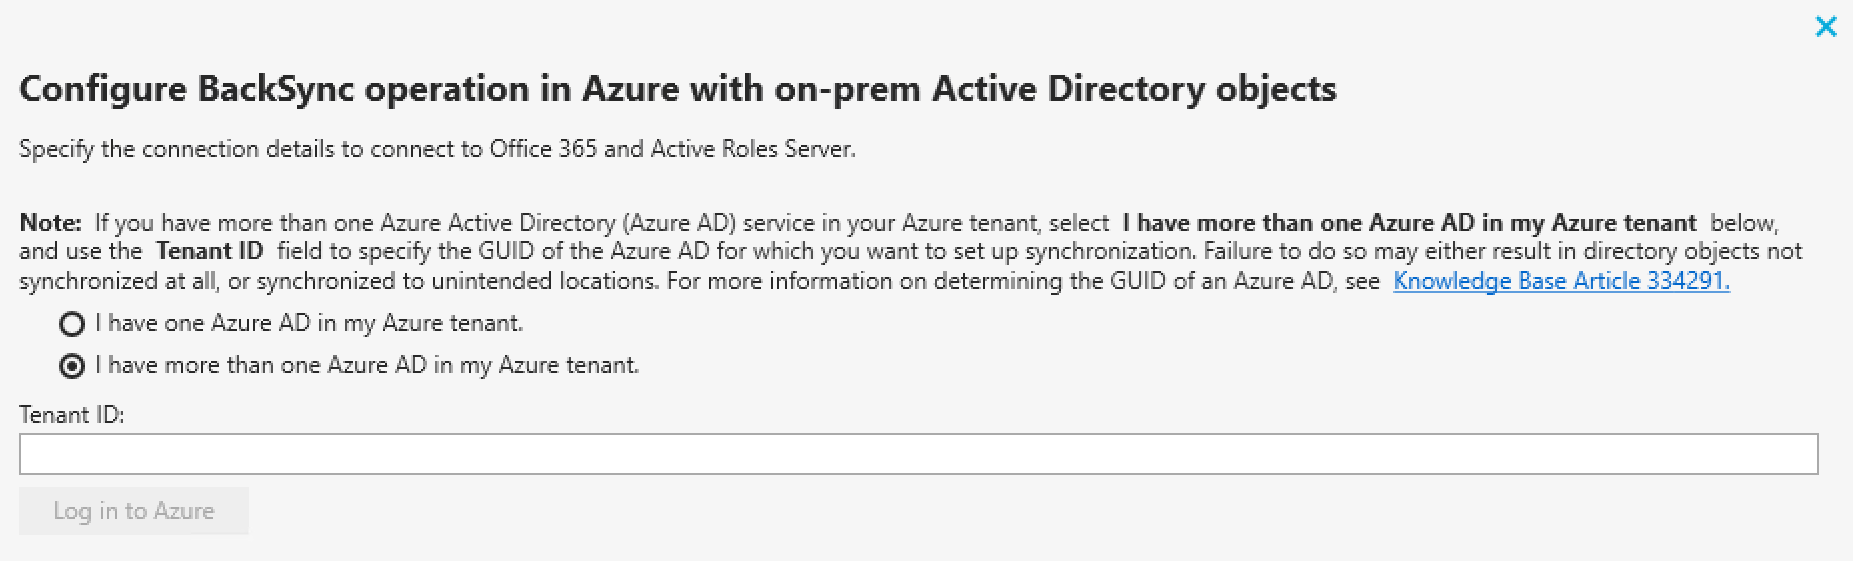
After specifying the tenant ID, click Log in to Azure to authenticate your access to Azure AD.
NOTE: If I have more than one Azure AD in my Azure tenant is selected, the Log in to Azure button will be enabled only if you specify a well-formed Azure AD GUID in the Tenant ID text box.
- Specify whether you want to use a proxy server for the connection:
-
Use WinHTTP settings: Configures the connector to use the proxy server settings configured for Windows HTTP Services (WinHTTP).
-
Automatically detect: Automatically detects and uses proxy server settings.
-
Do not use proxy settings: Specifies to not use proxy server for the connection.
-
Under Connect to, specify the domain name of the computer where Active Roles is running.
-
Select the validation method used to access Active Roles Administration Service. Depending on how Active Roles has been deployed in your organization, you can either use Synchronization Service account or Windows account-based validation. If you have selected Windows account authentication, enter your Windows user name and password.
-
To test the configured Active Roles connection, click Test Active Roles Connection. Successful validation will be indicated by a success message.
-
To apply your changes, click Configure BackSync.
NOTE: If the Azure BackSync settings have already been configured previously, Active Roles will display a warning message to confirm if you want to override the existing Azure BackSync settings with the new settings.
-
To override the existing settings, click Override BackSync Settings.
-
To keep the existing settings, click Cancel.
-
An Application Consent dialog will appear, prompting you for authentication. To consent Active Roles, click OK.
Active Roles will then automatically perform Azure application registration, and will create the required connections, mappings, and workflow steps for back synchronization. For more information on the automatically created Azure BackSync settings, see Settings updated after Azure BackSync configuration operation.
-
To make the new Azure BackSync workflow appear under Sync Workflows, close and reopen Active Roles . The new Azure BackSync workflow will appear with the following default name: AutoCreated_AzureADBackSyncWorkFlow_<tenant-name>.
This section provides descriptions about the Azure App registration, connections, mappings, and workflow steps that are created automatically as a result of the Azure BackSync configuration operation.
Azure App registration
The Azure App is created automatically with the default name as ActiveRoles AutocreatedAzureBackSyncApp_V2.
NOTE: After the Azure App is registered in Azure, you must not delete or modify the application. The back synchronization operation will not work as expected in case you modify or delete the registered Azure App.
Sync workflows
On the , click Sync Workflows to view the sync workflow named AutoCreated_AzureADBackSyncWorkflow_<tenant name> that is created as a result of the Azure BackSync configuration. The workflow displays the following synchronization update steps from Azure AD to Active Roles for users, groups, and contacts:
-
Step 1: AutoCreated_UpdateFromAzureToARSForBackSyncWorkFlowUser_<tenant> for users.
-
Step 2: AutoCreated_UpdateFromAzureToARSForBackSyncWorkFlowGroup_<tenant> for groups.
-
Step 3: AutoCreated_UpdateFromO365ToARSForBackSyncWorkFlowContact_<tenant> for contacts.
NOTE: Consider the following:
-
Multiple tenants are supported in back synchronization. The workflows can be identified using the name of the tenant.
-
The Forward Sync Rules to synchronize the following are automatically configured and displayed in the synchronization update steps for users and groups:
-
The Azure ObjectID property of a user or group is mapped to the Active Roles user or group edsvaAzureObjectID property.
-
The edsvaAzureOffice365Enabled attribute in the Active Roles user or group is set to True.
-
The edsvaAzureAssociatedTenantId attribute in the Active Roles user or group is set to the value of the Azure tenant ID.
-
The Forward Sync Rule to synchronize the following are automatically configured and displayed in the synchronization update steps for contacts:
-
Azure ExternalDirectoryObjectID property of a contact is mapped to the Active Roles contact edsaAzureContactObjectId property.
-
The edsvaAzureOffice365Enabled attribute in the Active Roles user or group is set to True.
-
The edsvaAzureAssociatedTenantId attribute in the Active Roles user or group is set to the value of the Azure tenant ID.
Connections
On the , click Connections to view the connections from Active Roles, Azure AD, and Microsoft 365 to external data systems. The following connections are configured and displayed by default:
-
AutoCreated_ARSConnectorForBackSyncWorkFlow_<tenant>
-
AutoCreated_AzureADConnectorForBackSyncWorkFlow_<tenant>
-
AutoCreated_O365ConnectorForBackSyncWorkFlow_<tenant>
NOTE: Multiple tenants are supported in back synchronization. The connection name can be identified using the name of the tenant.
Mapping
On the , click Mapping to view the mapping rules which identify the users, groups, or contacts in Azure AD and on-premises AD uniquely and map the specified properties from Azure AD to Active Roles appropriately.
On the Mapping tab, click a connection name to view or modify the mapping settings for the corresponding connection. The user, group, and contact mapping pair information is displayed by default as a result of the Azure BackSync configuration. For example, the property userprincipalname can be used to map users between on-premises AD and Azure AD in a federated environment.
NOTE: Consider the following when working with mapping rules:
-
For more information to manage mapping pairs for the connections see Change scope for mapping rules.
-
The mapping rules are created by default. Based on the environment, make sure that the default mapping rules identify the user or group uniquely. Otherwise, make sure to correct the mapping rule as required. Incorrect mapping rules may create duplicate objects and the back synchronization operation may not work as expected.
-
Initial configuration and running of back synchronization operation for Azure AD users ID and group ID is a one-time activity. If required, you can reconfigure the Azure BackSync settings, which will override the previously configured back synchronization settings.
If the Azure tenant of your organization contains multiple Azure AD services, One Identity highly recommends to specify its GUID (also known as Tenant ID) when configuring Azure BackSync automatically.
For details on configuring Azure BackSync automatically, see Configuring automatic Azure BackSync.
The GUID of each Azure AD service is listed on the Microsoft Azure Portal.
To find the GUID (Tenant ID) of an Azure AD
-
Log in to the Microsoft Azure Portal.
-
Click Show portal menu.
-
Click Azure Active Directory.
-
In the Overview tab, under the Basic information heading, the value of the Tenant ID is the GUID (Tenant ID) of the Azure AD.
TIP: If you have access to multiple Azure AD services, you can switch between them with Manage tenants.
