
To convert a group to another group type
Introduction
Getting Started
Starting the Active Roles console
User Interface overview
View mode
Using Managed Units
Setting up filter
Finding objects
User or Service Account Management
Steps for searching for a user, contact, or group
Steps for searching for a computer
Steps for searching for an Organizational Unit
Steps for using advanced search options
Steps for building a custom search
LDAP syntax
Getting policy-related information
About user accounts
User account management tasks
Group Management
Creating a user account
Finding a user account
Copying a user account
Modifying user account properties
Renaming a user account
Disabling and enabling a user account
Resetting user password
Adding user accounts to groups
Removing a user account from groups
Changing a user’s primary group
Performing Exchange tasks on a user account
Moving user accounts
Exporting and importing user accounts
Deleting user accounts
Deprovisioning a user account
Restoring a deprovisioned user account
Managing user certificates
Management of group Managed Service Accounts
About groups
Group management tasks
Computer Account Management
Creating a group
Finding a group
Copying a group
Modifying group properties
Changing group type and group scope
Renaming a group
Assigning a manager over a group
Adding members to a group
Removing members from a group
Performing Exchange tasks on a group
Moving groups
Exporting and importing groups
Deleting groups
Deprovisioning groups
Restoring deprovisioned groups
Administering query-based distribution groups
Administering dynamic (rule-based) groups
Using temporal group memberships
About computer accounts
Computer account management tasks
Organizational Unit Management
Creating a computer account
Finding a computer account
Modifying computer account properties
Disabling and enabling a computer account
Resetting a computer account
Adding computer accounts to groups
Removing a computer account from groups
Moving computer accounts
Exporting and importing computer accounts
Deleting computer accounts
Managing a remote computer
Using Remote Desktop Connection
Viewing BitLocker recovery passwords
About Organizational Units
Organizational Unit management tasks
Management of Contacts
Management of Exchange Recipients
Creating an Exchange mailbox
Steps for creating a user mailbox
Steps for creating a room or equipment Mailbox
Steps for creating a linked mailbox
Steps for creating a shared mailbox
Performing Exchange tasks
Managing Exchange-related properties
Exchange General tab
Exchange Advanced tab
E-mail Addresses tab
Mail Flow Settings tab
Mailbox Settings tab
Mailbox Features tab
Calendar Settings tab
Resource Information tab
Master Account tab
Mailbox Sharing tab
Managing Unified Messaging users
Steps for converting a group to another group type
Renaming a group
To rename a group, right-click the group, and then click Rename. Type a new name and press ENTER. This displays the Rename Group dialog box, shown in the following figure. In the Rename Group dialog box, you can change the group name and group name (pre-Windows 2000).
Figure 14: Rename Group
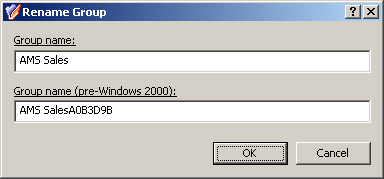
In the Rename Group dialog box, hyperlinks are used to indicate the properties controlled by Active Roles policies (see Getting policy-related information earlier in this document).
Steps for renaming a group
To rename a group
- In the console tree, locate and select the folder that contains the group.
- In the details pane, right-click the group and click Rename.
- Type a new name (or clear the existing name), and then press ENTER to display the Rename Group dialog box.
- Use the Rename Group dialog box to modify (if needed) the group name and the group name (pre-Windows 2000).
- When finished, click OK.

Assigning a manager over a group
To assign a manager over a group, right-click the group, click Properties, and go to the Managed By tab in the Properties dialog box, shown in the following figure. On the Managed By tab, click Change and select the user or contact to designate as the manager.
Figure 15: Assigning a manager over a group
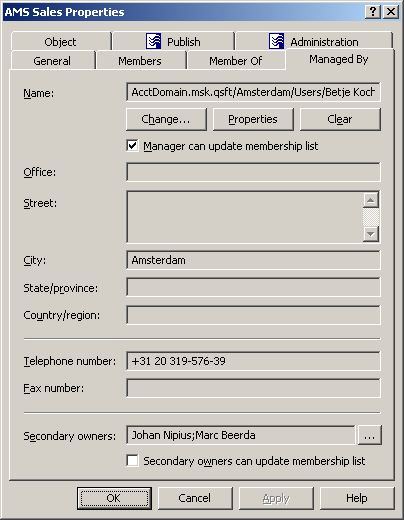
If you select Manager can update membership list, the manager can use Active Roles to add and remove members from the group.
It is possible to assign multiple group owners, to load balance the management of the group. To assign additional owners to the group, click the button next to the Secondary owners box. Group owners can be given the same rights over the group as the manager. For example, selecting the check box beneath the Secondary owners box gives the secondary owners the authority to add or remove members from the group.
It is possible to assign management of the group to another group: you can select a group in the Select Objects dialog box that you use to specify the manager or a secondary owner. This enables every member of the group to act as the manager or secondary owner.