
Dell™ One Identity Cloud Access Manager 8.1 - How to Develop OpenID Connect Apps
What is OAuth v2.0?
What is OpenID® Connect?
OpenID® Connect ID Token
OpenID® Connect Token signing
OAuth v2.0 and OpenID® Connect response types
Obtaining claims from Cloud Access Manager
OpenID® Connect discovery
When would you use OAuth v2.0 and OpenID® Connect?
Using the OpenID® Connect Flow Test Tool
Legal notices
Client machine
Cloud Access Manager administration
Exchanging set up information between Cloud Access Manager and client machine
Cloud Access Manager administration
Client machine
Building your OpenID® Connect client
Example: Providing OpenID® Connect SSO to a Salesforce.com Auth Provider
Building your OpenID® Connect client
Example: Providing OpenID® Connect SSO to a Salesforce.com Auth Provider
This example will guide you through the steps required to configure single sign-on for Salesforce.com® using OpenID Connect.
|
1 |
Log in to the Administration Console using the desktop shortcut Cloud Access Manager Application Portal, then select Add New from the Applications section on the home page. Cloud Access Manager provides a set of application templates to automatically configure common applications. This example describes how to configure an application manually, rather than using a template. |
|
2 |
Click Configure Manually. |
|
3 |
|
4 |
Create a new Auth. Provider in Salesforce of type Open ID Connect and enter the endpoint, issuer and client information displayed on the Cloud Access Manager OpenID Connect / OAuth 2.0 Settings page, see Step 3. |
|
5 |
After creating the Auth Provider in Salesforce, copy the Callback URL into the Redirect URI text box on the Cloud Access Manager Using OpenID Connect / OAuth 2.0 Settings page. |
|
6 |
|
7 |
|
8 |
Click Next to continue. |
|
9 |
|
10 |
You will now see the Permissions page which enables you to control the users who can access the application. By default, all Cloud Access Manager users have access to the application. You can restrict access to the application to users who belong to a specific Cloud Access Manager role, but for this demonstration deployment, simply click Next to allow all Cloud Access Manager users to access the application. |
|
11 |
|
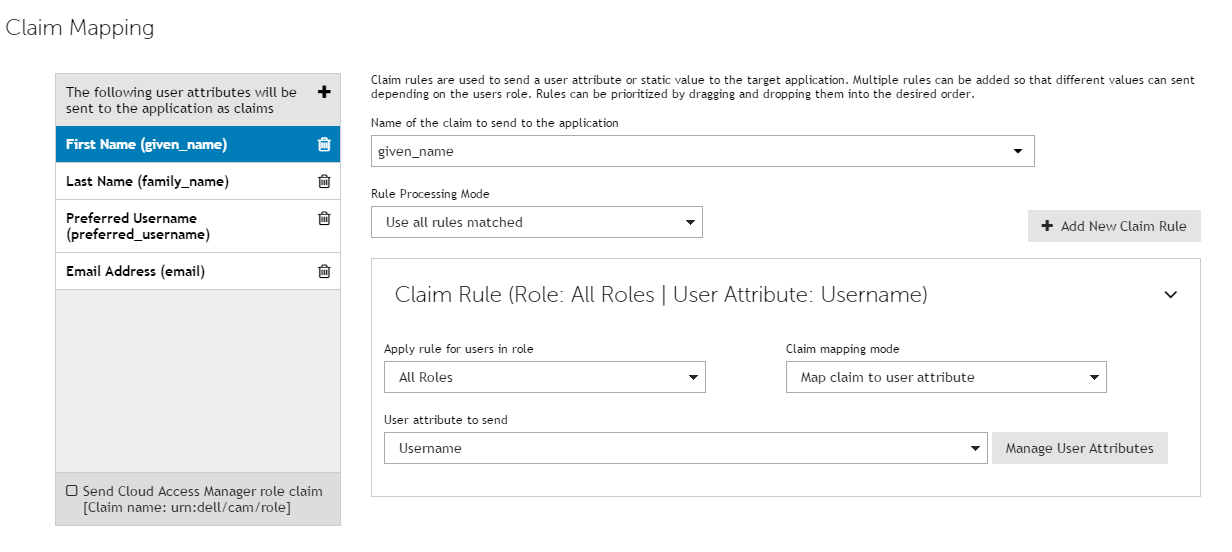
13 |
You can now configure how the application is displayed on the Cloud Access Manager Portal. Enter the Title and Description you want to display on the Cloud Access Manager Portal. |
|
14 |
Click Fetch icon from application to locate and display the application icon. |
|
|
|
|
|
|
|
|
|
|
|
|
15 |
Click Finish to complete the configuration of the application. |
|
2 |
Go to Setup. |
|
3 |
Go to Security | Auth Provider. |
|
4 |
Click New. |
|
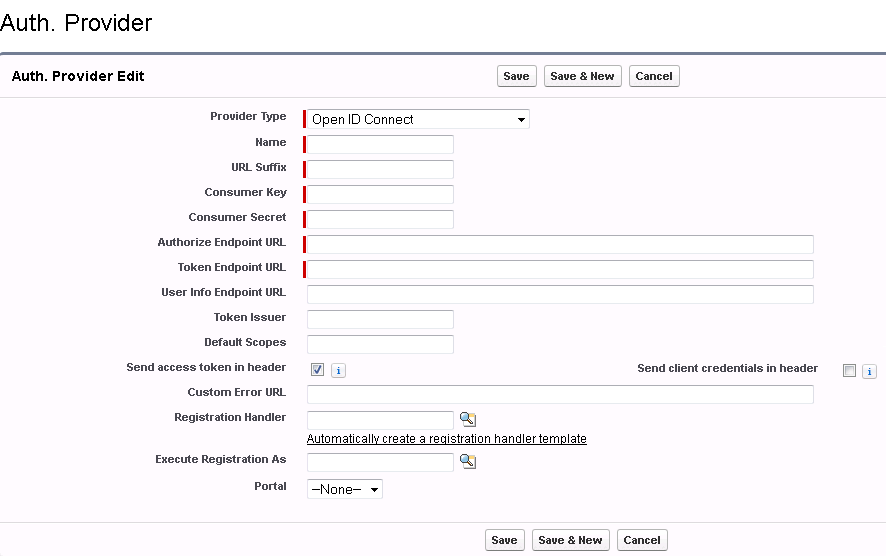
5 |
|
6 |
Enter a Name for the provider. |
|
7 |
Copy the corresponding values from your Cloud Access Manager OpenID Connect / OAuth 2.0 Settings into the appropriate fields, Consumer Key, Consumer Secret, Authorize Endpoint URL, Token Endpoint URL, User Info Endpoint URL, Token Issuer. |
|
8 |
Click Automatically create a registration handler template. |
|
9 |
Select a privileged user for Execute Registration As. |
|
10 |
Click Save. |
|
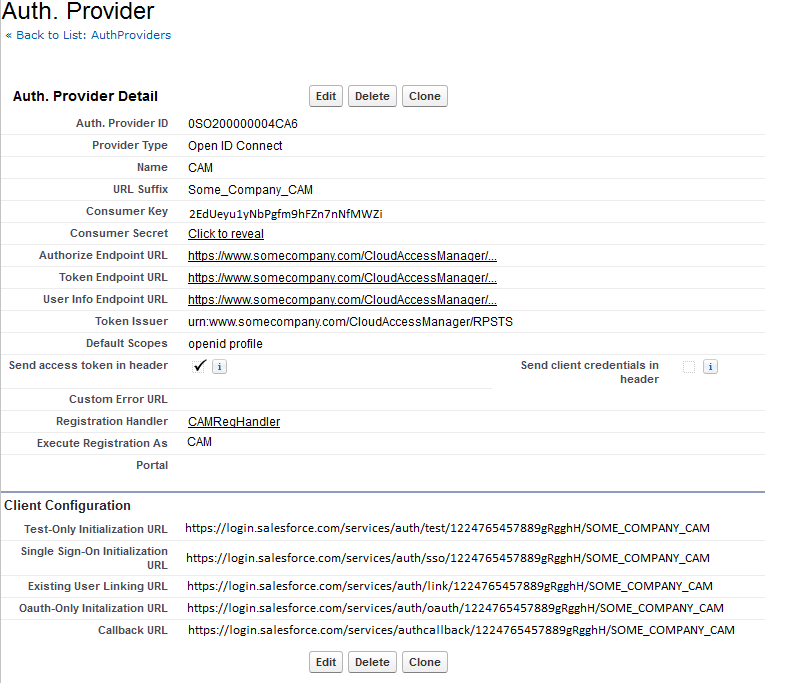
11 |
Copy the Callback URL into Cloud Access Manager for the Redirect URI. Single Sign-On Initialization URL — This is used to SSO into Salesforce using the Registration Handler. The default handler created above will require the Salesforce account to be already linked to a Cloud Access Manager account. However, it is possible to write your own handler which would automatically provision a user and link it to a Cloud Access Manager account. Existing User Linking URL — This is used to link Cloud Access Manager accounts to existing Salesforce accounts. The user is prompted to log into Cloud Access Manager and to then select the Salesforce account to link to. |
|
1 |
Log in to the Administration Console using the desktop shortcut Cloud Access Manager Application Portal, then select Add New from the Applications section on the home page. Cloud Access Manager provides a set of application templates to automatically configure common applications. This example describes how to configure an application manually, rather than using a template. |
|
2 |
Click Configure Manually. |
|
3 |
|
4 |
Configure the application with the endpoint, issuer and client information displayed on the Cloud Access Manager OpenID Connect / Oauth 2.0 Settings page displayed in Step 3. |
|
5 |
|
6 |
Select Public as the Client Type. |
|
7 |
|
8 |
|
9 |
You will now see the Permissions page, which enables you to control which users can access the application. By default, all Cloud Access Manager users have access to the application. You can restrict access to the application to users who belong to a specific role, but for this example, simply click Next to allow all users to access the application. |
|
10 |
|
11 |
Click Finish to complete the configuration of the application. |
Legal notices
Refer to our web site (quest.com) for regional and international office information.
Dell, Dell logo and Dell™ One Identity Cloud Access Manager are trademarks of Dell Inc.and/or its affiliates.
OpenID® is a trademark (registered in numerous countries) of the OpenID Foundation. Other trademarks and trade names may be used in this document to refer to either the entities claiming the marks and names or their products. Dell disclaims any proprietary interest in the marks and names of others.
OpenID® is a trademark (registered in numerous countries) of the OpenID Foundation. Other trademarks and trade names may be used in this document to refer to either the entities claiming the marks and names or their products. Dell disclaims any proprietary interest in the marks and names of others.
|
CAUTION: A CAUTION icon indicates potential damage to hardware or loss of data if instructions are not followed. | |
|
WARNING: A WARNING icon indicates a potential for property damage, personal injury, or death. | |