Using links
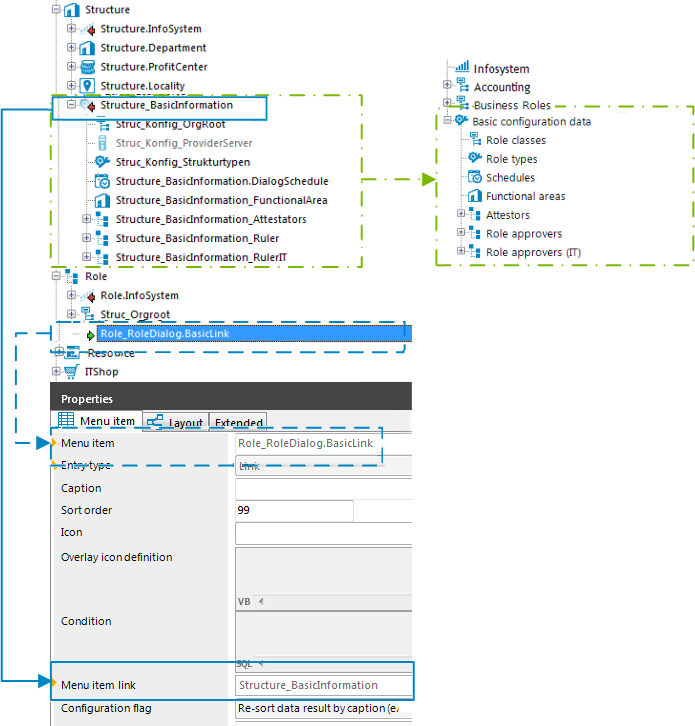
Links support the navigation configuration. Links are implemented to reference frequently used menu items. Parts of the navigation interface that require an application several times, only need to be set up once. The links themselves do not appear in the navigation. Instead the referenced menu items and their child menu items are shown.
Figure 13: Structure of the navigation interface using links in the User Interface Editor (left) and display in the Manager (right).

Special features of using links
-
Links inherit some properties of the reference entry.
-
You can use variables in the reference entry, for example in conditions for lists or data-dependent menu entries. Value assignment to the variables only takes place in the link. You must define the variables in the link.
-
The caption and the icon of the reference entry are overwritten with the corresponding values from the link.
To use links
-
Create the menu item that you want to use as the reference entry.
-
If necessary, create other menu items below the reference entry.
-
Create the menu items that link to the reference entry. Enter at least the following information for the link.
-
Menu item: Enter the name of the menu item.
-
Entry type: Select the Link entry type.
-
Menu item link: Select the reference entry to be shown at runtime when the link is called.
-
Assign an application and the permissions groups.
TIP:
- If the menu item is of the Link type, you can use the Follow link node context menu to navigate to the reference entry.
- For a reference entry, you can use the Referenced by context menu to display all links that refer to this reference entry and then navigate to these entries.
Related topics
Using variables
You may use variables to configure identifiers and menu item display templates for menu items in insert values and database queries. In some parts of the navigation interface you have to implement variables as, for example, in the case of formulating database queries for recursive data-dependent menu items.
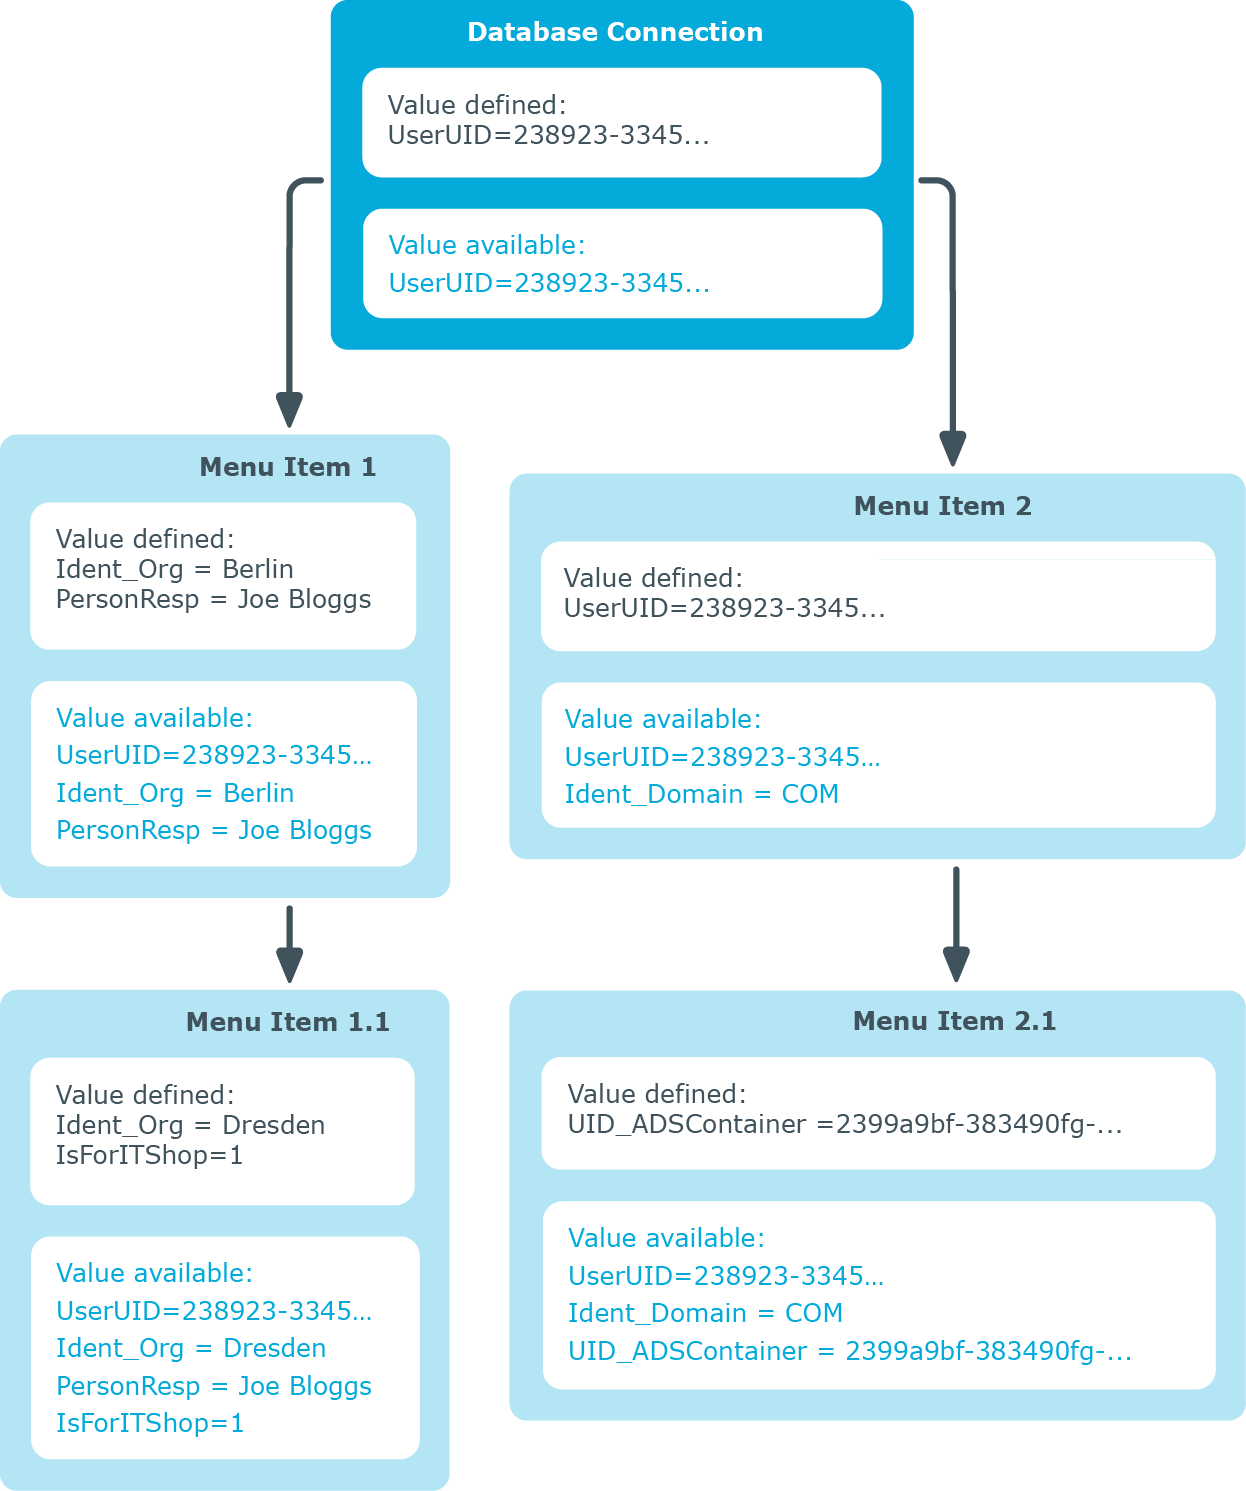
Variables are inherited within a hierarchical navigation. This means that variables in deeper levels of a hierarchy can be reused or overwritten. The actual run-time value is passed to the variable.
Figure 14: Inheriting variables in a hierarchical navigation interface

The variables of the session object that are listed below are always available when the menu items are being set up.
Table 39: Global session object variables
|
EnvUserName |
Name of user to be authenticated in the environment, for example, Domain\User in Active Directory |
|
LogonUser |
DialogUser.Username of the currently logged in user. |
|
DialogUserUID |
DialogUser.UID_DialogUser of the logged in user. |
|
UserName |
Name displayed in XUserInserted or XUserUpdated. |
|
UserUID |
Logged in user’s UID_Person, if user related authentication is being used. |
|
ShowCommonData |
Specifies whether system data is shown (1) or not shown (0) The variable is evaluated in the Designer by the program settings. |
|
SessionType |
Specifies whether a direct database connection or a connection over an application server is supported.
Direct database connection only: '%SessionType%' = 'Direct'
Connect with the application server only: '%SessionType%' = 'AppServer' |
Use the following syntax to access the variables:
%<variable>%
Related topics
Creating and displaying variables
In addition to the variables belonging to the session object, you can also define other variables. The variable definition is made up of variable type, variable name and the value. Basically, any string is permitted in the variable definition. However, events have proved that it is a good idea to use a pattern that is unlikely to occur in the data but is accepted as a string by the database server in use.
Use the following syntax to access the variables:
%<variable>%
Table 40: Variable definitions
|
Column |
Any string |
Current object’s column name |
Only used in data-dependent menu items. |
|
Display value |
Any string |
Current object’s column name |
Only used in data-dependent menu items. The Multilingual and List of permitted values column properties are resolved when creating the display value for a column. |
|
Text |
Any string |
Freely defined value |
Can be used in all menu items. |
To create variables
-
In the Designer, select the User interface | User interface navigation category.
The menu items are loaded and displayed in the User Interface Editor for editing.
-
Select the menu item in the navigation overview.
-
In the edit view, select Variable definitions.
In this view, all the variable definitions that belong to the selected menu item are displayed in tabular form with type, name, and assigned value.
TIP: To display variables inherited from parent nodes, click  .
.
-
To create a variable, click  and enter the following information.
-
Type of variable: Select Column, Display value, or Text.
-
Variable: Enter the name of the variable.
-
Value: Enter the value of the variable. The value to be entered depends on the variable type.
The actual value stored in the variable can be shown in the administration tools as additional navigation information.
To display variable values of a menu item in the Manager
-
In the Manager, enable the Show additional navigation information program setting.
-
In the Manager, select menu item in the navigation and select the Definition | Defined variables context menu item.
Related topics
Forms for the user interface
User interface forms are used to display and edit data in the user interface. The basic information for representing data on the user interface forms is described in form definitions and form templates. The form definition referenced by the interface form needs to be found. The form template given in the form definition is checked for existence in the form archive and to see if it labeled for the correct display purposes.
Detailed information about this topic


 .
. and enter the following information.