Logging in to One Identity Manager tools
NOTE: One Identity Manager tools can only be started if the user owns the relevant program functions. For more information about program functions, see the One Identity Manager Authorization and Authentication Guide.
When you start one of the One Identity Manager tools, a default connection dialog opens. This tries to restore the last used connection.
Figure 5: Default connection dialog
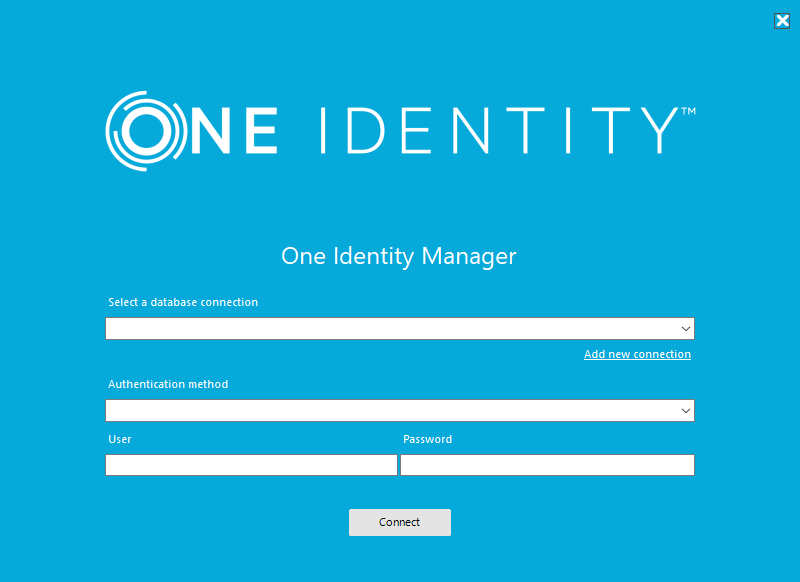
When you log in, you need to be aware of the difference between a database user and a user of individual One Identity Manager tools (system user). Several system users can work with one database user.
Login takes place in two steps:
-
Selecting the database connection to log in to the database
You can login to the database via an application server or a direct connection to the database.
-
Selecting the authentication method and finding the system user for logging in
Permitted system user IDs are determined by the authentication module you select. One Identity Manager provides various authentication modules for this purpose.
NOTE: After the initial schema installation, only the System user and ComponentAuthenticator authentication modules and the role-based authentication modules are enabled in One Identity Manager. For more information about One Identity Manager authentication modules, see the One Identity Manager Authorization and Authentication Guide.
NOTE: Use non role-based authentication modules to log in to the Designer. Role-based authentication modules for logging in to the Designer are not supported.
Detailed information about this topic
Logging in to the One Identity Manager database
To select an existing connection
NOTE:
-
Newly created connections are not shown in the connection dialog until the program has been restarted.
-
Connections that do not use the expected access level for SQL Server logins are not shown in the connection dialog.
-
The access level for an existing connection is shown in the menu item's tooltip.
For more information about minimum access levels for One Identity Manager tools, see the One Identity Manager Authorization and Authentication Guide.
To create a new connection to the One Identity Manager database
-
Under Select a database connection, click Add new connection and select the SQL Server system type.
-
Click Next.
-
Enter the connection data for the database server.
-
Server: Database server.
-
(Optional) Windows Authentication: Specifies whether the integrated Windows authentication is used. This type of authentication is not recommended. If you decide to use it anyway, ensure that your environment supports Windows authentication.
-
User: The user's SQL Server login name.
-
Password: Password for the user's SQL Server login.
-
Database: Select the database.
-
Select Test connection in the Options menu.
This attempts to connect the database with the given connection data. You are prompted to confirm a message about the test.
NOTE: Using Options > Advanced options item, you can make additional changes to the connection configuration.
-
Click Finished.
To set up a new connection to the application server
-
Under Select a database connection, click Add new connection and select the Application server system type.
-
Click Next.
-
Enter the address (URL) for the application server.
-
If you access an application server secured through SSL/TLS, configure additional settings for the certificate:
-
If the certificate's server name matches the application server's URL and, if the server certificate can be successfully validated, the server name displayed in green next the URL. By clicking the server name next to the URL, you can get information about the certificate.
-
If the certificate's server name does not match the application server's URL or, if the server certificate cannot be successfully verified, the server name is displayed in red next the URL. You decide whether to trust the certificate.
-
If a client certificate is expected according to the SSL settings, select the certificate under Select client certificate and specify how the certificate is to be verified. You have the following options: Find by subject name, Find by issuer name and Find by thumbprint.
-
If you want to use a self-signed certificate, enable the Accept self-signed certificate option.
-
Select Test connection in the Options menu.
This attempts to connect the database with the given connection data. You are prompted to confirm a message about the test.
NOTE: Using Options > Advanced options item, you can make additional changes to the connection configuration.
-
Click Finished.
To delete a connection
- Select the connection under Select a database connection.
- Press DEL.
- Confirm the security prompt with Yes.
The database connection is no longer displayed in the connection dialog.
To delete an SQL Server from the server list
-
Under Select a database connection, click Add new connection and select the SQL Server system type.
-
Click Next.
-
Open the Server menu and mark the server you want to delete.
-
Press the Del key.
-
Confirm the security prompt with Yes.
This removes the SQL Server from the list.
Related topics
Logging in to the One Identity Manager tools using a system ID
Following the database login, the user must log in to the program as a system user. Permitted system user IDs are determined by the authentication module you select.
NOTE:
-
After the initial schema installation, only the System user and ComponentAuthenticator authentication modules and the role-based authentication modules are enabled in One Identity Manager.
-
The One Identity Manager tools can only be started if the user has the relevant program function permissions.
-
Use non role-based authentication modules to log in to the Designer. Role-based authentication modules for logging in to the Designer are not supported.
To log in to One Identity Manager tools with a system user identifier
-
Select the authentication module under Authentication method in the connection dialog.
This displays a list of all available authentication modules.
-
Enter the login data for the system user ID.
The login data required depends on which authentication module you select.
-
Click Connect.
The connection data is saved and made available for the next login.
Figure 6: Login window
For more information about the One Identity Manager authentication modules and program functions, see the One Identity Manager Authorization and Authentication Guide.
Related topics
Enabling additional authentication modules
For more information about One Identity Manager authentication modules, see the One Identity Manager Authorization and Authentication Guide.
To use an authentication module for logging in, you must enable the authentication module. Perform the following steps to enable an authentication module.
To enable an authentication module
-
In the Designer, select the Base data > Security settings > Authentication modules category.
-
In the List Editor, select the authentication module.
-
In the Properties view, set the Activated property to True.
-
Select the Database > Save to database and click Save.
