
戻る
-
タイトル
Missing Tables or Columns in Identity Manager after a Schema Extension -
説明
After attempting to extend the Identity Manager schema, either with a Database Transport or via the Schema Extension wizard, a column might have been created and is visible when viewing the table from SQL Management Studio (SSMS) but does not display when looking at the table from within the Identity Manager applications. -
原因
Identity Manager has multiple layers (as documented in the Configuration Guide). At a very quick overview, this looks like:
Layers of Identity Manager
Database Layer
• The database represents the core of Identity Manager
Object Layer
• The object layer enables object-oriented access to the database
Presentation Layer
• The presentation layer comprises front-ends that are used to input and output data.
When a custom table or column is added in Identity Manager, a corresponding record is added to the tables DialogTable and DialogColumn.
In the event that a Column shows up directly in the database, but is not visible in Identity Manager, this missing entry in the DialogColumn is probably the culprit.
Figure 1: Missing Custom_Column_1 from Object Browser
Figure 2: Confirmation that the Custom_Column_1 exists on the table in the Database
Figure 3: Expected entry in DialogColumn for Custom_Column_1 (Left) vs Missing DialogColumn entry for Custom_Column_1 (Right)
-
対策
To correct this data consistency issue the following resolution steps should be followed.
NOTE: A database backup MUST be performed prior to following these steps.
1. Open "Designer"
2. Select "Database" | "Check data consistency" from the menu
3. In the "Test Options" popup, expand "Configuration" | "BaseInfo" and check "Missing columns in DialogColumn (tables)"
4. Click "OK" to close the pop-up
Figure 4: Test Options pop-up with "Missing columns in DialogColumn (tables)" checked.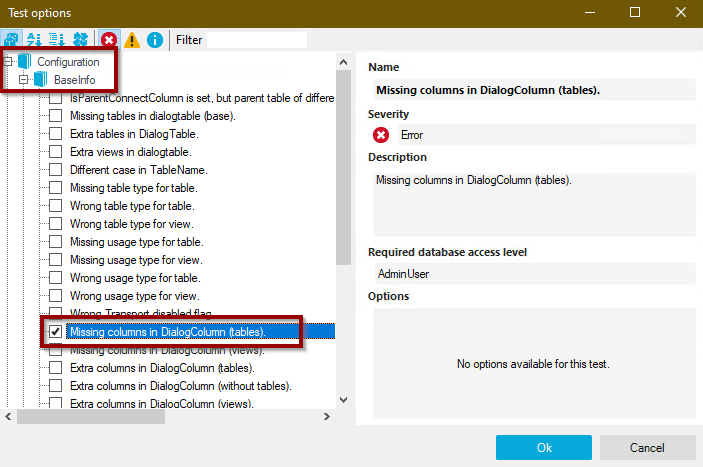
5. Right-Click on the "Database" row at the top, and select "Verify"
Figure 5: Data Consistency Tab demonstrating where to Right-Click and select "Verify"
6. In the bottom results an error is listed. Double-clicking on the error opens a popup to show the details of the missing column.
Figure 6: The results of the Consistency Check "Missing columns in DialogColumn (tables)", showing a missing entry in DialogColumn for the column not displayed in Identity Manager applications.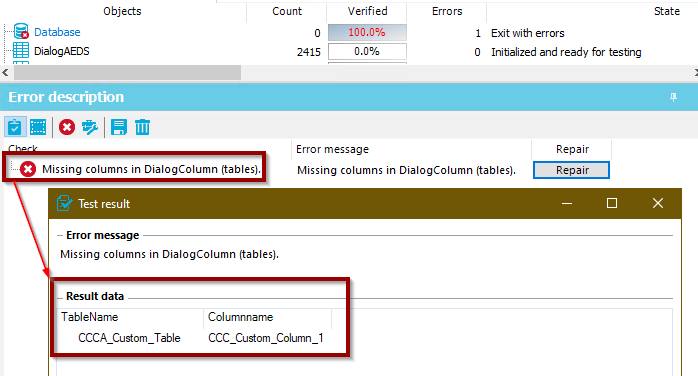
7. Next to the error, a "Repair" button might be available. Click this button to let Identity Manager attempt to correct the data consistency issue.
8. If the repair is successful, the check will now show a blue icon in the error results.
Figure 7: A successful repair icon is displayed in the consistency check list.
For more information about what the Repair button does, the below SQL query is executed by Designer when the button is clicked.
insert into dialogcolumn (UID_DialogColumn, uid_dialogtable, columnname
	, XObjectKey
	, XUserInserted, XUserUpdated, XDateInserted, XDateUpdated
	, SchemaDataType, SchemaDataLen
	)
	 select x.UID_DialogColumn, x.UID_DialogTable, x.columnname
		, dbo.QBM_FCVElementToObjectKey1('DialogColumn', 'UID_DialogColumn', x.UID_DialogColumn)
		, dbo.QBM_FGIDBOwner(), dbo.QBM_FGIDBOwner(), GetUTCDate(), GetUTCDate()
		, x.DATA_TYPE, x.CHARACTER_MAXIMUM_LENGTH
		from (
			select -- 33849dbo.QBM_FCVStringToGUID(dbo.QBM_FGIDBOwner(), o.COLUMN_NAME + o.TABLE_NAME + dbo.QBM_FGIDBOwner())
				dbo.QBM_FGIUID_DialogColumn (o.TABLE_NAME, o.COLUMN_NAME, null)
					as UID_DialogColumn,
					t.UID_DialogTable, rtrim(left(o.COLUMN_NAME,30)) as columnname
					, o.DATA_TYPE
					, o.CHARACTER_MAXIMUM_LENGTH
			from information_schema.columns o join dialogtable t on t.TableName = o.Table_name
			and o.Column_name not in ( N'msrepl_synctran_ts'
				, N'msrepl_tran_version'
				)
			and not exists (select top 1 1
				from dialogcolumn g
				where g.UID_DialogTable = t.UID_DialogTable
				and g.columnname = o.Column_name
				)
			and t.TableType in ('B', 'T')
			) as x