サポートと今すぐチャット
サポートとのチャット

Safeguard Authentication Services 5.0.1 - macOS Administration Guide

Privileged Access Suite for Unix Installation Safeguard Authentication Services macOS components Safeguard Authentication Services client configuration Special macOS features Limitations on macOS Group Policy for macOS Certificate Autoenrollment Glossary

Adding a printer

Note: This procedure shows you how to add a printer that will be available on macOS clients.

To add a printer

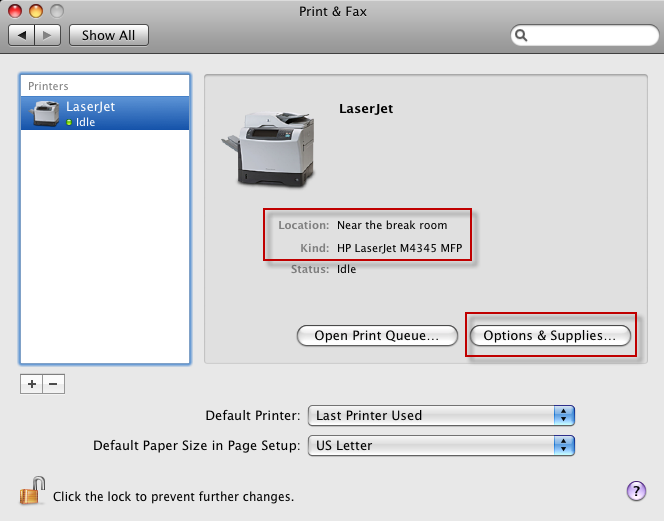
  1. In order to determine the proper printer settings the best practice is to first configure the printer on a single macOS host system. Add the printer as instructed in the macOS documentation and verify that you can print to it. Once you have set up the printer open the printer properties and make a note of the following settings: Name, Location, Kind and URL. The following screen shots show where to find these settings:

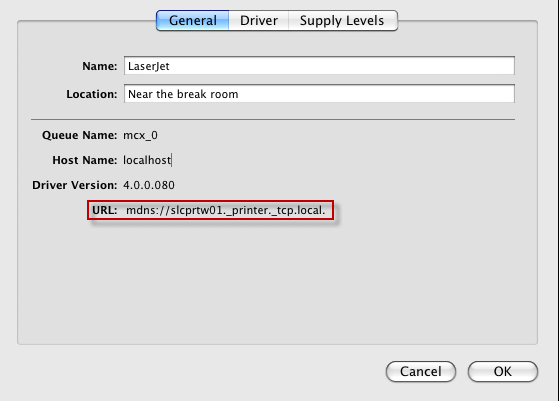
    Click the Options & Supplies button to determine the URL:

    This is all of the information you will need in order to configure the printer for all of your macOS systems using Group Policy.

  2. In Group Policy Management Editor, open the Printing policy (Computer Configuration | Policies| Mac OS X Settings | Workgroup Manager Settings) and select the Printers tab.
  3. Select the Always management mode.
  4. Click Add to add a new printer to the policy. The Add printer dialog appears. Enter the Name, Location, Model and Printer URL, then click OK. The best way to determine the printer URL is to configure a printer on a macOS client and enter the URL specified in the Options and Supplies dialog. See step 1.

    You can also add SMB printers by browsing for the printer in Active Directory.

  5. If you want the selected printer to be the default printer click Make Default.
  6. If you want to require the user to enter an administrator password before printing to the selected printer, click the Require an administrator password option.
  7. Click OK to save settings and close the Printing dialog.

Footer tab

The Footer tab settings of the Printing Properties control footer display and formatting; and, support the following management modes: Never, Always.

Footers are additional information appended at the bottom of each printed page containing the date and the name of the user that initiated the print job.

The following options are supported:

  • Print Page Footer

    Select to enable page footers.

  • Include MAC address

    Select to include the client computer's network card MAC address in the footer information when page footers are enabled.

  • Font name

    Select the page footers font name.

  • Font size

    Select the page footers font size.

Software Update Properties

The Software Update properties allows you to configure the Software Update server that managed clients use for downloading updates and purchasing or installing apps.

You can apply Application Properties settings under both both Computer Configuration and User Configuration.

Software Update tab

The Software Update tab settings of the Software Update Properties control the Software Update server that managed clients use to download updates.

You can cache software updates on your local intranet using a local Software Update server. This can help reduce network bandwidth usage and speed update deployment in your network. Use this setting to instruct managed clients to use the local Software Update server.

Select the Manage mode: Never, Once, or Always.

The following options are supported:

  • Software Update server to use

    Specify the URL of the software update server. The URL must be in the form http://<server hostname>:< port >/index.sucatalog

  • Allow installation of macOS beta releases
  • Allow non-admin users to purchase apps and install software updates
  • Automatically install macOS updates
  • Automatically install app updates from the App Store
関連ドキュメント

The document was helpful.

評価を選択

I easily found the information I needed.

評価を選択