To modify group properties
- In the console tree, locate and select the folder that contains the group you want to modify.
- In the details pane, right-click the group you want to modify, and then click Properties to display the Properties dialog box for that group.
- Use the tabs in the Properties dialog box to view or modify properties of the group.
- If you want to view or modify additional properties (those for which the tabs in the Properties dialog box do not provide data entries), go to the Object tab and click Advanced Properties.
- After setting all the properties you want, click OK.
|

|
NOTE:
- The behavior of the user interface elements in the Properties dialog box may vary depending on the configuration of Active Roles policies. To determine whether a given item on a tab is under the control of a certain policy, observe the text label next to the item: the underlined text label indicates that some policy restrictions are in effect. Click underlined text labels to examine the policies that govern the behavior of the user interface elements.
- To modify properties for multiple groups, press and hold down CTRL, and then click each group. Right-click the selection, and then click Properties.
- You can also access the Advanced Properties dialog box for a group as follows: Right-click the group and select All Tasks | Advanced Properties.
- You can use the Find function of Active Roles in order to locate the group you want to modify. Once you have found the group, you can open the Properties dialog box for that group as follows: Right-click the group in the list of search results and click Properties.
|
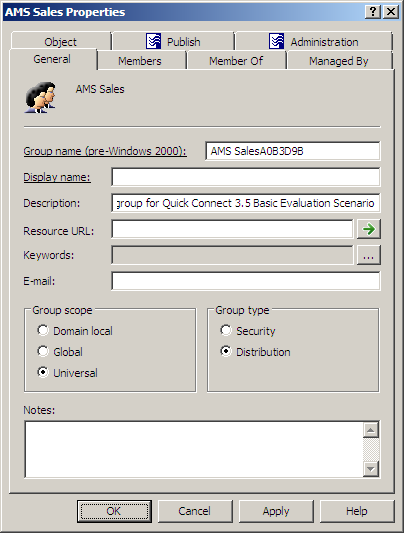
To change group scope or group type, right-click the group, click Properties, and go to the General tab in the Properties dialog box, shown in the following figure. On the General tab, click the group type in the Group type area or click the group scope under Group scope.
Figure 13: Changing group type and group scope
To change group scope
- In the console tree, locate and select the folder that contains the group you want to modify.
- In the details pane, right-click the group you want to modify, and then click Properties.
- On the General tab in the Properties dialog box, under Group scope, click the group scope you want for this group.
For information about possible scope settings, see About groups earlier in this document.
|
|
NOTE:
The following changes of the group scope are allowed:
- Global to universal This is allowed if the group you want to change is not a member of another global group.
- Domain local to universal This is allowed if the group you want to change does not have another domain local group as a member.
- Universal to global This is allowed if the group you want to change does not have another universal group as a member.
- Universal to domain local No restrictions for this operation.
|
To convert a group to another group type
- In the console tree, locate and select the folder that contains the group you want to modify.
- In the details pane, right-click the group you want to modify, and then click Properties.
- On the General tab in the Properties dialog box, under Group type, click the group type you want for this group.
