In addition to the Administration Service, MMC Interface and Web Interface, Active Roles allows you to install the following components:
- Active Roles Management Shell Provides commands based on the Windows PowerShell platform for managing users, group, computers and other objects in Active Directory via Active Roles; administering certain Active Roles objects; and configuring Active Roles Administration Service instances and Web Interface sites.
- ADSI Provider Enables custom applications and scripts to access directory data via Active Roles by using standard COM interfaces. Documentation for ADSI Provider can be found in the Active Roles SDK.
- Active Roles SDK Provides developers with documentation and samples to help them customize Active Roles by creating custom client applications and user interfaces, and implementing business rules and policies based on custom scripts.
- Collector Gathers data required for reporting. Retrieves data from specified data sources through the Administration Service, and stores the data on database server.
- Report Pack A comprehensive suite of report definitions that cover various administrative actions available in Active Roles.
Active Roles Management Shell, SDK and ADSI Provider are collectively referred to as management tools. On the Component Selection page, the Active Roles Setup wizard selects the Management Tools component if you have selected any core component such as Administration Service, Console (MMC Interface) or Web Interface. This means that Setup installs the Shell, SDK and ADSI Provider together with any core component. However, it is possible to install solely the Shell, SDK and ADSI Provider by selecting the Management Shell component only.
To install only the Shell, SDK and ADSI Provider
- Log on with a user account that has administrator rights on the computer.
- Navigate to the location of the Active Roles distribution package, and start the Setup wizard by double-clicking ActiveRoles.exe.
- Follow the instructions in the Setup wizard.
- On the Component Selection page, clear all check boxes except the Management Tools check box, and then click Next.
- On the Ready to Install page, click Install to perform installation.
- On the Completion page click Finish.
Once you have installed the management tools, you can open Management Shell or view SDK topics (including documentation for ADSI Provider). Depending upon the version of your Windows operating system, select the following on the Apps page or Start menu:
- To open Management Shell, select Active Roles 7.5.3 Management Shell
- To view SDK topics, select Active Roles 7.5.3 SDK
After you have opened Management Shell, you can view a reference manual by typing QuickRef. The manual contains documentation for all commands provided by Management Shell.
Active Roles comes with a comprehensive suite of report definitions, contained in the Active Roles Report Pack. To work with reports, you need to:
- Install the Active Roles Collector
- Use the Collector wizard to deploy the Report Pack
Installing Collector
The Active Roles Collector is used to prepare data for reporting, allowing you to configure, schedule, and run data collection jobs. Collector stores report data in a database on an on-premises SQL Server or Azure SQL database. For best results, use Microsoft SQL Server 2012 or a later version of SQL Server to host the Collector’s database.
NOTE: Collector can now store data in Azure database.
To install the Collector
- Install Active Roles Management Tools. For installation instructions, see Steps to install only the Shell, ADSI Provider and SDK earlier in this document.
- In the Active Roles distribution package, navigate to the Solutions/Collector and Report Pack folder, and double-click the .msi file held in that folder.
- Follow the instructions in the Setup wizard.
- Wait while the wizard completes the installation.
Once you have installed Collector, you can start the Collector wizard by selecting Active Roles 7.5.3 Collector and Report Pack on the Apps page or Start menu, depending upon the version of your Windows operating system.
Deploying Report Pack
Report Pack requires Microsoft SQL Server Reporting Services (SSRS). Make sure that you have SSRS deployed in your environment. When deploying Report Pack, the Collector wizard prompts you for the address (URL) of the Report Server Web service. You can find this address on the Web Service URL page in the Reporting Services Configuration Manager tool on the server where SSRS is installed.
To deploy the Report Pack
- Start the Collector wizard.
You can start the Collector wizard by selecting Active Roles 7.5.3 Collector and Report Pack on the Apps page or Start menu, depending upon the version of your Windows operating system.
- On the Select Task page, click Deploy reports to Report Server, and then click Next.
- On the Report Server page, type the URL of your SSRS Report Server in the Report Server Web Service URL box. Click Next.
By default, the URL is http://<serverName>/ReportServer. You can use the Reporting Services Configuration Manager tool to confirm the server name and URL. For more information about URLs used in Reporting Services, see the topic “Configure Report Server URLs (SSRS Configuration Manager)” at http://msdn.microsoft.com/library/ms159261.aspx.
- Optionally, on the Data Source page, configure the data source for the Active Roles reports:
- Click the Configure Data Source button.
- Use the Configure Data Source dialog box to specify the database server instance that hosts the database you have prepared by using Collector, the name of the database, database type, and the authentication method to use for connection to the database.
Configuring the data source is an optional step. If you do not have a database prepared by Collector, you can configure the data source later, after you have deployed the Report Pack. For instructions, see “Working with reports” in the Active Roles Administration Guide.
- Click Next and wait while the wizard deploys the Report Pack.
You can create and view Active Roles reports using Report Manager, a Web-based tool included with SSRS. For instructions, see “Generating and viewing a report” in the Active Roles Administration Guide.
You can upgrade from Active Roles 7.0.x or later to Active Roles 7.x using one of the following methods:
- In-place upgrade: Install the latest version of Active Roles on the computer without removing the earlier version.
- New installation with import of database from earlier version: Install the latest version of Active Roles and import the database from the earlier version of Active Roles.
NOTE:
- To perform a clean installation of Active Roles, uninstall the currently installed version before installing Active Roles 7.5.3.
- Active Roles supports selection of custom installation path only during a fresh installation. During an in-place upgrade, Active Roles does not support changing the custom installation path.
For information on importing configuration data from the database of an earlier version of Active Roles, see Import Configuration under Upgrading the Administration Service.
NOTE: Before upgrading to the latest version of Active Roles, the add-ons of the earlier versions must be uninstalled.
Upgrading from Active Roles 6.9 version to 7.x version is a side-by-side upgrade, which does not interrupt operations or affect the configuration of your earlier Active Roles version. To ensure smooth upgrade to the new Active Roles version, first upgrade the Administration Service and then upgrade the Web Interface.
Active Roles 6.x components are not used in the upgrade and neither are any components from the earlier version uninstalled.
IMPORTANT:
During in-place upgrade, when importing from the source database (Configuration and Management History database), the following database permissions are automatically migrated from the previously used (source) SQL database to the new (destination) SQL database:
The service account that is used for performing the in-place upgrade or the import or migration operation should have the following permissions in the SQL Server to perform the operation:
-
db_datareader fixed database role in the source database.
-
db_owner fixed database role and the default schema of dbo in the destination database.
-
sysadmin fixed server role in the destination database.
By default, the database users, permissions, logins, and roles are imported to the destination database. You can clear the Copy database users, permissions, logins, and roles check box in the following locations depending on the operation:
-
During in-place upgrade: in the Upgrade configuration window.
-
Importing configuration: Import Configuration > Source Database > Configure advanced database properties.
-
Importing management history: Import Management History > Source database > Configure advanced database properties.
Impact on Office 365 add-on
After an upgrade of Active Roles components to Active Roles 7.5.3, the Office 365 add-on which was supported in the earlier versions of Active Roles, ceases to work. Hence, it is recommended to uninstall the Office 365 add-on prior to the upgrade of Active Roles.
NOTE:
- Uninstall the Office 365 add-on before installing the latest version of Active Roles as the add-on is not supported.
- The latest version of Active Roles manages Office 365 and Azure AD natively. However, Active Roles does not support the following feature of Office 365 add-on that was supported in earlier versions:
- Ability to manage and select Office 365 domains through policies.
Upgrading to Active Roles 7.5.3 from 7.0.x or later using in-place upgrade method
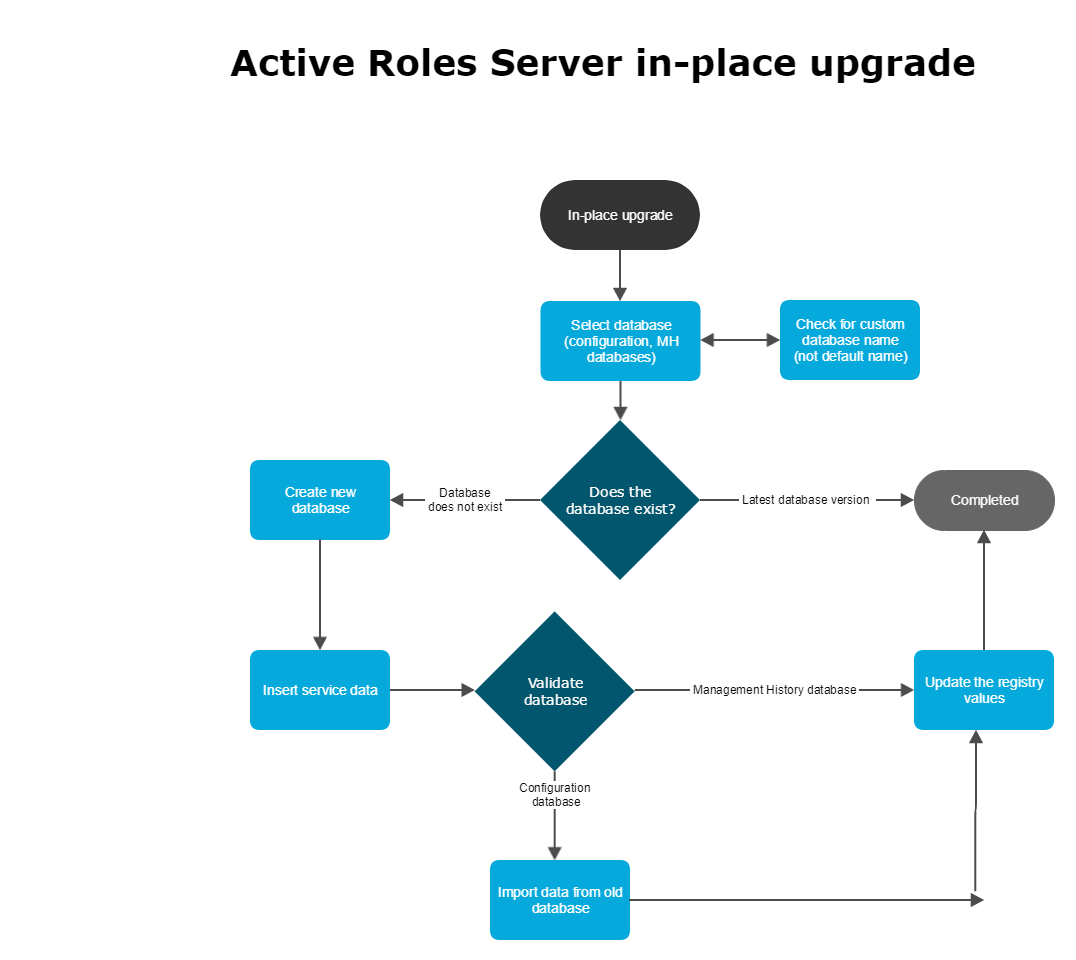
To upgrade existing Active Roles 7.0.x or later version to the latest version, perform the following steps.
NOTE: One Identity recommends to approve all pending approval activities before performing the in-place upgrade.
To upgrade the Active Roles package using in-place upgrade
- Log on with a user account that has administrator rights on the computer.
- Navigate to the location of the Active Roles distribution package, and start the Setup wizard by double-clicking ActiveRoles.exe.
- Follow the instructions in the Setup wizard.
- On the Ready to Upgrade page, click Upgrade to perform upgrade.
- On the Completion page, click Finish.
NOTE: After upgrading the Active Roles package to 7.5.3, perform Configuring Active Roles during in-place upgrade.
NOTE: By default, during in-place upgrade, the Copy database users, permissions, logins, and roles check box is selected in the Upgrade configuration window.
Configuring Active Roles 7.5.3 during in-place upgrade
NOTE: Before upgrading to the latest version of Active Roles:
The in-place upgrade of Active Roles 7.4 upgrades the Active Roles 7.4 Administration Service and Web Interface components.
The in-place upgrade of Active Roles 7.4 does not upgrade the Active Roles solution components such as SPML Provider, Add-on Manager, Add-ins for Outlook, Diagnostic Tools, and so on. To upgrade the solution components installed with Active Roles, use the respective installers available in the Active Roles installation package.
During Active Roles upgrade, if the Active Roles database is not split into configuration and management history databases, then the upgrade process creates a management history database by default.
The following steps describe the in-place upgrade scenario for Active Roles 7.5.3
-
After upgrading the Active Roles package to 7.5.3, restart the operating system.
NOTE: When upgrading from Active Roles version 7.4.1 or 7.4.3 to 7.5, you must restart the operating system
- After the system restarts, the Configuration Center opens by default, displaying the Upgrade configuration wizard.
As part of this upgrade, Active Roles creates new databases with default names. The Upgrade configuration wizard displays the new databases information.
Optional step: To change the default names of the new databases, click Click here to change or provide existing database names.
- On the Upgrade configuration wizard, select the check box to confirm that you have read the instructions in the Quick Start guide regarding "Configuring Active Roles for in-place upgrade".
-
The Azure Tenant association page displays the lists of configured Azure tenants in the source database and options for association.
The Azure Tenant association section notifies you to select an Azure tenant from the drop-down list of the Azure tenants configured in the source database, and the selected Azure tenant is associated with all Azure objects in the destination database. You can also choose to Run Azure Tenant association immediately or Schedule Azure Tenant association, where you select the date and time from the Calendar to run the Azure tenant association.
NOTE:
- This page is visible only if the Azure tenants association are present in the source database.
- If Azure Tenant association is scheduled at a certain time and the upgrade/import operation is still in progress or completes after the Azure Tenant association scheduled time, the tenants are not associated. You have to run the built-in scheduled task Update Azure Objects Associated Tenant Id from the Active Roles console to manually associate the Azure Tenants.
-
Alternatively, Azure Tenant association can be run at any time using the template workflow Update Azure Objects Associated Tenant Id available in the Built-in Workflow Container. The parameter in the script used by the workflow can be configured with the required tenant ID. You can use the drop-down to select a default Azure Tenant from the list of available Azure Tenants. The script used by the workflow can be modified to Search Azure objects based on the requirement.
-
The Services association page allows you to configure the Administration services for executing Dynamic Groups, Group Families, and Scheduled tasks from the drop-down list.
The available options in the drop-down list are This Server and Other, where choosing Other allows to specify any other Administration Service in a fully qualified domain name (FQDN) format. If the value is empty, then the current administration service is used.
NOTE: Services association does not update certain scheduled tasks, For example, scheduled tasks that cannot be edited (Managed Object Counter) or scheduled tasks that are set to All servers option.
You can choose to run the Services association immediately or schedule Services association.
NOTE: If Services association is scheduled at a certain time and the upgrade/import operation is still in progress or completes after the Services association scheduled time, the services are not associated. You have to run the built-in scheduled task Update Services To ExecuteOn from the Active Roles console to manually associate the Services.
To ensure Dynamic Groups, Group Families, and Scheduled tasks continue to function after an import the installation configures the new Active Roles server as the executing server for the tasks mentioned above. The configuration mentioned here runs after an upgrade.
NOTE: Alternatively, Services association can be performed any time using the template workflow Update Services To Execute On available in the built-in Workflow Container. The parameters in the script used by the workflow can be configured to the required administration services, such as, Dynamic Group Service, Group Family Service, Scheduled Task Service. You can select the Administration Service from the drop-down list. The drop-down list displays all the currently running Administration Services that are connected to the current configuration database. If the parameter value is not selected, then the current Administration Service is used.
- Click Next.
NOTE: If the disk space in SQL server is insufficient, then an error is displayed prompting you to increase the disk space.
In case of any errors during the in-place upgrade, you must resolve the errors and re-open the Configuration Center to continue the in-place upgrade.
The upgrade starts and the Execution tab displays the progress bar for the upgrade.
-
After the database upgrade, stop and then restart the Active Roles Service.
After the database upgrade is complete, the Active Roles Service is ready for use.
NOTE: To upgrade multiple Active Roles Service instances, log in to the individual systems where Active Roles Service was upgraded, and perform the in-place upgrade steps for each Service.
Compatibility of Active Roles components
The new Administration Service is only compatible with the Active Roles user interfaces (Web Interface and console) of version 7.5.3. Earlier versions of the user interfaces may not work with the new Administration Service. The user interfaces of Active Roles 7.5.3 are only compatible with the Administration Service of version 7.5.3. Therefore, to use the Active Roles console or Web Interface of version 7.5.3, you must first upgrade the Administration Service.
Impact on custom solutions
An upgrade of Active Roles may affect custom solutions (such as scripts or other modifications), if any, that rely on the Active Roles functions. Custom solutions that work fine with an earlier Active Roles version may cease to work after the upgrade. Prior to attempting an upgrade, you should test the existing solutions with the new Active Roles version in a lab environment to verify that the solutions continue to work.
