This section describes how to create local users.
NOTE: The admin user is available by default, and has all possible privileges. It is not possible to delete this user.
When using RADIUS authentication together with local users, the users are authenticated to the RADIUS server, only their group memberships must be managed locally on One Identity Safeguard for Privileged Sessions (SPS). For details, see Authenticating users to a RADIUS server.
To create a local user
-
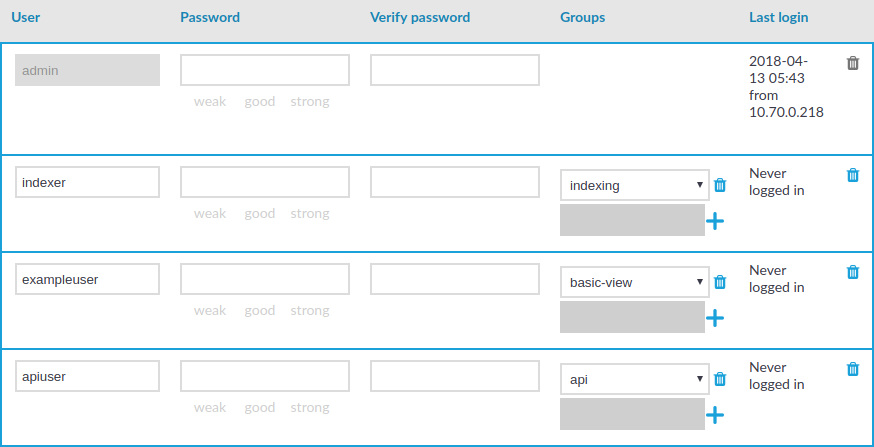
Navigate to Users & Access Control > Local Users and click
.
Figure 38: Users & Access Control > Local Users — Creating local users
-
Enter the username in the User field.
NOTE: For the username of SSH users, only valid UTF-8 strings are allowed.
The following characters cannot be used in usernames: <>\/[]:;|=,+*?
-
Enter a password for the user in the Password and Verify password fields.
The strength of the password is indicated below the Password field, as you type. To set a policy for password strength, see Setting password policies for local users. The user can change the password later from the SPS web interface, and you can modify the password of the user here.
Use strong passwords: at least 8 characters that include numbers, letters, special characters, and capital letters. For local One Identity Safeguard for Privileged Sessions (SPS) users, require the use of strong passwords (set Users & Access Control > Login options > Minimal password strength to strong). For more information, see Setting password policies for local users in the Administration Guide.
NOTE: SPS accepts passwords that are not longer than 150 characters and supports the following characters:
-
Letters A-Z, a-z
-
Numbers 0-9
-
The space character
-
Special characters: !"#$%&'()*+,-./:;<>=?@[]\^-`{}_|
NOTE: If possible, use a random password generator.
To create a strong password:
-
Use special characters
-
Use long passwords
-
Mix uppercase and lowercase letters
For strong passwords, do not use:
-
Personal information in the passwords
-
Sequential letters or numbers
-
The word password as the password
-
Keyboard paths (for example, qwerty)
-
-
Click
You can also modify the group membership of local users here.
To remove a user from a group, click
next to the group.
-
To save the modifications, click Commit.