Applying the Help Desk Access Template
You can apply the Access Template using the Delegation of Control Wizard.
First, you start the wizard on the Sales Organizational Unit: right-click the Organizational Unit, click Delegate Control, and then, in the Active Roles Security window, click Add.
Next, on the Users or Groups page of the wizard, add the Help Desk group to the list.
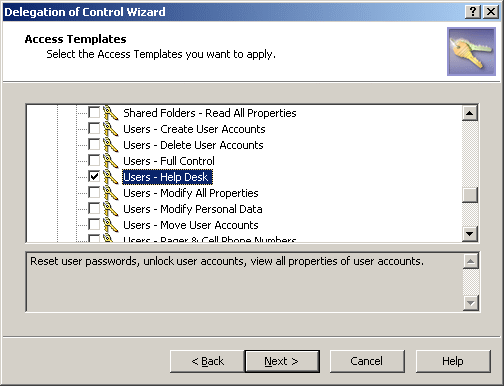
Next, on the Access Templates page of the wizard, expand Access Templates > Active Directory and select the check box next to Users - Help Desk, as shown in the following figure.
Figure 9: Access Template – Delegation of control

Click Next and accept the default settings in the wizard. On the completion page, click Finish. Finally, click OK to close the Active Roles Security window.
For more information about the Delegation of Control Wizard, see Applying Access Templates in the Active Roles Administration Guide.
Example 2: Implementing Self-Administration
This scenario shows how to use an Access Template that allows users to modify certain portions of their personal information in Active Directory.
The Active Roles Web Interface provides the Site for Self-Administration to manage user accounts. The site displays users their personal information, such as the first and last names, address information, phone numbers, and other data. By default, Web Interface users are only authorized to view their personal information. To enable the users to also modify their personal information, you must give them additional permissions.
Suppose you need to authorize the users in the Sales Organizational Unit to perform self-administration. To implement this scenario, you should perform the following steps:
-
Prepare a Self-Administration Access Template that defines the appropriate permissions on user accounts.
-
Apply the Self-Administration Access Template to the Sales Organizational Unit, selecting the Self object as a Trustee.
As a result of these steps, users from the Sales Organizational Unit are authorized to perform self-management tasks on their personal accounts. The Self-Administration Access Template determines what data the users are permitted to modify. Users can manage their personal information via the Site for Self-Administration. For information about the Site for Self-Administration, refer to the Active Roles Web Interface User Guide.
The following sections elaborate on the steps involved in this scenario.
Preparing a self-administration Access Template
For the purposes of this scenario, you can use the predefined Self - Account Management Access Template, located in the Configuration > Access Templates > User Self-management container. This Access Template specifies the necessary permissions to view a basic set of user properties and modify telephone numbers.
If you want to add or remove permissions from the Self - Account Management Access Template, you need to first create a copy of that Access Template, then modify and apply the copy.
This scenario assumes that you apply the predefined Self - Account Management Access Template.
Applying the self-administration Access Template
You can apply the Access Template using the Delegation of Control Wizard.
First, you start the wizard on the Sales Organizational Unit (OU): right-click the OU, click Delegate Control, and then, in the Active Roles Security window, click Add.
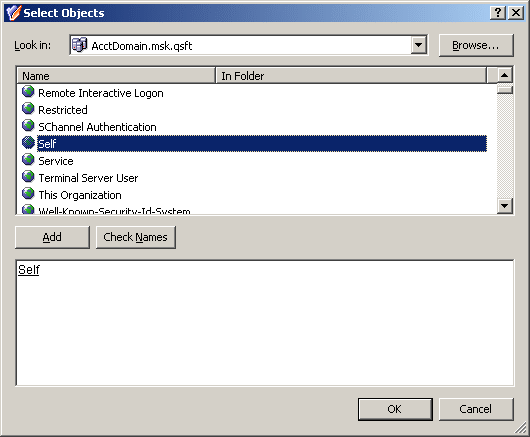
Next, on the Users or Groups page of the wizard, click Add. In the Select Objects window, select the Self object, as shown in the following figure, click Add, and then click OK.
Figure 10: Access Template – Self administration

Next, on the Access Templates page of the wizard, expand Access Templates > User Self-management and select the check box next to Self - Account Management.
Click Next and accept the default settings in the wizard. On the completion page, click Finish. Finally, click OK to close the Active Roles Security window.
For more information about the Delegation of Control Wizard, see Applying Access Templates in the Active Roles Release Notes.


