The universal SIEM forwarder can automatically send data about the audited sessions to Splunk, ArcSight, or other third-party systems. The messages are standard syslog messages in RFC3164 format (also called legacy-syslog or BSD-syslog format). The body of the syslog message (the MESSAGE part) can be formatted as JavaScript Object Notation (JSON), Common Event Format (CEF), or JSON-CIM format. For information about the details of the messages that the universal SIEM forwarder sends to the external SIEM network elements, see Message format forwarded to SIEMs in the Administration Guide.
One of the main advantages of the universal SIEM forwarder is that it has a lower impact on network and performance.
Each message contains the minimal information relevant to the event. Use the built-in correlation feature of the SIEM to combine events by session ID and view all information in one place.
Prerequisites and restrictions
-
SPS version 5 F9 or later
-
Splunk version 6.5 or later
-
The CEF format is supported on all currently supported versions of ArcSight ESM, IBM QRadar and Microsoft Azure Sentinel.
-
SPS does not send historical data, only data from the sessions started after you complete this procedure.
To use the universal SIEM forwarder
-
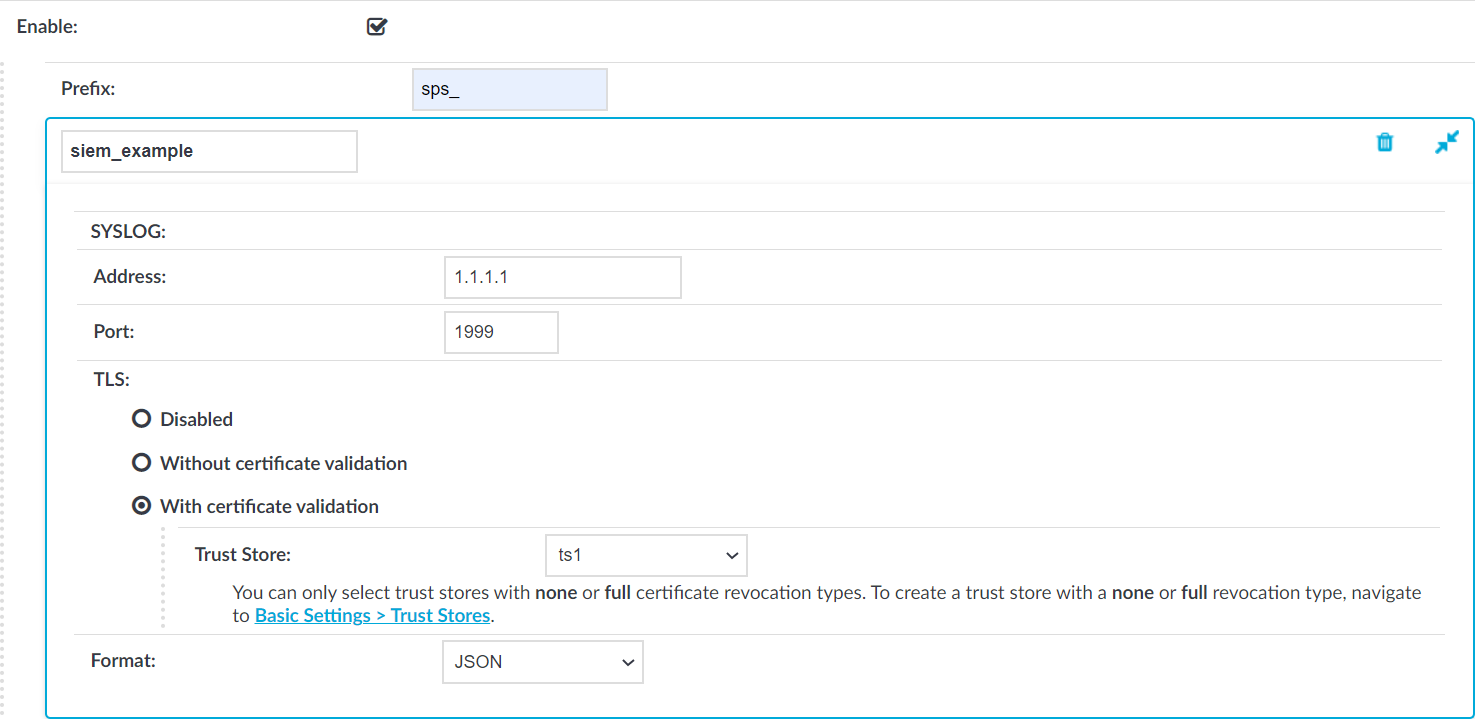
Log in to SPS and navigate to Basic Settings > Management > Universal SIEM forwarder.
Figure 13: Basic Settings > Management > Universal SIEM forwarder — Sending session data to SIEM
-
Enter the IPv4 address or hostname of your third-party system, into the Address field.
-
Enter the port number where your third-party system is accepting connections into the Port field. For example, if you use Splunk, use port 1999.
-
Select the appropriate TLS setting:
-
If your third-party system accepts unencrypted connections, select TLS > Disabled.
Because the data forwarded contains sensitive information, One Identity recommends to use TLS encryption between SPS and your SIEM.
-
To use TLS encryption between SPS and your third-party system, select TLS > Without certificate validation.
-
To use TLS encryption between SPS and your third-party system and also verify the identity of your third-party system server, select TLS > With certificate validation, then select the trust store you want to use to validate the certificate of the third-party system in the Trust Store field.
NOTE: You can only select a trust store with None or Full revocation check type.
For more information on creating trust stores, see Verifying certificates with Certificate Authorities using trust stores.
-
- Select the format of the message:
-
JSON-CIMjson_cim: if using Splunk.
-
CEFcef: if using CEF-compatible SIEMs, for example, Microsoft Azure Sentinel.
-
JSONjson: for general use.
-
-
(Optional) You can specify a prefix to make the data more readable. Enter the prefix you want to use into the Prefix field.
The prefix is added to each JSON key. For example, if you use sps_ as a prefix, in the forwarded JSON message the {"protocol": "ssh"} key changes to {"sps_protocol": "ssh"}, which allows you to identify the forwarded data more easily.
Other formats ignore the Prefix option.
-
Click
. From now on, SPS forwards session data to your third-party system.