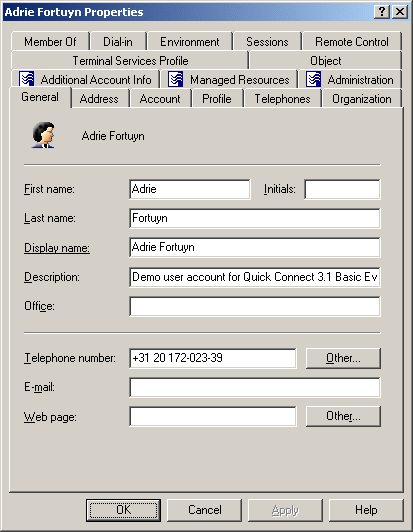
To modify user account properties, right-click the account and click Properties. You can make changes to user account properties in the Properties dialog, shown in the following figure.
Figure 6: User account properties
In the wizard, some property labels may be displayed as hyperlinks. The hyperlink indicates that Active Roles enforces certain policy restrictions on the property. To examine policy details, click the hyperlink: the policy information is displayed. For more information, see Getting policy-related information.
The policy information is also displayed whenever you supply a property value that violates a policy restriction. The wizard cannot proceed until you enter an acceptable value.
You can use the Properties dialog to view or modify any property of the object by navigating to the Object tab and clicking Advanced Properties. In the Advanced Properties window you can manage all properties, including those that cannot be accessed via the Properties dialog itself.
You can also display the Advanced Properties window by right-clicking the object and selecting All Tasks > Advanced Properties.
You can modify the properties of Active Directory user accounts with the Active Roles Console.
To modify user account properties
-
In the Console tree, locate and select the folder that contains the user account you want to modify.
-
In the details pane, right-click the user account you want to modify, then click Properties.
-
Use the tabs in the Properties dialog to view or modify properties of the user account.
-
If you want to view or modify additional properties (those for which the tabs in the Properties dialog do not provide data entries), navigate to the Object tab and click Advanced Properties.
-
After setting all the properties you want, click OK.
NOTE: Consider the following when modifying a user account:
-
The behavior of the user interface elements in the Properties dialog may vary depending on the configuration of Active Roles policies. To determine whether a given item on a tab is under the control of a certain policy, observe the text label next to the item: the underlined text label indicates that some policy restrictions are in effect. Click the underlined text labels to examine the policies that govern the behavior of the user interface elements.
-
To modify properties for multiple objects, press and hold CTRL, then click each object. Right-click the selection, then click Properties.
-
You can also access the Advanced Properties dialog for an object by right-clicking the account and selecting All Tasks > Advanced Properties.
-
To locate the object that you want to modify, use the Find function of Active Roles. Once you found the object, open the Properties page by right-clicking the object, and clicking Properties.
To rename a user account, right-click the account and click Rename. Type a new name and press ENTER. This displays the Rename User dialog, shown in the following figure. In the Rename User dialog, you can change the user’s first name, last name, display name, and logon name.
Figure 7: Rename User
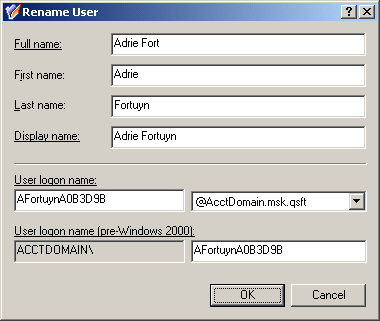
In the Rename User dialog, hyperlinks are used to indicate the properties controlled by Active Roles policies. For more information, see Getting policy-related information.
You can rename Active Directory user accounts with the Active Roles Console.
To rename a user account
-
In the Console tree, locate and select the folder that contains the user account you want to rename.
-
In the details pane, right-click the user account and click Rename.
-
Type a new name (or clear the existing name), then press ENTER to display the Rename User dialog.
-
Use the Rename User dialog to modify (if needed) the naming properties of the user account such as the user full name, first name, last name, display name, and login name.
-
When finished, click OK.
NOTE: Consider the following when renaming a user account:
-
The behavior of the Rename User dialog may vary depending on the configuration of Active Roles policies. To determine whether a given item in the dialog is under the control of a certain policy, observe the text label next to the item: the underlined text label indicates that some policy restrictions are in effect. Click underlined text labels to examine the policies that govern the behavior of the dialog.
-
To locate the user account you want to rename, use the Find function of Active Roles. Once you found the user account, rename it by selecting it in the list of search results, right-clicking it, clicking Rename, then specifying the new name. To apply the new name, press Enter.
