When you upgrade the Defender Management Shell, make sure you have installed Windows PowerShell 3.0 or later on the computer running the Defender Management Shell.
To upgrade Defender Management Shell
- On the computer that has a previous version of the Defender Management Shell installed, run the Defender.exe file.
In the Defender distribution package, you can find the Defender.exe file in the Setup folder.
- Complete the Defender Setup Wizard.
When stepping through the wizard, make sure to select the Defender Management Shell feature for installation.
For more information about the wizard steps and options, see Defender Setup Wizard reference.
After you have installed the Defender Management Shell 6.2, you can uninstall a previous version of the Management Shell.
To uninstall a previous version of Defender Management Shell
- Open the list of installed programs (appwiz.cpl).
- In the list, select the PowerShell Management for Defender entry and click Uninstall.
To use native Defender software tokens, you need to have a license added in Defender. The native Defender software tokens are the Defender Soft Token, e-mail token, GrIDsure token, and SMS token. Other software or hardware tokens supplied with or supported by Defender do not require any license.
A Defender license can regulate the following:
- Maximum number of users who can have native Defender software tokens assigned.
- Maximum number of native Defender software tokens you can assign to users.
A Defender license can either be perpetual or have a limited validity period (fixed-term). If the validity period of a Defender license expires, the license is not removed from Defender automatically; rather, you have to remove the expired license manually.
Whenever any of the constraints set by the license are violated, Defender does not cease functioning but starts displaying a warning message stating that you are in violation of the software transaction agreement. To get rid of the warning message, you can install an additional license to increase the licensed number of users or tokens. Alternatively, you can unassign security tokens from users in your environment in order to comply with the license constraints.
You can have multiple licenses added in Defender. Adding a new license effectively increases the maximum licensed number of users, native software tokens, or both.
When you perform a clean installation of Defender, the Defender Setup automatically installs a built-in trial license. This trial license sets the following constraints:
- Maximum number of users who can have native Defender tokens assigned: 25
- Maximum number of native Defender tokens (except GrIDsure) you can assign to users: 200
- Maximum number of GrIDsure tokens you can assign to users: 0
- Trial license validity period: 90 days from installation
When you upgrade to One Identity 6.2 from a previous version, the existing Defender licenses are transferred to the new installation of One Identity. During Defender upgrade, the built-in trial license is not installed.
See also:
You can manage Defender licenses in the About dialog box on the Licenses tab. There you can add new licenses, view the details of added licenses, and remove licenses that have expired.
To open the Licenses tab
- On the computer where the Defender Administration Console is installed, open the Active Directory Users and Computers tool (dsa.msc).
- In the left pane (console tree), expand the appropriate domain node, and click to select the Defender container.
- On the menu bar, select Defender | License.
The Licenses tab that opens looks similar to the following:
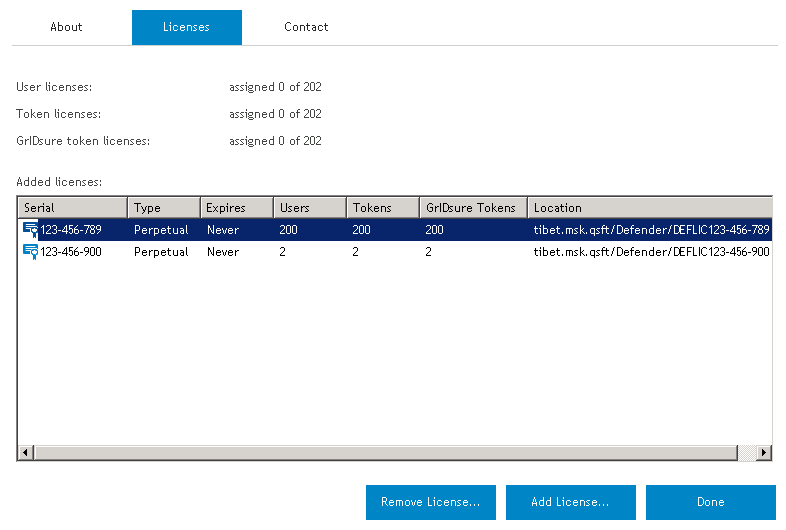
On the Licenses tab, you can use the following elements:
Table 5:
Licenses tab elements
|
User licenses |
Shows how many user licenses you have expended so far out of the maximum number available. |
|
Token licenses |
Shows how many token licenses you have expended so far out of the maximum number available. |
|
GrIDsure token licenses |
Shows how many GrIDsure token licenses you have expended so far out of the maximum number available. |
|
Added licenses |
Provides details of the Defender licenses you have added. |
|
Remove License |
Allows you to remove the license selected in the Added licenses list. For example, you can remove fixed-term licenses whose validity period has expired. |
|
Add License |
Allows you to add a new license to the Added licenses list.
After clicking this button, you are prompted to specify the license key and site message of the license to add. |
|
Done |
Closes the About dialog box. |
