-
It is recommended to run consistency checks with an administrative user.
Not all consistency checks are available for end users and configuration users.
-
To use the Consistency Editor, users need the Option to call a consistency check for a database (Common_ConsistencyCheck) program function.
-
To use the repair function in the Consistency Editor, users need the Option to start automatic consistency check repair function (Common_ConsistencyCheck_Repair) program function.
-
Consistency checks of type Object test are always run in the context of the user currently logged in. If users do not have any permissions for a certain object, errors may not be identified or repairing errors may fail.
Notes on the consistency check
Running consistency checks
To run a consistency check
-
in the Designer or the Manager, start the Consistency Editor with the Database > Check data consistency menu item.
During start up, One Identity Manager schema table definitions are loaded and database objects are made available for testing.
-
Specify the test settings.
-
In the Consistency Editor toolbar, click
.
-
Enable the test that is to be run and adjust the test settings further if necessary.
- Click OK.
NOTE: In the Designer, the test settings dialog opens immediately after the Consistency Editor is started.
-
-
Start the consistency check. The following test procedures are available in the Consistency Editor for this:
-
Checking all test objects
Use the
button to start the check.
NOTE: To exclude individual test objects from the check, use the Disable item in the context menu to disable these test objects in the list view before the check starts.
-
Checking single test objects
In the list view, select the relevant test objects and start this check by selecting Test.
TIP: Use Shift + select or Ctrl + select to select more than one test object to be checked.
NOTE: To stop a check that is in progress, click
in the Consistency Editor toolbar.
-
-
Verify error output.
-
Repair errors if necessary.
Related topics
Test settings for consistency checks
Define the valid test settings before you run a consistency check. Tests are performed at database, table, and object level. There are already predefined tests available. You can run your own custom tests.
To configure the settings for testing
-
in the Designer or the Manager, start the Consistency Editor with the Database > Check data consistency menu item.
-
In the Consistency Editor toolbar, click
.
-
Enable the test that is to be run and adjust the test settings further if necessary.
- Click OK.
The tests are grouped according to different criteria.
| Icon | Meaning |
|---|---|
|
|
Tests are grouped by themes. |
|
|
Tests are grouped by types (database, tables , objects). |
|
|
Tests are displayed as a list. |
|
|
Tests are grouped by module association. |
|
|
Tests with Error severity are displayed. |
|
|
Tests with Warning severity are displayed. |
|
|
Tests with Information severity are displayed. |
Use user-defined tests to run your own tests. You can use the scripts from the script library for these tests. All scripts in the script library are provided for custom tests. The method call of these scripts corresponds to the following syntax.
Database test
Public Sub Methodname (ByRef con As IConnection)
Public Sub Methodname (ByVal con As IConnection)
Table test
Public Sub Methodname (ByRef dbTable As ITableDef)
Public Sub Methodname (ByVal dbTable As ITableDef)
Object test
Public Sub Methodname (ByRef dbObject As ISingleDBObject)
Public Sub Methodname (ByVal dbObject As ISingleDBObject)
For detailed information about scripts and the script library, see the One Identity Manager Configuration Guide.
Displaying test objects and test status
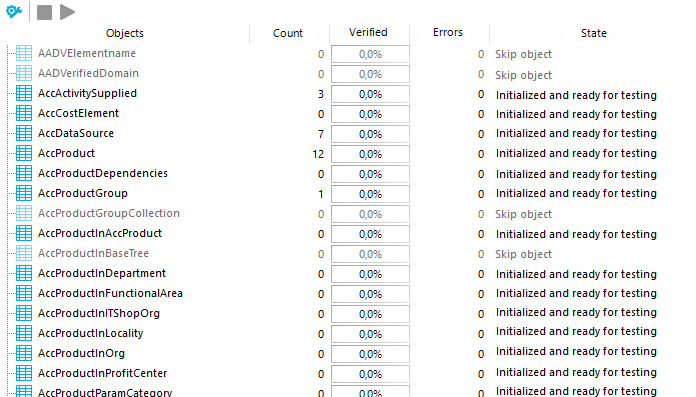
When Consistency Editor is starting up, One Identity Manager schema table definitions are loaded and database objects are made available for testing. The database tables, the number of objects per table and the test status are displayed in the Consistency Editor’s list view.
TIP: To sort by a specific column, click on that column in the table header.
Figure 10: Consistency Editor with Initialized Data

| Column | Meaning |
|---|---|
|
Object |
Test object name. |
|
Count |
Total number of objects in the database table. |
|
Verified |
Test progress in percent. |
|
Errors |
The number of error that occurred during a consistency check. |
|
Status |
Current test status. The status is updated during the consistency check. |
| Icon | Meaning |
|---|---|
|
|
Test object is currently being test. |
|
|
Consistency check was successful for this Test object. |
|
|
Consistency check for this test object is complete but errors occurred. |
| Context menu item | Meaning |
|---|---|
|
Enable |
Enables selected test object(s) for the period of the consistency check. |
|
Disable |
Disables selected test object(s) for the period of the consistency check. |
|
Test |
Starts running the consistency check for the selected test object(s). |
|
Skip |
Skip the test object during the consistency check. |


