지금 지원 담당자와 채팅
지원 담당자와 채팅

Defender 6.2 - Administration Guide

Getting started Managing Defender objects in Active Directory Configuring security tokens Securing VPN access Securing Web sites Securing Windows-based computers Defender Management Portal (Web interface) Securing PAM-enabled services Delegating Defender roles, tasks, and functions Automating administrative tasks Administrative templates Integration with Active Roles Push Notifications Appendices
Appendix A: Enabling diagnostic logging Appendix B: Troubleshooting common authentication issues Appendix C: Troubleshooting DIGIPASS token issues Appendix D: Defender classes and attributes in Active Directory Appendix E: Defender Event Log messages Appendix F: Defender Client SDK Appendix G: Defender Web Service API

Tokens list buttons


Table 6:

Tokens list buttons

Button

Description

Program

Click to program a token for the user.

Recover

Click to recover the token selected in the list or reset the token’s passphrase. You may need to reset a token when it has reached its preset use limit or been invalidated because the user exceeded the preset number of bad PIN attempts.

Test

Allows you to verify that the token is programmed correctly and valid for the user.

After you click this button, use the Response text box to type the one-time password displayed on the token. If a PIN is enabled for the token, you can also test the PIN by entering it in the PIN (Optional) text box. Click Verify to run the test on the token.

If you use the Test button to test a token response, that token response cannot then be used for user authentication.

Helpdesk

Allows you to resynchronize the token selected in the list with the Defender Security Server or assign a temporary password to the token user.

After you click the Helpdesk button, a dialog box opens. This dialog box provides the following options:

  • Reset  Click this button to resynchronize the token with the Defender Security Server.

    The token generates a one-time password that is based on an internal time clock and DES keys. For successful authentication, the Defender Security Server must agree with the token's time clock and DES keys. The token's time clock can become out-of-sync with the Defender Security Server. If this value is out-of-sync, the user cannot use the token for authentication. If access is denied to the user, the token clock must be synchronized with the Defender Security Server clock.

    After resetting the token, instruct the user to use the token to generate a one-time password and use it for Defender authentication.

  • Expires  Allows you to select a validity period for the temporary password.
  • Allow response to be used multiple times  Select this check box to allow the temporary password to be used more than once for authentication. If you leave this check box cleared, the temporary password can only be used once.
  • Assign  Assigns the generated temporary password to the user.
  • Clear  Removes the temporary password from the user.
  • Response  Shows the generated temporary password.

Unassign

Removes the token selected in the list from the user. You can also use this option to delete the corresponding token object from Active Directory.

To remove the token from the user and keep the token object in Active Directory, in the confirmation message that appears after you click this button, click No. In this case, the token object does not get deleted from Active Directory and can be reassigned.

To remove the token from the user and delete the token object from Active Directory, in the confirmation message, click Yes.

Add

Allows you to search for and assign a token to the user. After you click this button, a new dialog box opens. In that dialog box, you can use the following elements:

  • Token Serial Number  Type the serial number of the token you want to assign to the user. If you do not know the serial number, leave this text box blank.
  • Show unassigned tokens only  Select this check box to search for the tokens that are not assigned to users. If you leave this check box cleared, the search results will include both assigned and not assigned tokens.
  • Token Type  Select the token type you want to search for.

Click OK to start your search. When the search completes, in the Select Defender Tokens dialog box, double-click the token you want to assign, and then click OK to assign the token to the user. The assigned token appears on the Defender tab in the Tokens list.

Set PIN

Allows you to set a new PIN for the token selected in the list. After you click the Set PIN button, a dialog box opens. This dialog box provides the following options:

  • Enable PINs  Enables PIN for the selected token.
  • New PIN  Type the new PIN you want to assign to the selected token.
  • Confirm PIN  Confirm the new PIN you want to assign.
  • Expire  Select this check box if you want the PIN to expire.

When you require users to enter a PIN set for a selected token, users should enter the PIN followed by the token response to access a resource protected by Defender. For example, if the PIN is 1234 and the response is 5678, users should enter 12345678 when prompted for authentication.

When users need to reset the PIN, they should enter the old and new PINs in the following format: <old PIN><new PIN><new PIN>. For example, if the old PIN is 1234 and the new PIN is 5678, users should enter the following: 123456785678.

Password

Allows you to specify the Defender password that the user must enter during the authentication process. The password is only required if Defender password is selected as the primary or secondary authentication method in the Defender Security Policy that applies to the user.

After you click the Password button, a new dialog box opens. In the dialog box, use the Password and Confirm text boxes to type the new Defender password you want to assign.

If you want the password to expire, select the Expire check box.

Authentication Details area elements


Table 7:

Authentication Details area elements

Element

Description

Defender ID

Use this text box to type the Defender ID you want the Defender Security Server to use to identify the user.

You only need to specify a Defender ID for a user if the Access Node of which the user is a member has been configured to identify users by Defender ID.

Violation Count

Displays the number of violations accumulated by this user. The violation count is incremented each time the user exceeds the specified number of failed logon attempts.

Reset Count

Displays the number of times the user account has been reset following an account lockout.

Last Logon

Displays the time and date of the last successful logon.

Reset

Resets the violation count to zero and increments the reset count.

Resetting passphrase for a user

You can reset the passphrase for a user. For example, you can do so if the user has forgotten the passphrase and the passprhase has been locked. In order you could reset the passphrase, the user must provide to you the challenge code generated by the token.

To reset the passphrase for a user

  1. On the computer where the Defender Administration Console is installed, open the Active Directory Users and Computers tool (dsa.msc).
  2. In the left pane (console tree), expand the appropriate domain node to select the container that contains the user.
  3. In the right pane, double-click the user object.
  4. In the dialog box that opens, click the Defender tab.
  5. In the Tokens area, select the token, and then click the Recover button.
  6. In the dialog box that opens, use the Challenge text box to type the challenge code provided to you by the user, and then click the Get Response button.
  7. Copy the passphrase unlock code displayed in the Response box and provide the code to the user.

Managing Defender Security Policy for a user

To manage Defender Security Policy for a user

  1. On the computer where the Defender Administration Console is installed, open the Active Directory Users and Computers tool (dsa.msc).
  2. In the left pane (console tree), expand the appropriate domain node to select the container that contains the user for whom you want to manage Defender Security Policy (typically, this is the Users container).
  3. In the right pane, double-click the user object.
  4. In the dialog box that opens, click the Policy tab. This tab allows you to view the current or assign a new Defender Security Policy to the user. The tab has the following elements:
    • Assigned Policy  Shows the Defender Security Policy that is currently assigned to the user. When there is no Defender Security Policy assigned to the user, this option displays <undefined>.
    • Select  Allows you to select an existing Defender Security Policy to assign to the user.
    • Clear  Unassigns the current Defender Security Policy from the user.
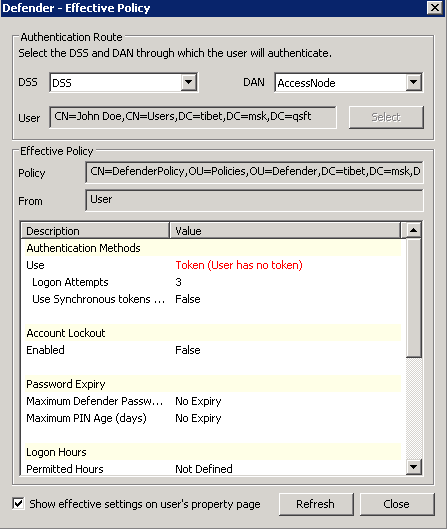
    • Effective  Click this button to view the Defender Security Policy settings that will apply to the user for a particular Defender Security Server/Access Node combination. The window that opens looks similar to the following:


The DSS list shows the Defender Security Server that is currently selected for the user. If necessary, select any other Defender Security Server.

The DAN list shows the Access Node of which the user is a member. If necessary, select any other Access Node.

The User option displays the current user.

The Effective Policy area displays the Defender Security Policy details and authentication settings that will be effective when the user authenticates via Defender.

관련 문서

The document was helpful.

평가 결과 선택

I easily found the information I needed.

평가 결과 선택