Use this task to obtain an overview of the most important information about a group.
To obtain an overview of a group
- Select the SharePoint > Groups category.
- Select the group in the result list.
- Select the SharePoint group overview task.
Use this task to obtain an overview of the most important information about a group.
To obtain an overview of a group
When groups are assigned to user accounts an employee may obtain two or more groups, which are not permitted in this combination. To prevent this, you can declare mutually exclusive groups. To do this, you specify which of the two groups should apply to the user accounts if both are assigned.
It is possible to assign an excluded group at any time either directly, indirectly, or with an IT Shop request. One Identity Manager determines whether the assignment is effective.
NOTE:
The effectiveness of the assignments is mapped in the
Clara Harris has a user account
By using suitable controls, you want to prevent an employee from
|
Effective group |
Excluded group |
|---|---|
|
Group A |
|
|
Group B |
Group A |
|
Group C |
Group B |
|
Employee |
Member in role |
Effective group |
|---|---|---|
|
Ben King |
Marketing |
Group A |
|
Jan Bloggs |
Marketing, finance |
Group B |
|
Clara Harris |
Marketing, finance, control group |
Group C |
|
Jenny Basset |
Marketing, control group |
Group A, Group C |
Only the group C assignment is in effect for Clara Harris. It is published in the target system. If Clara Harris leaves the "control group" business role at a later date, group B also takes effect.
The groups A and C are in effect for Jenny Basset because the groups are not defined as mutually exclusive. If this should not be allowed, define further exclusion for group C.
|
Employee |
Member in role |
Assigned group |
Excluded group |
Effective group |
|---|---|---|---|---|
|
Jenny Basset
|
Marketing |
Group A |
|
Group C
|
|
Control group |
Group C |
Group B
Group A |
The QER | Structures | Inherite | GroupExclusion configuration parameter is set.
In the Designer, set the configuration parameter and compile the database.
NOTE: If you disable the configuration parameter at a later date, model components and scripts that are not longer required, are disabled. SQL procedures and triggers are still carried out. For more information about the behavior of preprocessor relevant configuration parameters and conditional compiling, see the One Identity Manager Configuration Guide.
Mutually exclusive groups belong to the same site collection.
To exclude a group
In the Manager, select the SharePoint > Groups category.
Select a group in the result list.
Select the Exclude groups task.
In the Add assignments pane, assign the groups that are mutually exclusive to the selected group.
- OR -
In the Remove assignments pane, remove the groups that are no longer mutually exclusive.
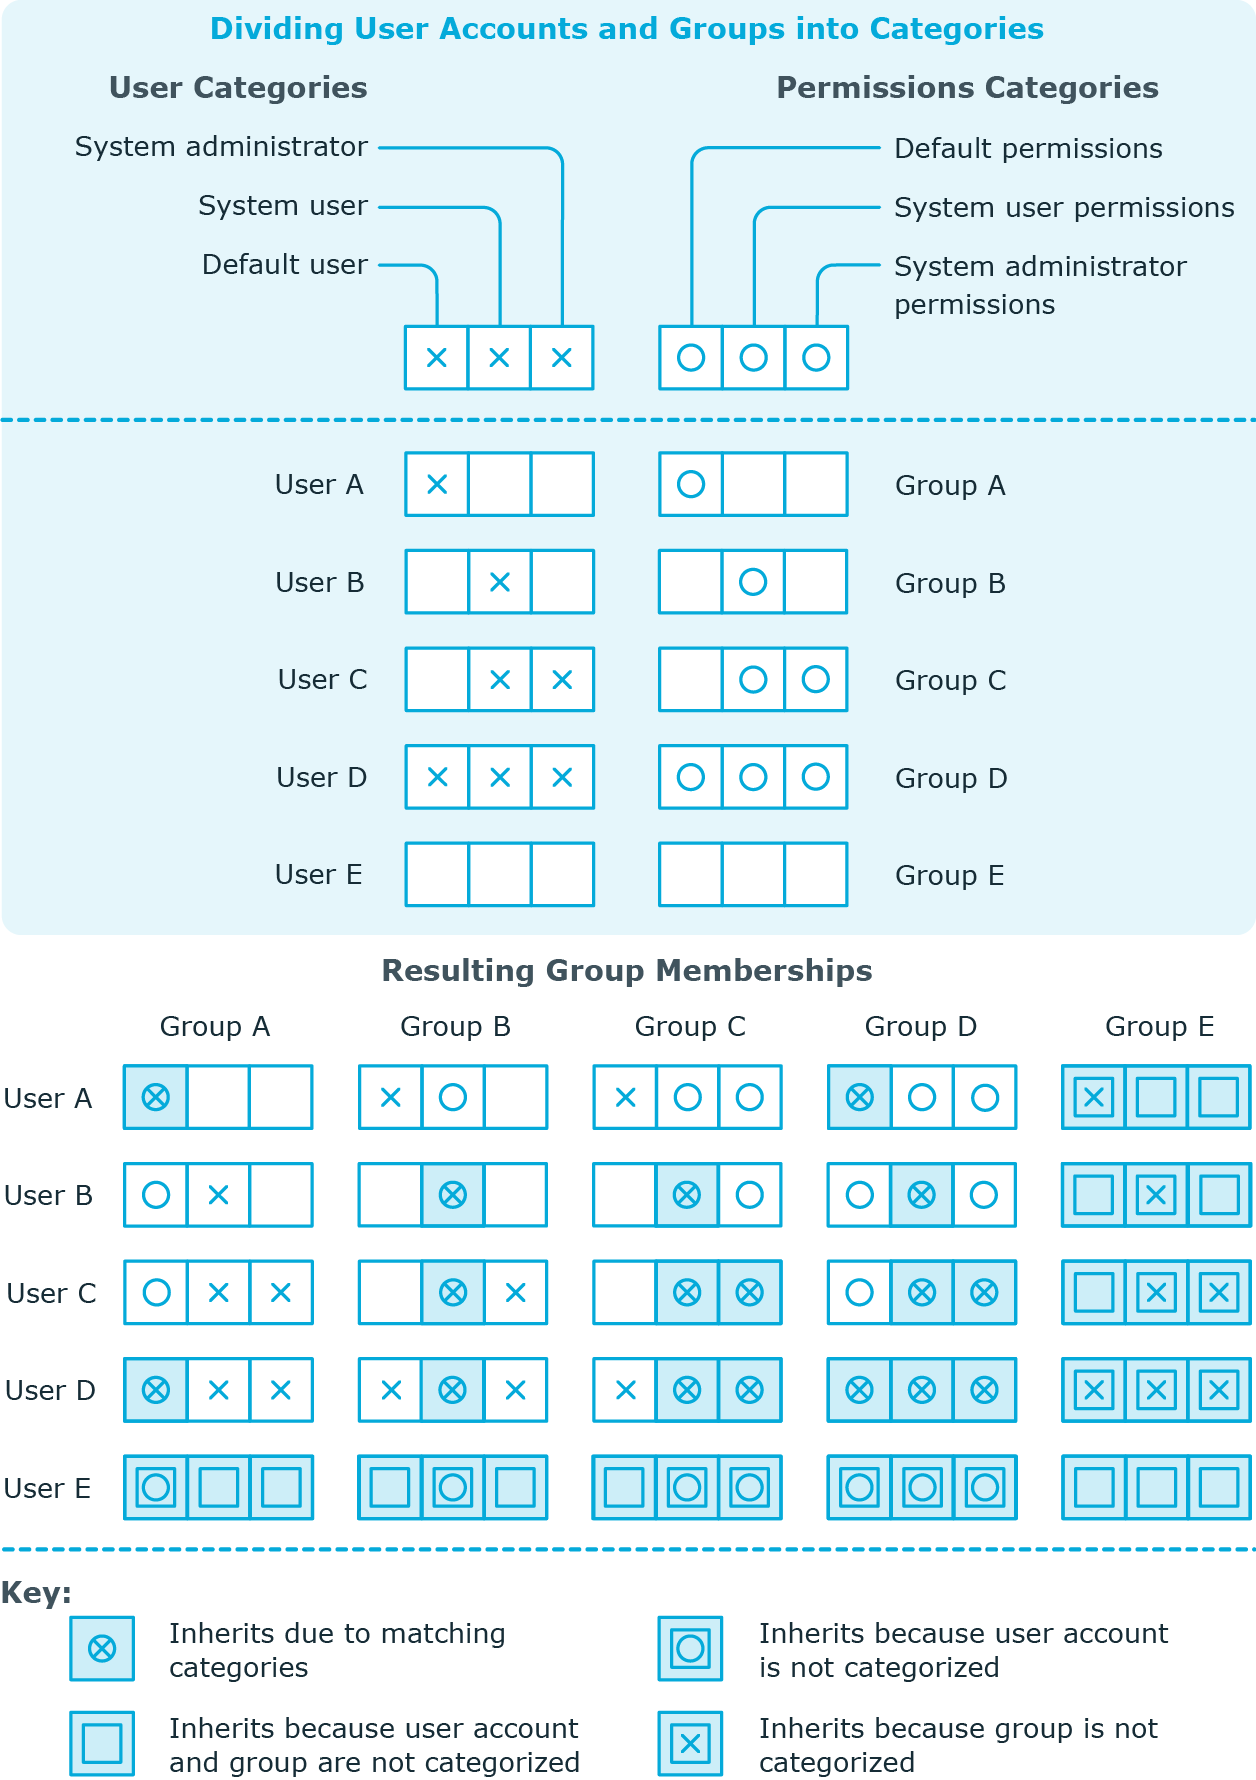
Every user account can be assigned to one or more categories. Each group can also be assigned to one or more categories. The group is inherited by the user account when at least one user account category items matches an assigned group. The group is also inherited by the user account if the group or the user account is not put into categories.
NOTE: Inheritance through categories is only taken into account when groups are assigned indirectly through hierarchical roles. Categories are not taken into account when groups are directly assigned to user accounts.
| Category item | Categories for user accounts | Categories for groups |
|---|---|---|
| 1 | Default user | Default permissions |
| 2 | System users | System user permissions |
| 3 | System administrator | System administrator permissions |
Figure 3: Example of inheriting through categories.

To use inheritance through categories
Extended properties are meta objects, such as operating codes, cost codes, or cost accounting areas that cannot be mapped directly in One Identity Manager.
For more detailed information about setting up extended properties, see the One Identity Manager Identity Management Base Module Administration Guide.
To specify extended properties for a group
In the Manager, select the SharePoint > Groups category.
Select the group in the result list.
Select Assign extended properties.
In the Add assignments pane, assign extended properties.
TIP: In the Remove assignments pane, you can remove assigned extended properties.
To remove an assignment
Select the extended property and double-click 
© 2025 One Identity LLC. ALL RIGHTS RESERVED. 이용 약관 개인정보 보호정책 쿠키 기본 설정 센터