Effectiveness of group memberships
When groups are assigned to user accounts an employee may obtain two or more groups, which are not permitted in this combination. To prevent this, you can declare mutually exclusive groups. To do this, you specify which of the two groups should apply to the user accounts if both are assigned.
It is possible to assign an excluded group at any time either directly, indirectly, or with an IT Shop request. One Identity Manager determines whether the assignment is effective.
NOTE:
- You cannot define a pair of mutually exclusive groups. That means, the definition "Group A excludes group B" AND "Group B excludes groups A" is not permitted.
- You must declare each group to be excluded from a group separately. Exclusion definitions cannot be inherited.
- One Identity Manager does not check if membership of an excluded group is permitted in another group ( table).
The effectiveness of the assignments is mapped in the AADUserInGroup and AADBaseTreeHasGroup tables by the XIsInEffect column.
Example: The effect of group memberships
- Group A is defined with permissions for triggering requests in a tenant. A group B is authorized to make payments. A group C is authorized to check invoices.
- Group A is assigned through the "Marketing" department, group B through "Finance", and group C through the "Control group" business role.
Clara Harris has a user account in this tenant. She primarily belongs to the "Marketing" department. The "Control group" business role and the "Finance" department are assigned to her secondarily. Without an exclusion definition, the user account obtains all the permissions of groups A, B, and C.
By using suitable controls, you want to prevent an employee from being able to trigger a request and to pay invoices. That means, groups A, B, and C are mutually exclusive. An employee that checks invoices may not be able to make invoice payments as well. That means, groups B and C are mutually exclusive.
Table 15: Specifying excluded groups (AADGroupExclusion table)
|
Group A |
|
|
Group B |
Group A |
|
Group C |
Group B |
Table 16: Effective assignments
|
Ben King |
Marketing |
Group A |
|
Jan Bloggs |
Marketing, finance |
Group B |
|
Clara Harris |
Marketing, finance, control group |
Group C |
|
Jenny Basset |
Marketing, control group |
Group A, Group C |
Only the group C assignment is in effect for Clara Harris. It is published in the target system. If Clara Harris leaves the "control group" business role at a later date, group B also takes effect.
The groups A and C are in effect for Jenny Basset because the groups are not defined as mutually exclusive. That means that the employee is authorized to trigger requests and to check invoices. If this should not be allowed, define further exclusion for group C.
Table 17: Excluded groups and effective assignments
|
Jenny Basset
|
Marketing |
Group A |
|
Group C
|
|
Control group |
Group C |
Group B
Group A |
Prerequisites
-
The QER | Structures | Inherite | GroupExclusion configuration parameter is set.
In the Designer, set the configuration parameter and compile the database.
NOTE: If you disable the configuration parameter at a later date, model components and scripts that are not longer required, are disabled. SQL procedures and triggers are still carried out. For more information about the behavior of preprocessor relevant configuration parameters and conditional compiling, see the One Identity Manager Configuration Guide.
-
Mutually exclusive groups belong to the same tenant.
To exclude a group
-
In the Manager, select the Azure Active Directory > Groups category.
-
Select a group in the result list.
-
Select the Exclude groups task.
-
In the Add assignments pane, assign the groups that are mutually exclusive to the selected group.
- OR -
In the Remove assignments pane, remove the groups that are no longer mutually exclusive.
- Save the changes.
Azure Active Directory group inheritance based on categories
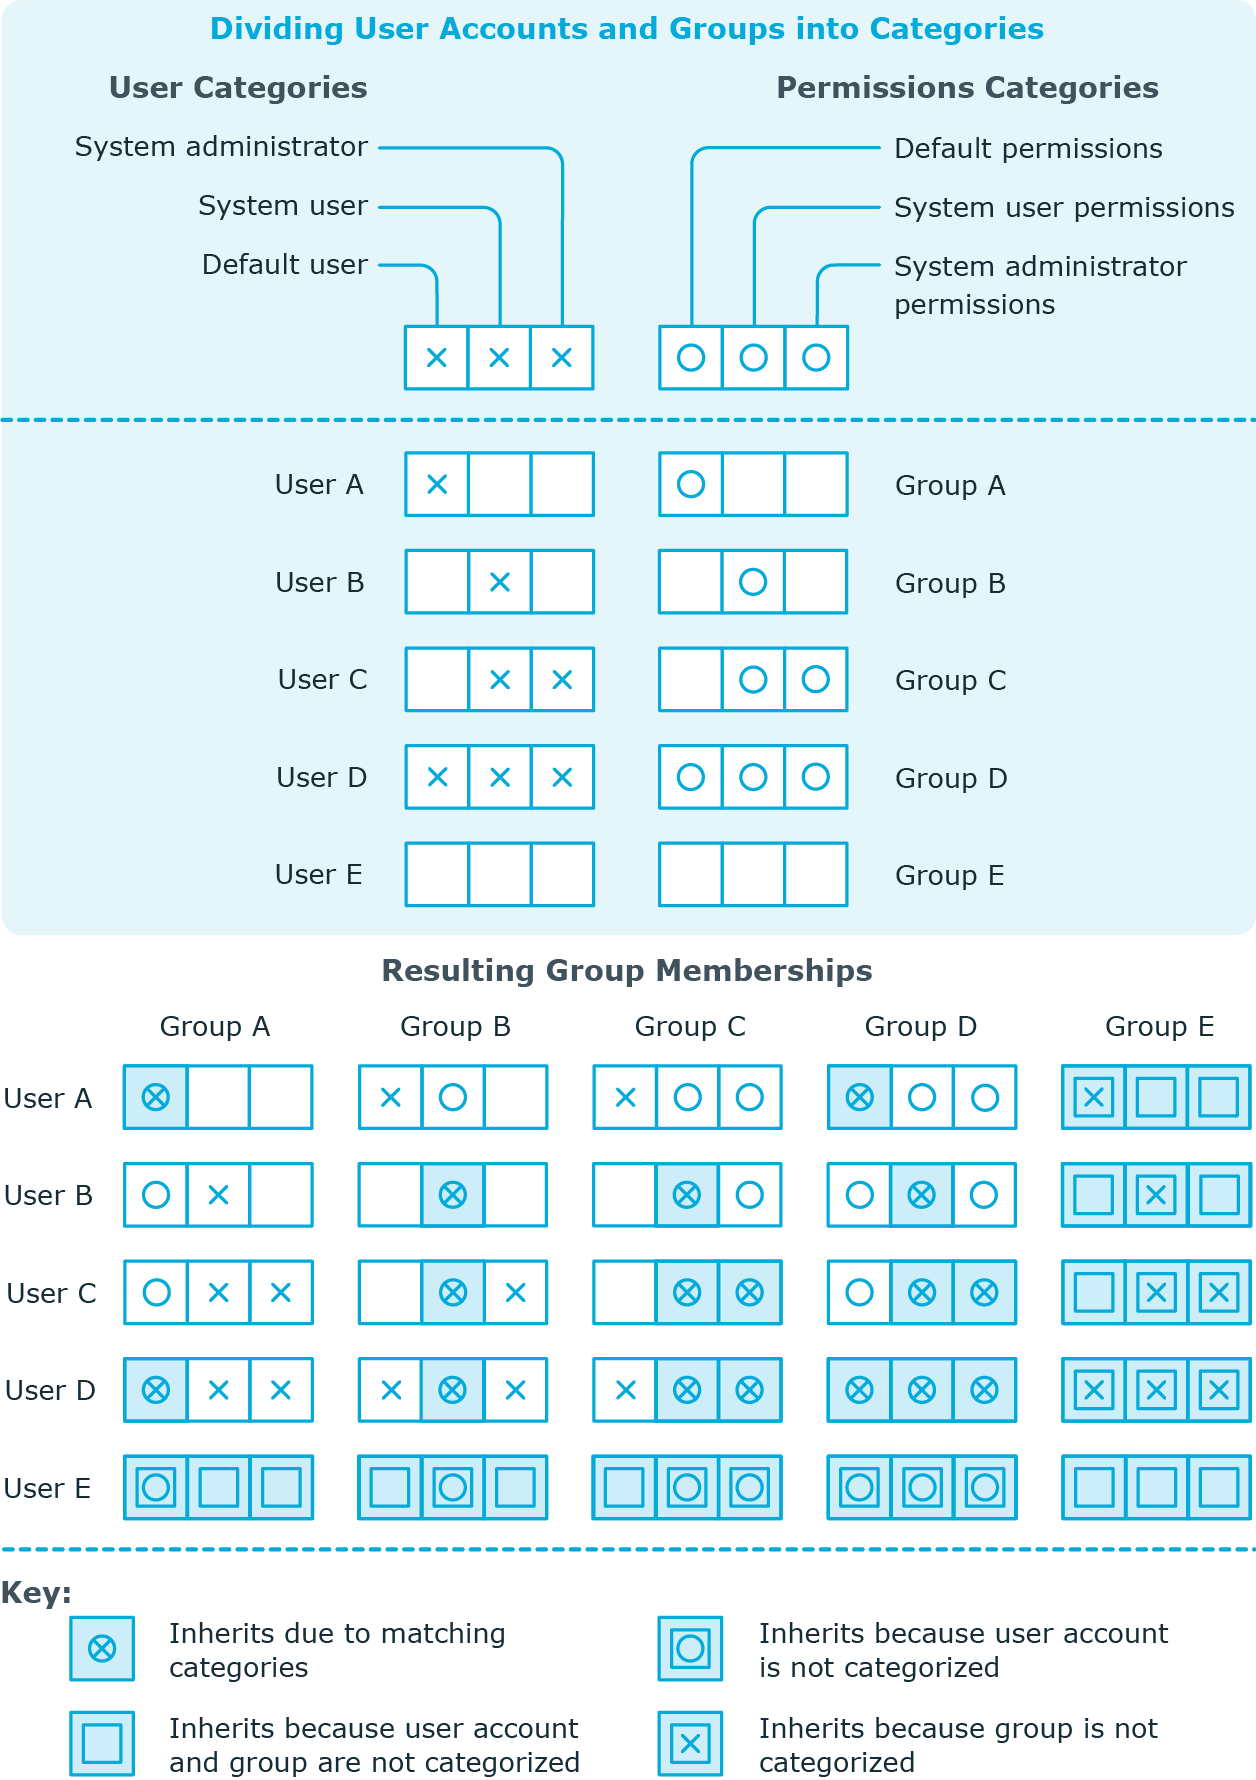
In One Identity Manager, user accounts can selectively inherit groups, administrator roles, subscriptions, and disabled service plans. To do this, the groups (administrator roles, subscriptions, and disabled service plans) and the user accounts are divided into categories. The categories can be freely selected and are specified using a mapping rule. Each category is given a specific position within the template. The mapping rule contains different tables. Use the user account table to specify categories for target system dependent user accounts. In the other tables, enter your categories for the groups, administrator roles, subscriptions, and disabled service plans. Each table contains the category positions position 1 to position 63.
Every user account can be assigned to one or more categories. Each group can also be assigned to one or more categories. The group is inherited by the user account when at least one user account category items matches an assigned group. The group is also inherited by the user account if the group or the user account is not put into categories.
NOTE: Inheritance through categories is only taken into account when groups are assigned indirectly through hierarchical roles. Categories are not taken into account when groups are directly assigned to user accounts.
Table 18: Category examples
| 1 |
Default user |
Default permissions |
| 2 |
System users |
System user permissions |
| 3 |
System administrator |
System administrator permissions |
Figure 2: Example of inheriting through categories.
To use inheritance through categories
-
In the Manager, define the categories in the Azure Active Directory tenant.
-
In the Manager, assign categories to user accounts through their main data.
-
In the Manager, assign categories to groups through their main data.
Related topics
Overview of all assignments
The Overview of all assignments report is displayed for some objects, such as authorizations, compliance rules, or roles. The report finds all the roles, for example, departments, cost centers, locations, business roles, and IT Shop structures in which there are employees who own the selected base object. In this case, direct as well as indirect base object assignments are included.
Examples:
-
If the report is created for a resource, all roles are determined in which there are employees with this resource.
-
If the report is created for a group or another system entitlement, all roles are determined in which there are employees with this group or system entitlement.
-
If the report is created for a compliance rule, all roles are determined in which there are employees who violate this compliance rule.
-
If the report is created for a department, all roles are determined in which employees of the selected department are also members.
-
If the report is created for a business role, all roles are determined in which employees of the selected business role are also members.
To display detailed information about assignments
-
To display the report, select the base object from the navigation or the result list and select the Overview of all assignments report.
-
Click the  Used by button in the report toolbar to select the role class for which you want to determine whether roles exist that contain employees with the selected base object.
All the roles of the selected role class are shown. The color coding of elements identifies the role in which there are employees with the selected base object. The meaning of the report control elements is explained in a separate legend. To access the legend, click the  icon in the report's toolbar.
-
Double-click a control to show all child roles belonging to the selected role.
-
By clicking the  button in a role's control, you display all employees in the role with the base object.
-
Use the small arrow next to to start a wizard that allows you to bookmark this list of employees for tracking. This creates a new business role to which the employees are assigned.
Figure 3: Toolbar of the Overview of all assignments report.

Table 19: Meaning of icons in the report toolbar
|
|
Show the legend with the meaning of the report control elements |
|

|
Saves the current report view as a graphic. |
|
|
Selects the role class used to generate the report. |
|

|
Displays all roles or only the affected roles. |
Managing Azure Active Directory administrator roles assignments
In One Identity Manager, you can assign the Azure Active Directory administrator roles directly to user accounts or they can be inherited through departments, cost centers, locations, or business roles. Users can also request the administrator roles through the Web Portal. To do this, administrator roles are provided in the IT Shop.
Detailed information about this topic
