
The Manager web application is accessed over a browser.
Use the appropriate URL for this:
http://<server name>/<application name>
https://<server>/<application name>
The Manager web application is accessed over a browser.
Use the appropriate URL for this:
http://<server name>/<application name>
https://<server>/<application name>
NOTE:
We recommend that you perform the automatic update only in specific maintenance windows, in which the application cannot be accessed by users and the application can be manually restarted with no risk.
The following permissions are required for automatic updating:
The user account for updating requires write permissions for the application directory.
The user account for updating requires the Log on as a batch job local security policy.
The user account running the application pool requires the Replace a process level token and Adjust memory quotas for a process local security policies.
The application update happens automatically if the Auto update plug-in is enabled for the web application.
To run an update, first load the files to be updated into the One Identity Manager database. The necessary files are loaded into the One Identity Manager database and updated when a hotfix, a service pack, or a full version update is run.
The Automatic update plug-in performs a check when the application is started, and every approx. 5 minutes thereafter. New files are loaded from the database as they are identified. The plug-in cannot update the files while the application is running. The update waits until the application is restarted.
The application is restarted automatically by the web server when it has been idle for a defined length of time. This may take some time or be hindered by continuous user requests.
Perform the following steps to uninstall the web application.
To uninstall a web application
Launch autorun.exe from the root directory of the One Identity Manager installation medium.
On the start page of the installation wizard:
Change to the Installation tab.
In the Web-based components pane, click Install.
This starts the Web Installer.
On the Web Installer start page, click Uninstall a web application and click Next.
On the Uninstall a web application page, double-click the application that you want to remove.
The 
Click Next.
On the Database connection page, select the database connection and authentication method and enter the corresponding login data.
Click Next.
Confirm the security prompt with Yes.
The uninstall progress is displayed on the Setup is running page.
Once installation is complete, click Next.
On the Wizard complete page, click Finish.
Close the autorun program.
NOTE: One Identity Manager tools can only be started if the user owns the relevant program functions.
When you start one of the One Identity Manager tools, a default connection dialog opens. This tries to restore the last used connection.
Figure 5: Default connection dialog
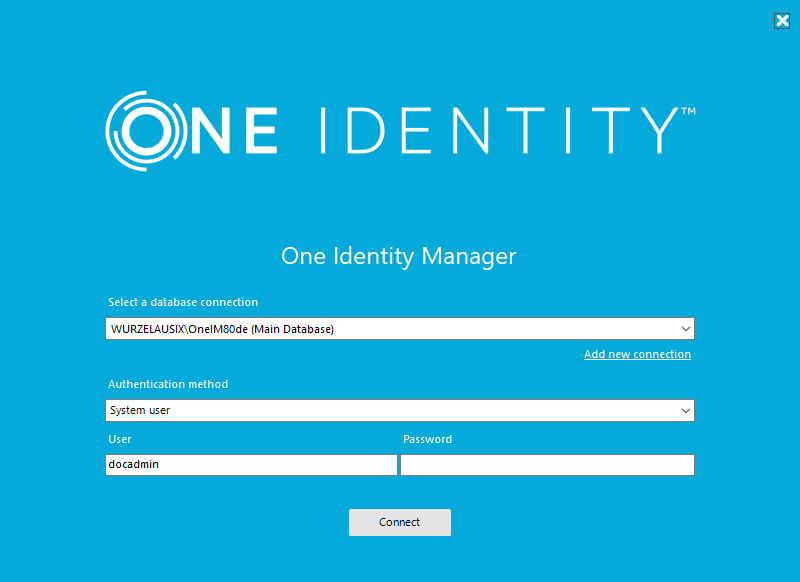
When you log in, you need to be aware of the difference between a database user and a user of individual One Identity Manager tools (system user). Several system users can work with one database user.
Login takes place in two steps:
Selecting the database connection to log in to the database
You can login to the database via an application server or a direct connection to the database.
Selecting the authentication method and finding the system user for logging in
Permitted system user IDs are determined by the authentication module you select. One Identity Manager provides various authentication modules for this purpose.
NOTE: After the initial schema installation, only the System user and ComponentAuthenticator authentication modules and the role-based authentication modules are enabled in One Identity Manager.
NOTE: Use non role-based authentication modules to log in to the Designer. Role-based authentication modules for logging in to the Designer are not supported.
© 2025 One Identity LLC. ALL RIGHTS RESERVED. 이용 약관 개인정보 보호정책 쿠키 기본 설정 센터