Updating (users)
To synchronize the Active Directory® attributes
-
Navigate to the Workflow tab.
-
Click Add synchronization step.
-
Click Update and then Next.
-
From the Source connected system section, click Specify….
-
A new wizard starts.
-
Select your Active Directory Connector and click Finish.
-
The Source object type is currently set to User (user).
-
Specify any Update Criteria, for example only members of an OU are synchronized.
-
Click Next.
-
In the Target connected system section, click Specify…, and then locate your existing AS/400 connector.
-
Click Finish. The Target object type is prefilled by One Identity Quick Connect to os400-usrprf.
-
Click Next.
-
In the Specify updating rules section, click Attribute. (*)
-
The Direct Synchronization screen is displayed. In the Source attribute: section, click Select…, locate mail and click OK.
-
In the Target attribute: field, click Select…, enter os400-text and click OK.
-
Click Finish to complete this synchronization step.
(*) At this stage in the configuration procedure, you can configure as many attribute mappings between AS/400 and Active Directory as required for your infrastructure. The items specified in this guide are examples only. For more information, please refer to Operating constraints.
When these steps are completed successfully, any modifications to your existing users or groups will be synchronized with your AS/400.
Deprovisioning (groups)
To deprovision groups
- Navigate to the Workflow tab.
-
Click Add synchronization step.
-
Click Deprovision and then Next.
-
In the Source connected system section, click Specify….
-
Select your Active Directory® Connector and click Finish.
-
Modify the Source Object type to group.
-
In the Deprovision target if: section, select the Source object is deleted or is out of synchronization scope check box.
-
Alternatively, configure the Source object meets these criteria as required.
-
Click Next.
-
In the Target connected system: field, click Specify….
-
Locate your IBM AS/400® connector and complete the steps in the wizard.
-
The Target object type is prefilled automatically to os400-usrprf.
-
Click Next.
-
Select Delete target object.
-
Click Finish to complete this synchronization step.
Deprovisioning (users)
To deprovision users
- Navigate to the Workflow tab.
-
Click Add synchronization step.
-
Click Deprovision and then Next.
-
In the Source connected system section, click Specify….
-
Select your Active Directory® Connector and click Finish.
-
Verify the Source object type is set to user.
-
In the Deprovision target if: section, select the Source object is deleted or is out of synchronization scope check box.
-
Alternatively, configure the Source object meets these criteria as required.
-
Click Next.
- In the Target connected system: field, click Specify….
-
Locate your IBM AS/400® connector and complete the steps in the wizard.
-
The Target object type is prefilled automatically to os400-usrprf.
-
Click Next.
-
Select Delete target object.
-
Click Finish to complete this synchronization step.
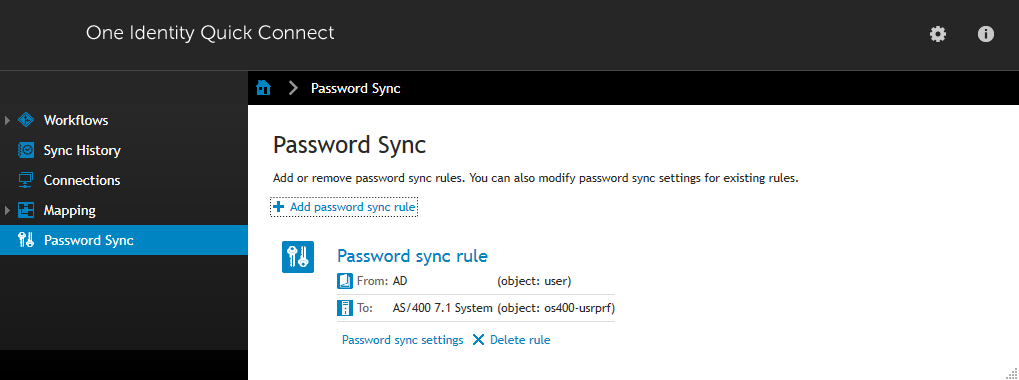
Configuring IBM AS/400® password synchronization
Configuring IBM AS/400® password synchronization
Passwords are only captured from Active Directory® when the One Identity Quick Connect capture module is installed.
|
|
NOTE: Password synchronization is possible in one direction only, from Active Directory to IBM AS/400®. |

Please refer to Automated Password Synchronization in the One Identity Quick Connect v5 documentation for further configuration information.
To enable password synchronization from Active Directory® to IBM AS/400®
-
Navigate to the One Identity Quick Connect Administration Console.
-
Click the Password Sync tab.
-
Click Add password sync rule.
-
Click Specify….
-
Select your Active Directory Connector and click Finish.
-
Click Next.
-
Click Specify….
-
Select your AS/400 Connector and click Finish.
-
Optionally configure the Password Sync settings.
-
Click Finish.