Synchronization Service allows you to ensure that group membership information is in sync in all connected data systems. For example, when provisioning a group object from an Active Directory domain to One Identity Manager domain, you can configure rules to synchronize the Member attribute from the source to the target domain.
This scenario describes how to create a provisioning step for a workflow to synchronize group objects between the source and target systems.
To create a group provisioning step:
- In the Synchronization Service Administration Console, open the Sync Workflows tab, and then click the workflow AD to OneIM Sync.
- Click Add synchronization step.
- On the Select an action dialog box, select Creation, and then click Next.
- On the Specify source and criteria dialog box, click Specify, click Add new connected system or Select existing connected system, and then step through the wizard to add the Active Directory Test AD as a connected system.
- In Specify object type field, click Select and from the Select Object type list, select Group and then click OK.
- In the Provisioning Criteria section, click Add.
- On the Select Container dialog box, from the containers list, select the required container and click OK.
- Click Next.
- On the Specify target dialog box, click Specify.
- Click Add new connected system or Select existing connected system, and then step through the wizard to add the target One Identity Manager domain as a connected system.
- Click Select, to add the required target object type.
- On the Select Object Type dialog box, select the object type UNSGroupB from the list of object types.
- Click Ok.
The Group provisioning step is created.
The Delta processing mode of the Synchronization Service allows you to synchronize identities between the source and the target systems for only the data that has changed in the source and target connected systems since their last synchronization.
This scenario describes how to enable the delta processing mode between the source (Active Directory domain) and target (One Identity Manager) systems.
To enable the delta processing mode:
- Step 1: Create a sync workflow for provisioning data synchronization between the source (Active Directory) and target (One Identity Manager) system.
- Step 2: Add a creating step for the workflow to provision users from the source system to target system.
- Click on the synchronization step for provision of users.
- In the General Options tab, specify the delta process mode:
- Under Source Connected System select the option Process delta from last run.
- Under Target Connected System select the option Process delta from last run.
- Click Save and continue.
NOTE: Before any data has been processed from the source to the target system, the initial synchronization of data is always performed in the Process all delta mode.
- Step 3: Run the configured creating step.
The data for the users added or updated to the source since the previous run, is displayed under Processed Objects.
Once you configured a connection with the Generic SCIM Connector as described in Configuring the Generic SCIM Connector for Starling Connect connections, you can configure import-based data synchronization tasks to import data from the SCIM-based SuccessFactors HR and ServiceNow connectors of Starling Connect to another target system supported by Active Roles Synchronization Service.
Creating such a SCIM-based synchronization workflow has two main steps:
-
Mapping objects by configuring one or more mapping pairs and mapping rules. By mapping objects, you can specify logic checks by which Active Roles Synchronization Service can identify if two data entries stored in two separate databases are the same or not.
-
With mapping pairs, you can establish a relationship between object types in two connected systems.
-
With mapping rules, you can define the conditions on how the objects specified in the mapping pair will be mapped during synchronization.
Example: Mapping objects by user ID
You can use object mapping, for example, to identify the same data entries between a SuccessFactors HR database (connected to Active Roles via a Generic SCIM Connector connection) and an SQL server (connected to Active Roles Synchronization Service via a Microsoft SQL Server Connector).
To do so, you can set up a mapping that compares the User ID value of the data entries in the two systems. If the data entries in the two systems share the same User ID, Active Roles will consider them the same.
For more information on object mapping, see Mapping objects. For an example mapping procedure using the Generic SCIM Connector, see Creating object mapping between a SCIM connection and an SQL connection.
-
Setting up a synchronization workflow based on the configured object mapping, so that you can automate creating, removing or deprovisioning specific data entries between the connected systems.
For more information on synchronization workflows, see Getting started with identity data synchronization. For an example workflow configuration procedure using the Generic SCIM Connector, see Creating a synchronization workflow for synchronizing data from a SCIM-based Starling Connect connector.
The following chapters will provide an example for setting up a synchronization workflow that will import data from a SuccessFactors HR database via a Generic SCIM Connector connection, and synchronizing that data to an SQL database.
Once you configured a connection with the Generic SCIM Connector as described in Configuring the Generic SCIM Connector for Starling Connect connections, you can configure import-based data synchronization tasks to import data from the SCIM-based SuccessFactors HR and ServiceNow connectors of Starling Connect to another target system supported by Active Roles Synchronization Service.
The first step of creating this synchronization is mapping objects between the SCIM-based source system and a target system, so that Active Roles Synchronization Service can detect identical data entries between the two system for proper data synchronization.
By mapping objects, you can specify logic checks by which Active Roles Synchronization Service can identify if two data entries stored in two separate databases are the same or not.
-
With mapping pairs, you can establish a relationship between object types in two connected systems.
-
With mapping rules, you can define the conditions on how the objects specified in the mapping pair will be mapped during synchronization.
The following example procedures show how to create a mapping pair and a mapping rule between:
-
A SuccessFactors HR database connected to Active Roles Synchronization Service with the Generic SCIM Connector. The SuccessFactors HR database will be the source system from which Active Roles Synchronization Service imports the data.
-
An SQL database connected to Active Roles Synchronization Service with the Microsoft SQL Server Connector. The SQL database will act as the target system to which Active Roles Synchronization Service will synchronize the SuccessFactors HR data.
Prerequisites
You can perform the following procedures only if Active Roles Synchronization Service already contains the following working connectors:
To configure a mapping pair between a SuccessFactors HR database and an SQL database
-
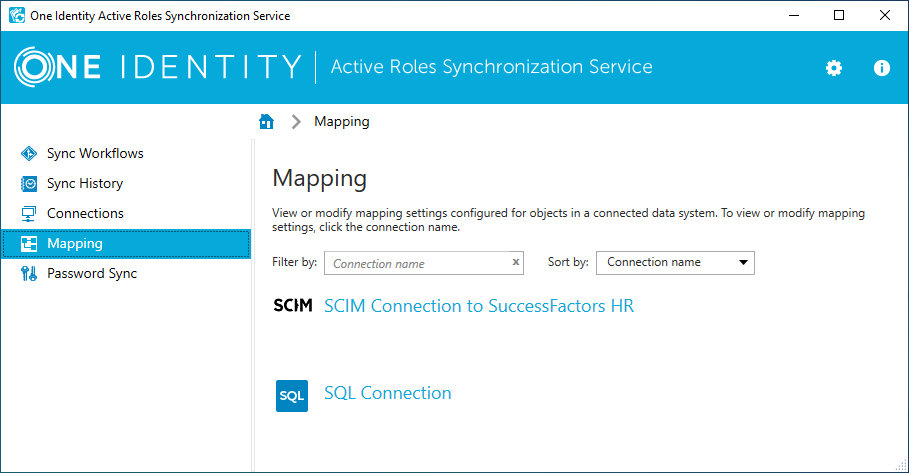
In the Active Roles Synchronization Service Console, navigate to Mapping, then click the SCIM Connection to SuccessFactors HR connection.
Figure 14: Active Roles Synchronization Service – Selecting a connector for mapping objects
-
To start configuring a new object mapping with the Add mapping pair dialog, click Add mapping pair.
-
In the Specify source step, under Connected system object type, select the resource object type you want the object mapping to check. In this example, we are using the Employees data entry of the SuccessFactors HR database, so click Select, then in the Select Object Type step, select Employees.
TIP: If the data entry is hard to find due to the length of the list, use the Filter by name field to find it quicker.
To apply your selection, click OK, then Next.
-
In the Specify target step, under Target connected system, configure the target system where the other resource object type is located. To do so, click Specify, and in the Add Connected System Wizard, select the Select existing connected system option, then the connector of the SQL server (in this example, SQL Connection). To apply your selection, click Finish.
-
Under Connected system object type, select sql-Object.
-
To create the mapping pair, click Finish.
-
(Optional) If needed, you can configure additional mapping pairs as well for your synchronization workflow. To do so, click Add mapping pair again, and repeat the procedure. This example procedure uses only one mapping pair.
Once the mapping pair is created, you can configure its associated mapping rule.
To configure a mapping rule between a SuccessFactors HR database and an SQL database
-
In the Active Roles Synchronization Service Console, navigate to Mapping, then click the SCIM Connection to SuccessFactors HR connection.
-
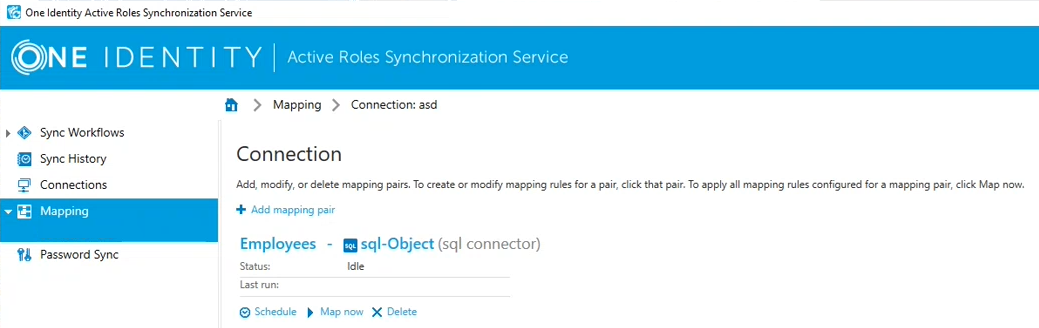
The previously configured mapping pair appears. To open the available mapping pair settings, click the Employees object type in the mapping pair.
Figure 15: Active Roles Synchronization Service – Mapping pair in a configured SCIM connection
-
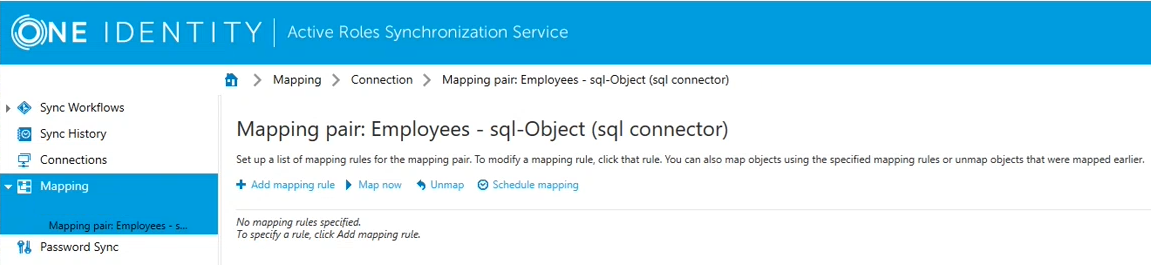
To start configuring a new mapping rule, in the Mapping pair window, click Add mapping rule.
-
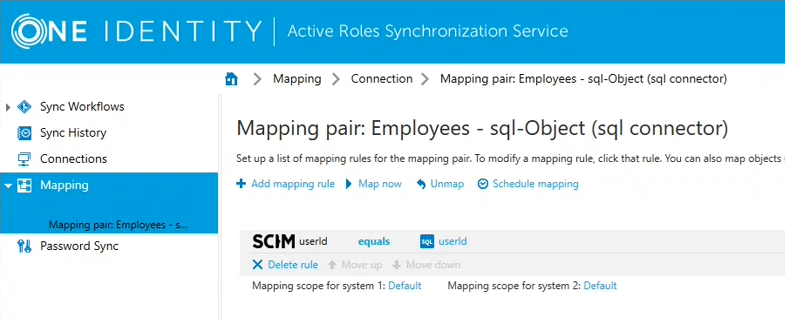
In the Define Mapping Rule window, specify the source and target resource object types that must be equal so that Active Roles Synchronization Service can map the data pairs. In this example, we are using the UserID attribute for this purpose both in the SuccessFactors HR database and in the SQL database as well.
Therefore, at the Value generated for SCIM Connection to SuccessFactors HR by using field, click Attribute, then in the Select attribute window, select userId. This adds the userId object value to both the source and target fields.
TIP: If the data entry is hard to find due to the length of the list, use the Filter by name field to find it quicker.
-
To finish adding the mapping rule, click OK.
Figure 16: Active Roles Synchronization Service – Mapping rule in a configured SCIM mapping pair
-
To start the mapping synchronization based on the configured value pair of the mapping rule, click Map now. Active Roles Synchronization Service offers two mapping types:
-
Quick Map, using local cached data to speed up the mapping process.
-
Full Map, retrieving data from the source and target data system for accuracy.
As this is the first time of running this mapping, perform a Full Map.
Once the mapping rule finishes running successfully, it will indicate the unmapped, changed and mapped objects, along with the objects that do not meet the scope conditions of the configured mapping rule.
