Once you configured a connection with the Generic SCIM Connector as described in Configuring the Generic SCIM Connector for Starling Connect connections, you can configure import-based data synchronization tasks to import data from the SCIM-based SuccessFactors HR and ServiceNow connectors of Starling Connect to another target system supported by Active Roles Synchronization Service.
The second step of creating this synchronization task is setting up a synchronization workflow based on the object mapping configured in Creating object mapping between a SCIM connection and an SQL connection. By configuring a workflow, you can automate creating, removing or deprovisioning specific data entries between the connected systems.
The following example procedure shows how to create a workflow that creates and updates data synchronization between:
-
A SuccessFactors HR database connected to Active Roles Synchronization Service with the Generic SCIM Connector. The SuccessFactors HR database will be the source system from which Active Roles Synchronization Service imports the data.
-
An SQL database connected to Active Roles Synchronization Service with the Microsoft SQL Server Connector. The SQL database will act as the target system to which Active Roles Synchronization Service will synchronize the SuccessFactors HR data.
Prerequisites
Before performing the procedure, make sure that the following conditions are met:
-
Active Roles Synchronization Service must already contain the following working connectors:
-
A Generic SCIM Connector connecting Active Roles Synchronization Service to the Starling Connect SuccessFactors HR connector. To configure such a connection, see Configuring the Generic SCIM Connector for Starling Connect connections. In this example procedure, this connection is called SCIM Connection to SuccessFactors HR.
-
A Microsoft SQL Server Connector providing connection to the SQL server used in this example. To configure such a connection, see Creating a Microsoft SQL Server connection. In this example, this connection is called SQL Connection.
-
-
The mapping pair and mapping rule configured in Creating object mapping between a SCIM connection and an SQL connection are active and working.
To configure a data synchronization workflow between a SuccessFactors HR database and an SQL database
-
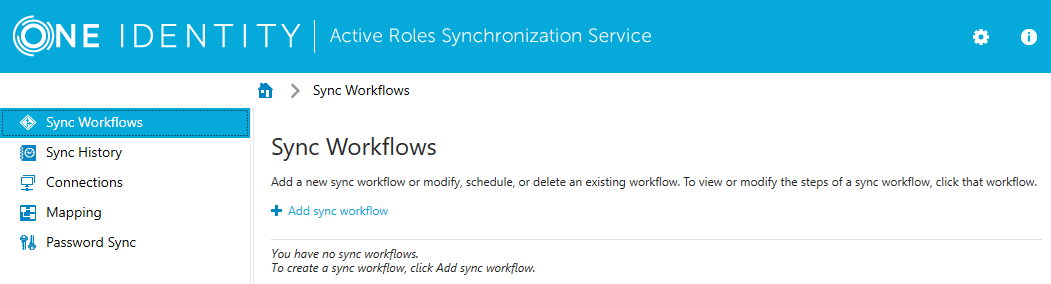
In the Active Roles Synchronization Service Console, click Sync Workflows > Add sync workflow.
Figure 17: Active Roles Synchronization Service – Adding a new synchronization workflow
-
In the Sync workflow name step, name the workflow (for example, SuccessFactors HR to SQL Server), then click OK.
The new workflow then appears in the Sync Workflows tab.
-
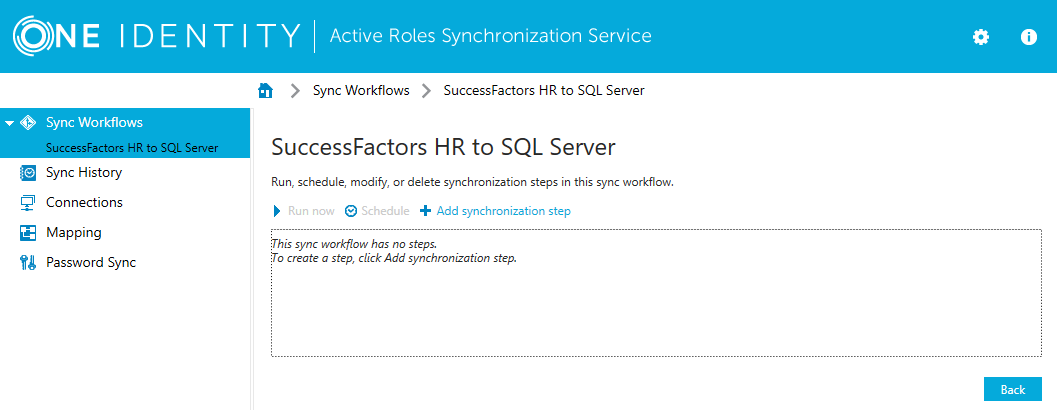
Configure a data synchronization creation step for the workflow. To do so, in Sync Workflows, click the name of the workflow (in this example, SuccessFactors HR to SQL Server), then click Add synchronization step.
Figure 18: Active Roles Synchronization Service – Adding a new synchronization step
-
In the Select an action step, select Creation, then click Next.
The Creation step of the workflow will be used to create the synchronized data entries of the SuccessFactors HR database in the target SQL database. The Creation step performs data synchronization only for data entries that do not exist in the target system. Because of this, you typically run this step only once.
-
In the Specify source and criteria step, configure the following settings:
-
Source connected system: Specify the SuccessFactors HR database connection here, created with the Generic SCIM Connector. To do so, click Specify > Select existing connected system, then select the SCIM-based connection (in this example, SCIM Connection to SuccessFactors HR).
-
Source object type: Specify the source object type here (in this example, the Employees object type). To do so, click Select, then in the Select Object Type window, select Employees, and click OK.
TIP: If the data entry is hard to find due to the length of the list, use the Filter by name field to find it quicker.
-
(Optional) Creation Criteria: Specify additional conditions that the specified source object(s) must meet for synchronization in this workflow step. This setting is not used in this example.
-
-
In the Specify target step, configure the following settings:
-
Target connected system: Specify the SQL server connection here, created with the Microsoft SQL Server Connector. To do so, click Specify > Select existing connected system, then select the SQL server connection (in this example, SQL Connection).
-
Target object type: Specify the target object type here. By default, when selecting an SQL server connection in Target connected system, Active Roles Synchronization Service sets this setting to sql-Object, the object type used in this example.
-
-
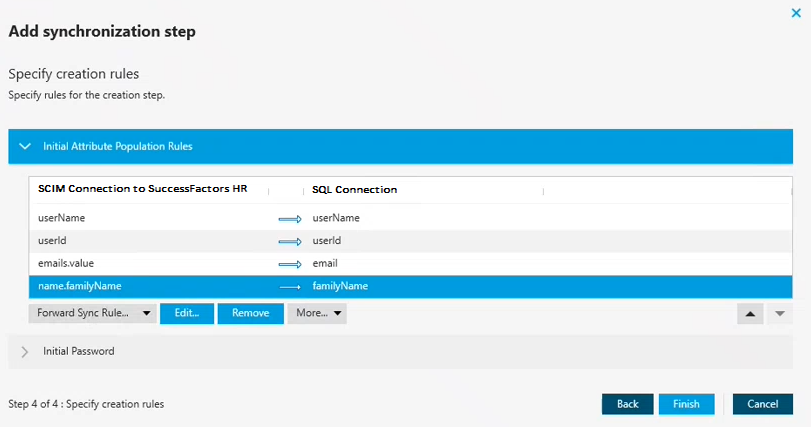
In the Specify creation rules step, configure the logic (called forward synchronization rules) that Active Roles Synchronization Service will use to perform first-time synchronization and copy data entries from the SuccessFactors HR database over to the target SQL database.
To do so, specify one or more unique attributes that Active Roles Synchronization Service can use to link the corresponding data entries in the connected SuccessFactors HR and SQL data systems. In this example, four such SuccessFactors HR attributes are specified: userName, userId, emails.value and name.familyName.
To specify these creation rules:
-
Click Forward Sync Rule.
-
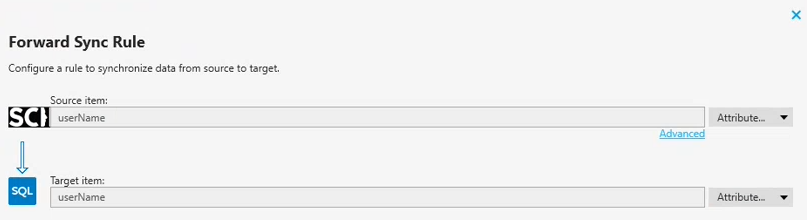
Click Source item > Attribute, and in the Select Object Attribute window, search for the user name attribute in the SuccessFactors HR database (for example, userName), then click OK.
TIP: If the data entry is hard to find due to the length of the list, use the Filter by name field to find it quicker.
-
Click Target item > Attribute, and search for the applicable user name attribute pair in the SQL database (for example, userName), then click OK.
TIP: If the data entry is hard to find due to the length of the list, use the Filter by name field to find it quicker.
Figure 19: Active Roles Synchronization Service – Mapping attributes for a forward synchronization rule
-
To apply the forward synchronization rule created for the specified user name attributes, click OK.
-
To configure synchronization rules for the userId, emails.value and name.familyName SuccessFactors HR data entries too, click Forward Sync Rule again, and repeat the previous sub-steps by selecting the source and target attributes applicable to these data entries.
-
-
Once all forward synchronization rules are configured, to finish configuring the Creation step, click Finish.
Figure 20: Active Roles Synchronization Service – Finalizing all forward synchronization rules
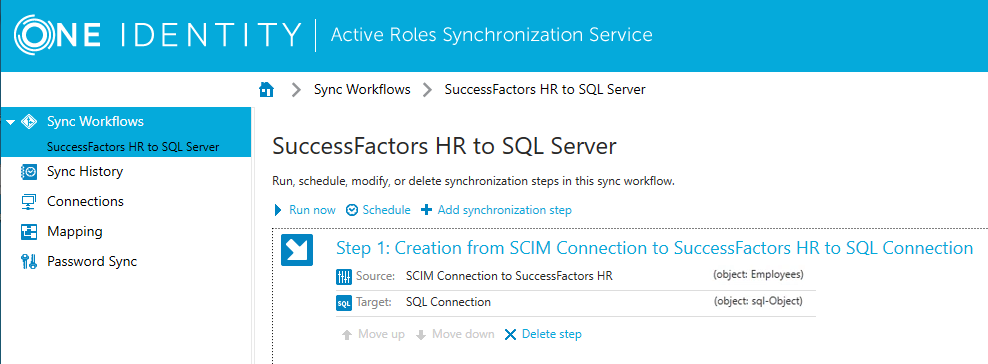
This creates the Creation step as the first step of the synchronization workflow.
Figure 21: Active Roles Synchronization Service – Step 1 created for the SuccessFactors HR / SQL server workflow
-
Now that the Creation step of the workflow is configured, configure the Update step. To do so, click Add synchronization step again.
The Update step of the workflow will be used to update existing data entries mapped between the SuccessFactors HR database and the target SQL database. The Update step performs data synchronization only for existing data entries: it does not create new ones. Because of this, you typically run this step after running the Creation step, and run only the Update step later once the data entries have been created with the Creation step.
-
In the Select an action step, select Update, then click Next.
-
In the Specify source and criteria step, configure the following settings:
-
Source connected system: Specify the SuccessFactors HR database connection here, created with the Generic SCIM Connector. To do so, click Specify > Select existing connected system, then select the SCIM-based connection (in this example, SCIM Connection to SuccessFactors HR).
-
Source object type: Specify the source object type here (in this example, the Employees object type). To do so, click Select, then in the Select Object Type window, select Employees, and click OK.
TIP: If the data entry is hard to find due to the length of the list, use the Filter by name field to find it quicker.
-
(Optional) Creation Criteria: Specify additional conditions that the specified source object(s) must meet for synchronization in this workflow step. This setting is not used in this example.
-
-
In the Specify target step, configure the following settings:
-
Target connected system: Specify the SQL server connection here, created with the Microsoft SQL Server Connector. To do so, click Specify > Select existing connected system, then select the SQL server connection (in this example, SQL Connection).
-
Target object type: Specify the target object type here. By default, when selecting an SQL server connection in Target connected system, Active Roles Synchronization Service sets this setting to sql-Object, the object type used in this example.
-
-
In the Specify update rules step, configure the forward synchronization rules that Active Roles Synchronization Service will use to update existing data entries in the target SQL database from the SuccessFactors HR database. In this example, four such attributes are specified: userName, userId, SuccessFactors HR ID (displayed as sfid) and metadata information (displayed as meta).
To specify these creation rules:
-
Click Forward Sync Rule.
-
Click Source item > Attribute, and in the Select Object Attribute window, search for the user name attribute in the SuccessFactors HR database (for example, userName), then click OK.
TIP: If the data entry is hard to find due to the length of the list, use the Filter by name field to find it quicker.
-
Click Target item > Attribute, and search for the applicable user name attribute pair in the SQL database (for example, userName), then click OK.
TIP: If the data entry is hard to find due to the length of the list, use the Filter by name field to find it quicker.
-
To apply the forward synchronization rule created for the specified user name attributes, click OK.
-
To configure synchronization rules for the user ID, sfid and meta data entries too, click Forward Sync Rule again, and repeat the previous sub-steps by selecting the source and target attributes applicable to these data entries.
-
-
Once all forward synchronization rules are configured, to finish configuring the Update step, click Finish. The configured workflow will appear, containing both steps.
-
Start the workflow by clicking Run workflow. For the first-time run, select only Step 1 (Creation from SCIM Connection to SuccessFactors HR to SQL Connection), then select the running method:
-
Full Run fetches all data entries specified in the workflow steps directly from the source system. As such, One Identity recommends using this method when running the workflow the first time, even if the process takes longer than a Quick Run.
-
Quick Run uses cached data whenever possible, and is normally faster.
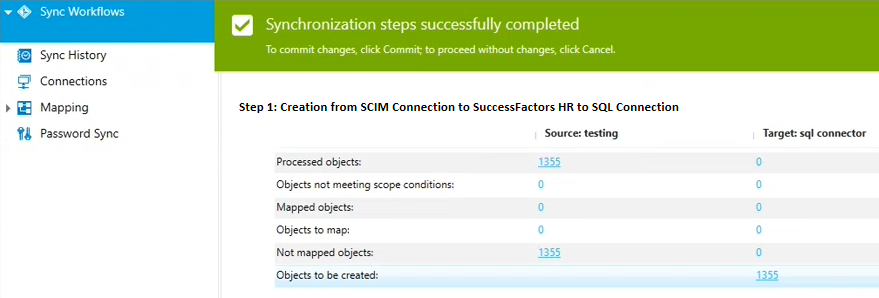
The run may take several minutes to complete.
Figure 22: Active Roles Synchronization Service – Running a configured synchronization workflow for the first time
-
-
Once Active Roles Synchronization Service found all mapped objects, apply the synchronization changes by clicking Commit.
Alternatively, to check detailed information about the processed objects, click the Processed objects number. The Objects processed in window then opens, listing all new data objects that Active Roles Synchronization Service will synchronize to the target SQL database.