Converse agora com nosso suporte
Chat com o suporte

Active Roles 8.0.1 LTS - Console User Guide

Introduction Getting started User or service account management Group management Computer account management Organizational Unit management Contact management Exchange recipient management

How to create a group

You can create new Active Directory groups with the Active Roles Console.

To create a group

  1. In the Console tree, locate and select the folder in which you want to add the group.

  2. Right-click the folder, point to New and click Group to start the New Object - Group wizard.

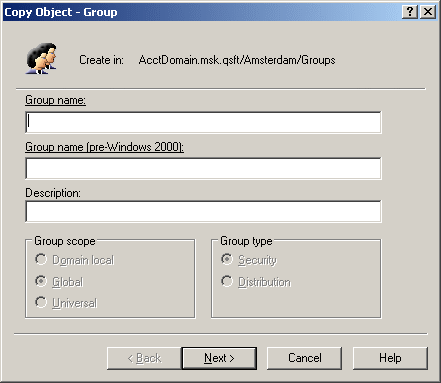
  3. Follow the wizard pages to specify properties of the new group, such as the group name, pre-Windows 2000 group name, description, scope, type, membership list, and Exchange address settings.

  4. If you want to set values for additional properties (those for which the wizard pages do not provide data entries), click Edit Attributes on the completion page of the wizard.

  5. After setting any additional properties, click Finish on the completion page of the wizard.

NOTE: Consider the following when creating a group:

  • The behavior of the wizard pages may vary depending on the configuration of Active Roles policies. To determine whether a given item on a page is under the control of a certain policy, observe the text label next to the item: the underlined text label indicates that some policy restrictions are in effect. Click underlined text labels to examine the policies that govern the behavior of the wizard pages.

  • You can also start the New Object - Group wizard by clicking on the toolbar.

  • To create a group, you can also copy a previously created group. For more information, see Copying a group.

  • A new user account with the same name as a previously deleted user account does not automatically assume the permissions and group memberships of the previously deleted account because the security ID (SID) for each account is unique. To duplicate a deleted user account, all permissions and memberships must be manually recreated.

Finding a group

To find a group, right-click the container you want to search, and click Find. In the Find window, select Groups from the Find list, specify your search criteria, and start the search. In the search results list, you can right-click groups and use commands on the shortcut menu to perform management tasks.

For step-by-step instructions on how to search for groups, see Searching for a user, contact, or group.

Finding groups in which a user is a member

You can list the Active Directory (AD) groups in which an AD user is a member with the Active Roles Console.

To find groups in which a user is a member

  1. In the Console tree, locate and select the folder that contains the user account.

  2. In the details pane, right-click the user account, then click Properties.

  3. Click the Member Of tab.

NOTE: Consider the following when finding groups in which a user is a member:

  • The Member Of tab for a user displays a list of groups in the domain where the user’s account is located. Active Roles does not display groups that reside in trusted domains.

  • On the Member Of tab, you can select the Show nested groups check box in order for the list to also include the groups to which the user belongs because of group nesting.

Copying a group

To create a copy of a group, right-click the group, click Copy, and follow the instructions in the wizard. The first step of the wizard looks as shown in the following figure.

Figure 11: Copying a group

The copy contains the same permission settings as the original group. The Copy Object - Group wizard allows you to modify the membership list of the new group.

Documentos relacionados

The document was helpful.

Selecione a classificação

I easily found the information I needed.

Selecione a classificação